I shall start by saying that I’m by no way a Database Administrator, but over the years I have picked up some knowledge and I have talked to a few guys that have more Knowledge on the topic to learn small tips & tricks. I have created in previous posts how to quickly create a vCenter Database using Transact-SQL scripts, and how to create a vCloud Director database using Transact-SQL script. It this small article, I will just resume how to create some Maintenance Plans to ensure that your vCenter/UpdateManager/vCloudDirector databases are backed up. I’m not using the Full Recovery model in SQL Server 2008 R2 for my lab and my clients, so these maintenance jobs should be fine. I believe that if you have a large enough environment that is critical to your day-to-day operations, you should use the Full Recovery model, but you would then also have a real Database Administrator onsite that could manage, nurture and keep your databases in proper running condition.
I have seem my share of transaction log databases for VMware vCenter go haywire, such that the Roll-Up jobs are not running anymore (Check your History Log) and the transaction log databases explodes. My personal worse situation was last year at a client that didn’t check their database and the transaction log database run out of storage on the disk when it passed the 90GB. There are procedures on the VMware Knowledge Base on how to compact and roll-up these huge transaction database, but it takes a lot of time. In most cases, we cut out losses and just purge the transactions logs.
Coming back to my Maintenance plan. We will create to sets of database maintenance plans, one for the System Dababases and one for the User databases. I need to thank my friend Eric Krejci for showing me how to separate the two maintenance plans.
System Maintenance Plan
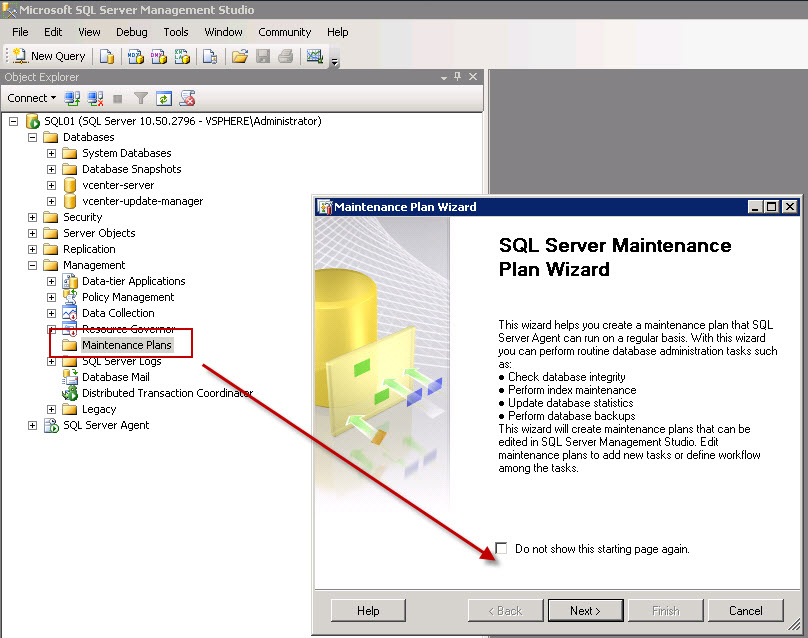
We need to connect to our database server using the SQL Server Management Studio program. And from the Management folder, select the Maintenance Plan and start the Wizard.
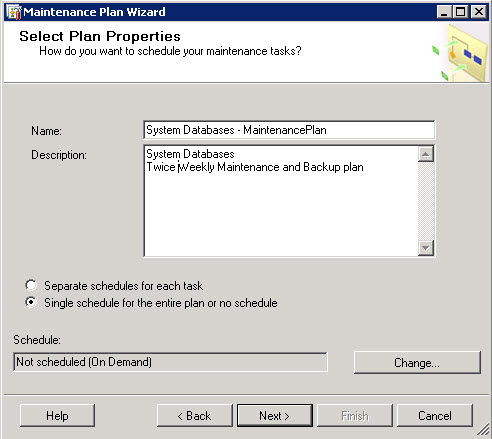
The System databases is comprised of the Master, Model, MSDB and TempDB databases. These database don’t change much, but I will select to make a Twice Weekly maintenance and Backup Plan. Please note that the MSDB database contains all the Stored Procedures for your vCenter & Update Manager database.
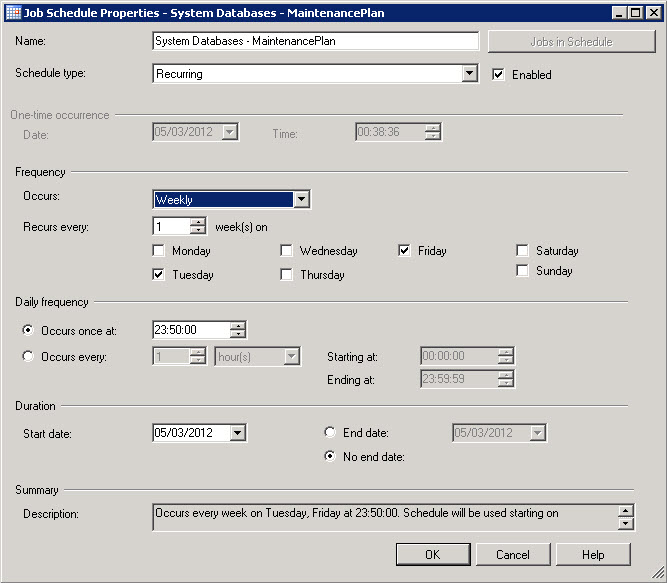
And let’s Schedule the Plan for two runs per week on Tuesday evening and Friday evening.
You can select any other pattern that you wish.I for one also use VMware Data Recovery 2.0 for making daily backup of my virtual machines, so I make sure that my VMware Data Recovery schedule does not run on my databases between 23:00 and 01:00.
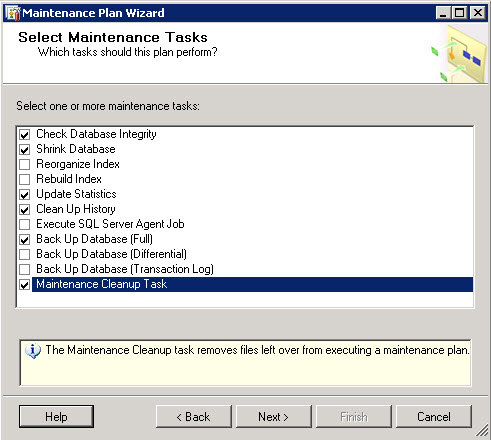
Now we can select the various Maintenance Tasks we want to run.
I have selected
- Check Database Integrity
Shrink Database- Update Statistics
- Clean Up History
- Back Up Database (Full)
- Maintenance Cleanup Task.
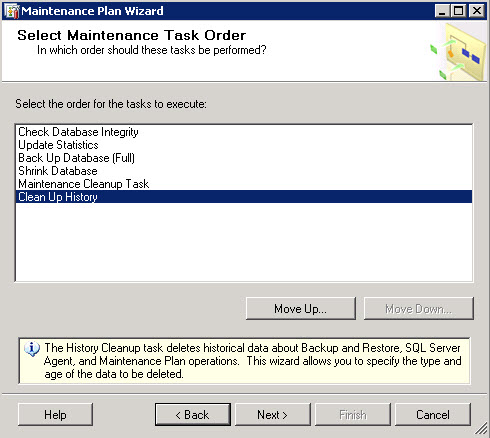
And I have changed their Order around on Select Maintenance Task Order step.
So we run
- Check Database Integrity
- Update Statistics
- Back Up Database (Full)
Shrink Database- Maintenance Cleanup Task
- Clean Up History
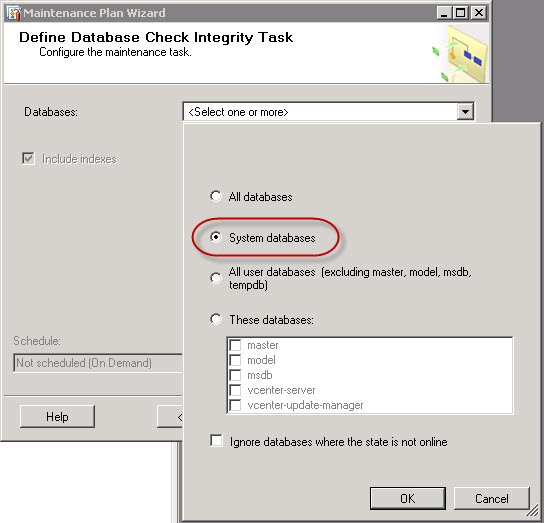
Now let’s configure the Maintenance Tasks – Define Check Database Integrity. I have selected for this first Maintenance Plan the System Databases.
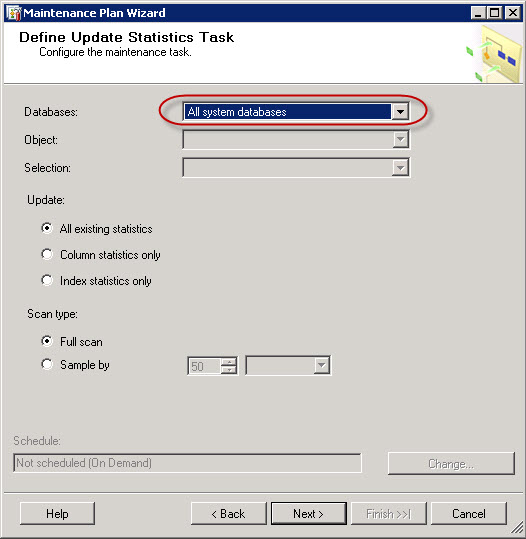
We now Define Update Statistics Task for the System Databases
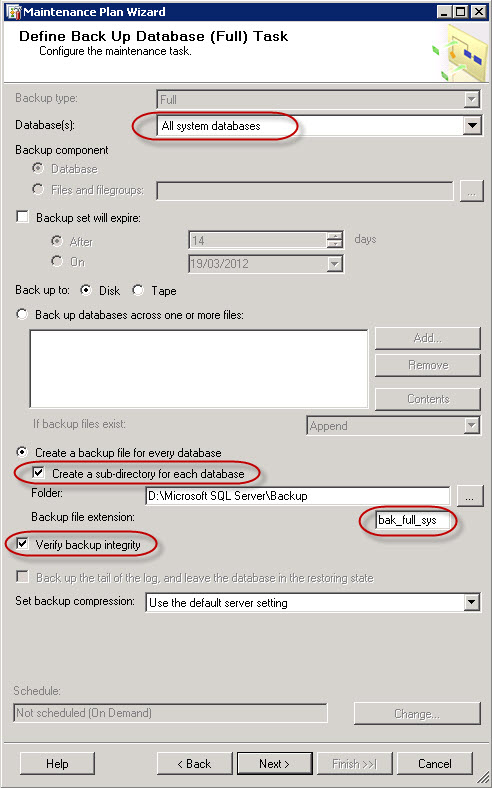
The next step is the definition of the back up job. Define Back Up Database (Full) Task. Please note that we have added the option to create a sub-directory for each database, and to verify the backup integrity. I have also modified the Backup File Extention to BAK_FULL_SYS so that we can make better use and more flexible backup cleanup maintenance job later in this article.
There is always a good discussion if you have enough Compute power to create a compressed backup or not.
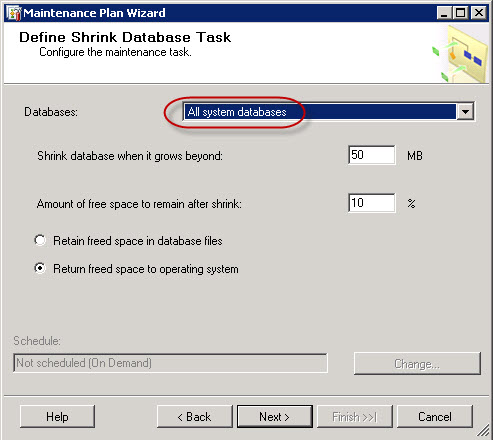
Now that we have a good full backup for the system databases we can do some database shrinkage. Define Shrink Database Task.
Update 22/03/2013. Since I created this post, I’ve stopped using the Shrink task in the maintenance plan. I rather do it sparingly manually than automate it.
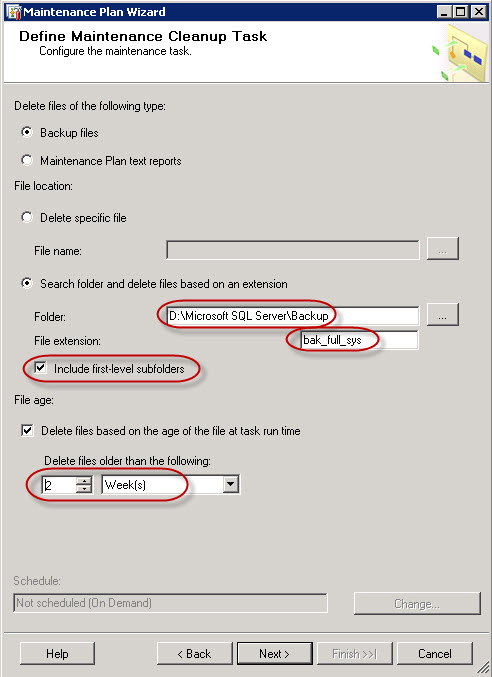
Now remember that we modified the Backup File Extension earlier. We we will now Define Maintenance Cleanup Task to erase all System Databases backups that are older than two weeks, and we will use the various sub-folders for the backups.
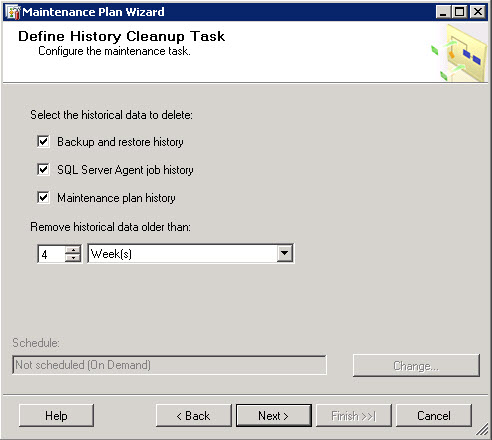
And last we Define History Cleanup Task for the whole SQL Server 2008 R2 instance. I did not modify the settings of this tab. This Maintenance Task will cleanup the Backup and Restory History, the SQL Server Agent job history and the Maintenance Plan History.
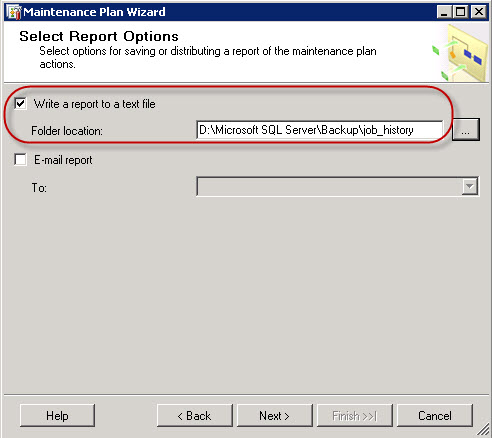
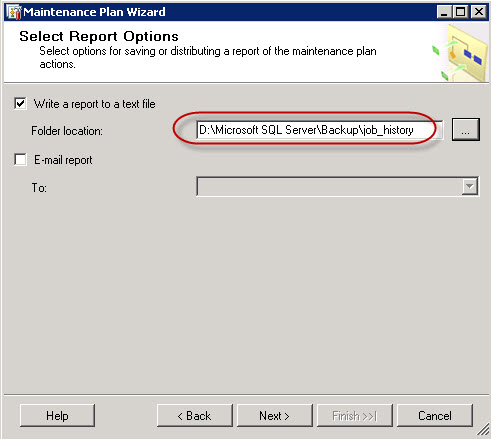
We will also save a copy the Maintenance Plan actions to a text file in the same directory as where the backup files are stored.
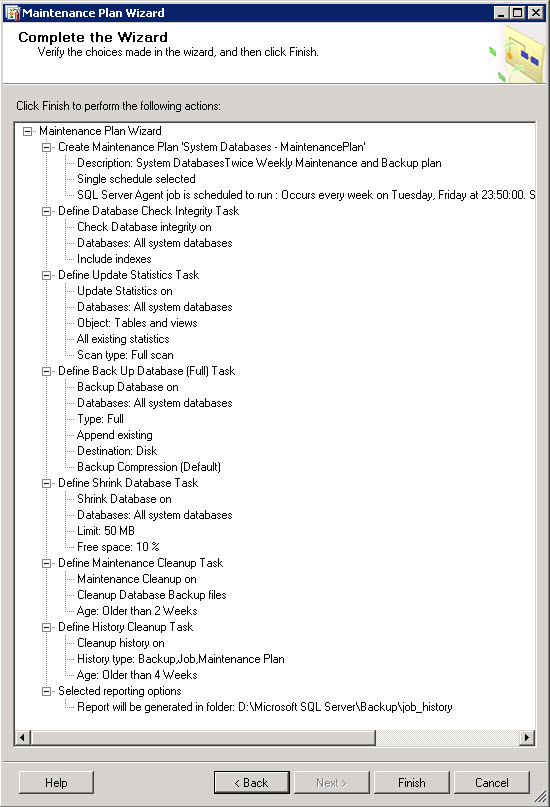
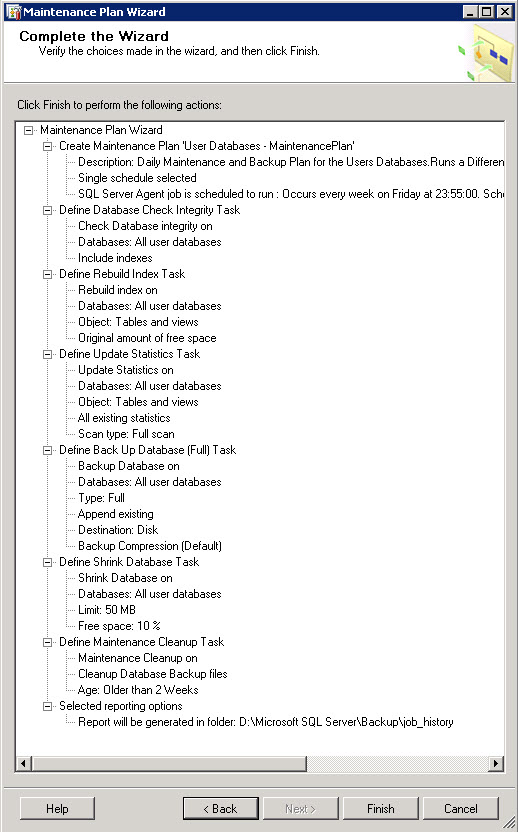
We now have a resume of the Maintenance Plan we can complete.
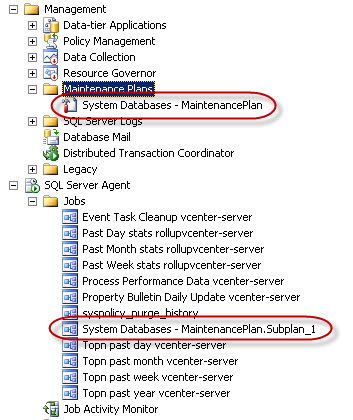
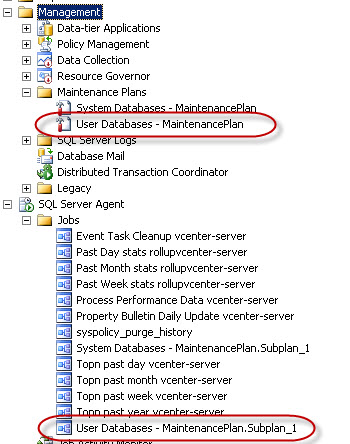
We see the new job in the Maintenance Plans section and the new job in the SQL Server Agent
User Maintenace Plan
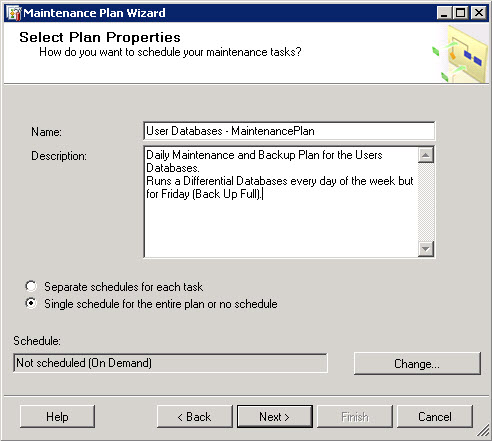
We now attack the User Databases Maintenance Plan. We start our Maintenance Plan Wizard and start the definition of the plan properties. I’m creating a Maintenance Plan for the Users Databases that will create a Differential Back Up every day, and a Full Back Up on Friday.
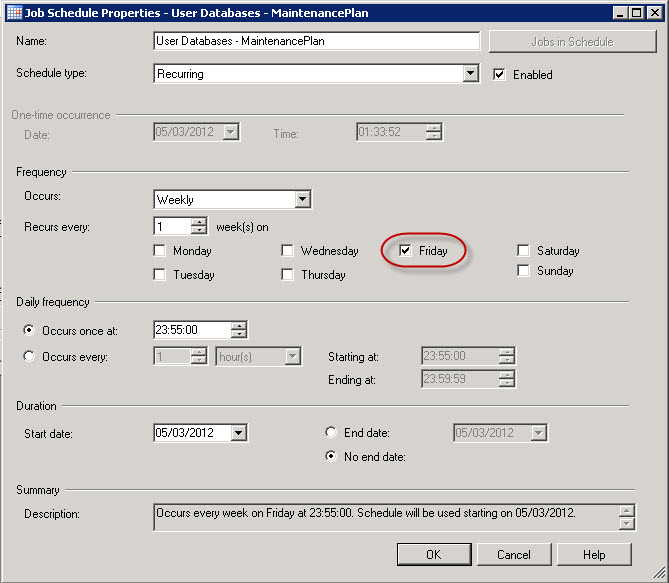
I modify the Schedule so that the main part of this Maintenance Plan including the Full Back Up happens each Friday. I will then later add a subplan to do the Differential plan each day.
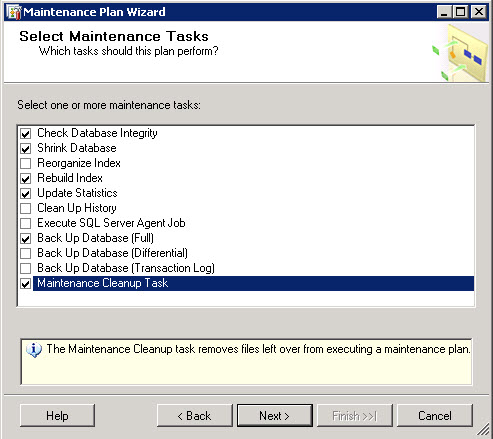
We now add the various Maintenance Tasks for our Users Databases.
I have selected
- Check Database Integrity
- Shrink Database
- Rebuild Index
- Update Statistics
- Back Up Database (Full)
- Maintenance Cleanup Task
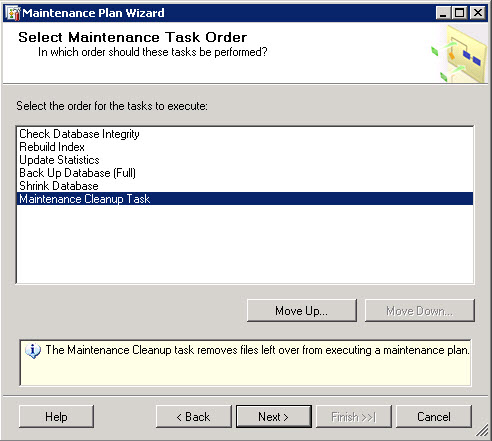
And we Select Maintenance Task Order to move down the Shrink Database task after the Back Up Database (Full).
So we run
- Check Database Integrity
- Rebuild Index
- Update Statistics
- Back Up Database (Full)
- Shrink Database
- Maintenance Cleanup Task
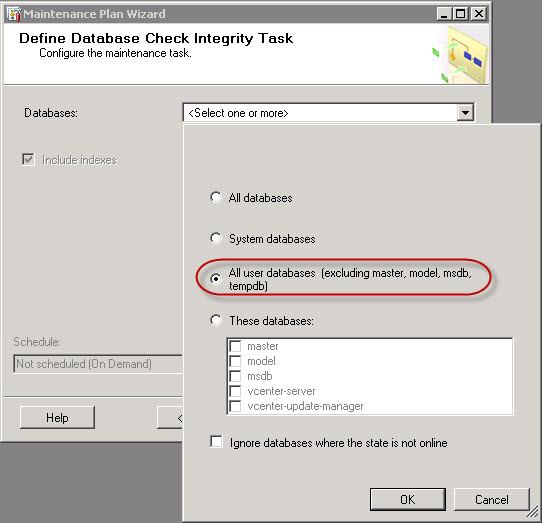
The first Task to run is the Database Check Integrity Task where we select the Users Databases
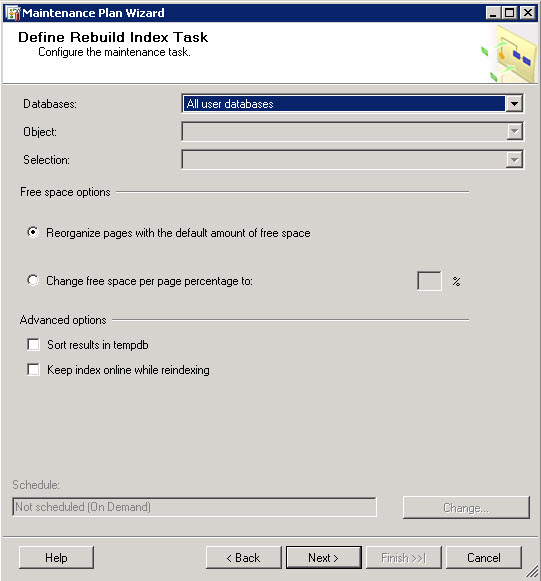
We then Rebuild Index Task for the Users Databases
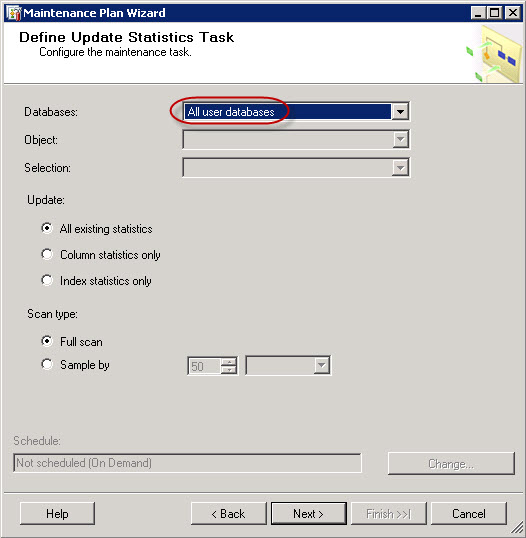
We Define Update Statistics Task for the User Databases.
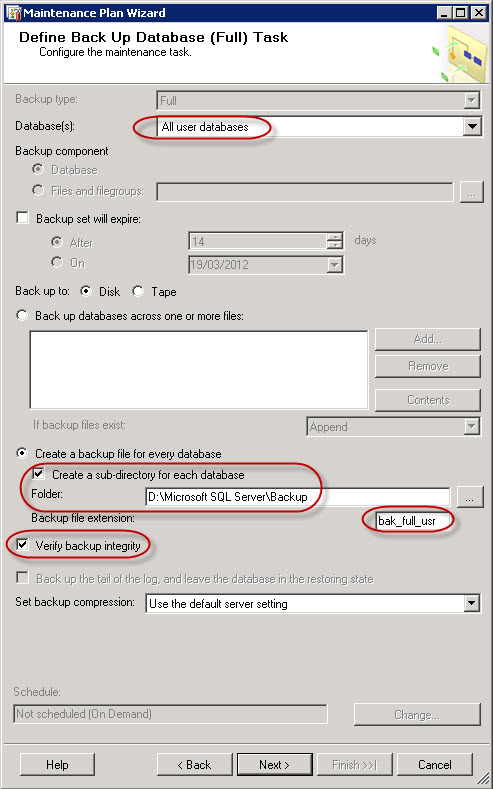
We now do the Back Up Database (Full) Task for the User Databases. Note that we use sub-directories for each database, we changed teh Backup File extionsion to BAK_FULL_USR and we verify the integrity of the backup.
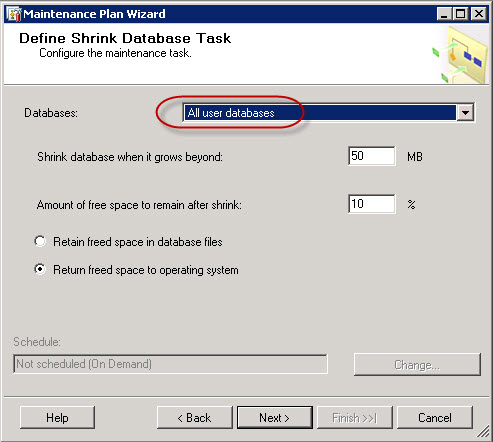
Once we have the Full Back Up of the User Databases we can launch the Shrink Database Task.
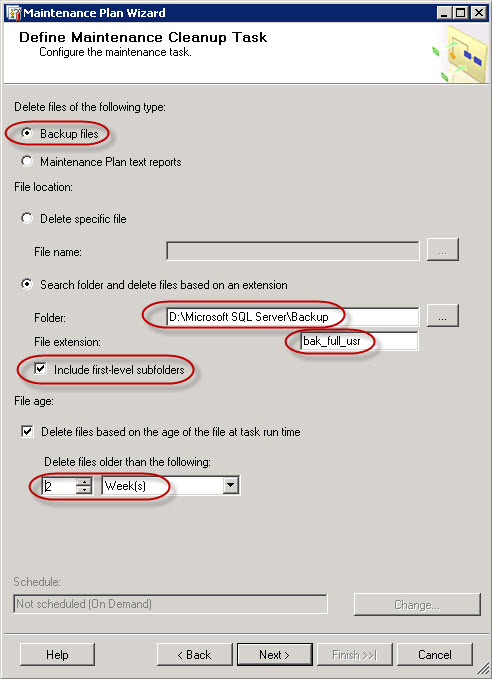
We now setup the Maintenance Cleanup Task for the User Databases so that we keep only the last two weekly full backups.
And we save the Maintenance Plan Report to the job_history directory.
We now have a complete Maintenace Plan ready.
This creates the new Maintenance Plan and the SQL Agent Job.
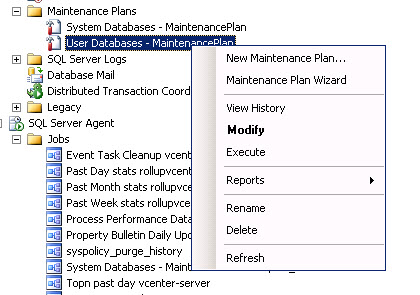
We now select to Modify the User Databases – MaintenancePlan
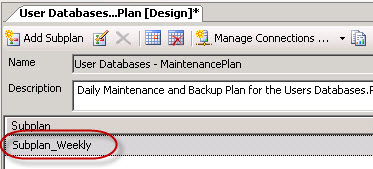
And let’s quickly rename the Subplan_1 to Subplan_Weekly in the Subplan menu.
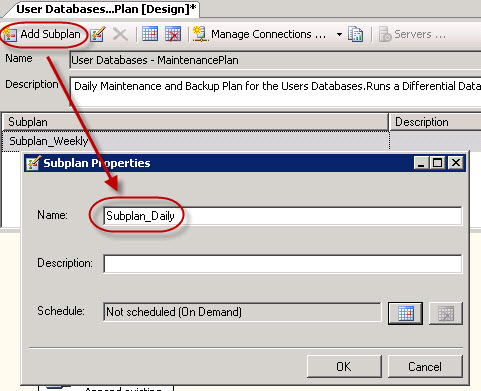
So we can now Add Subplan to this Maintenance Task
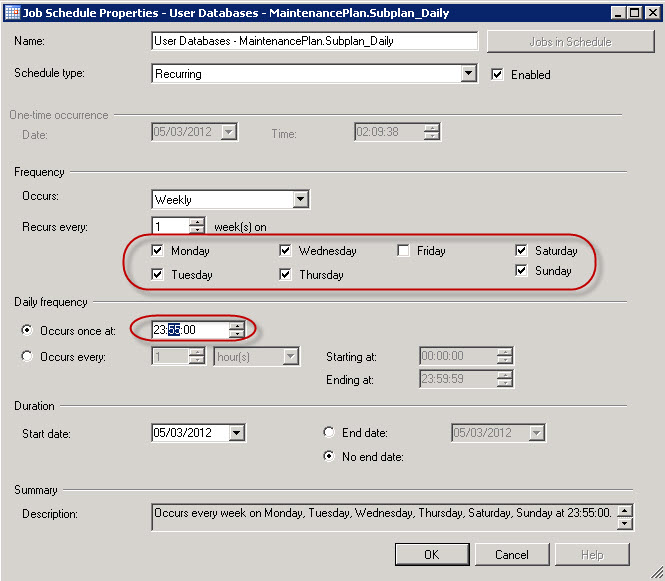
And we edit the Job Schedule to run everyday but Friday at the same time.
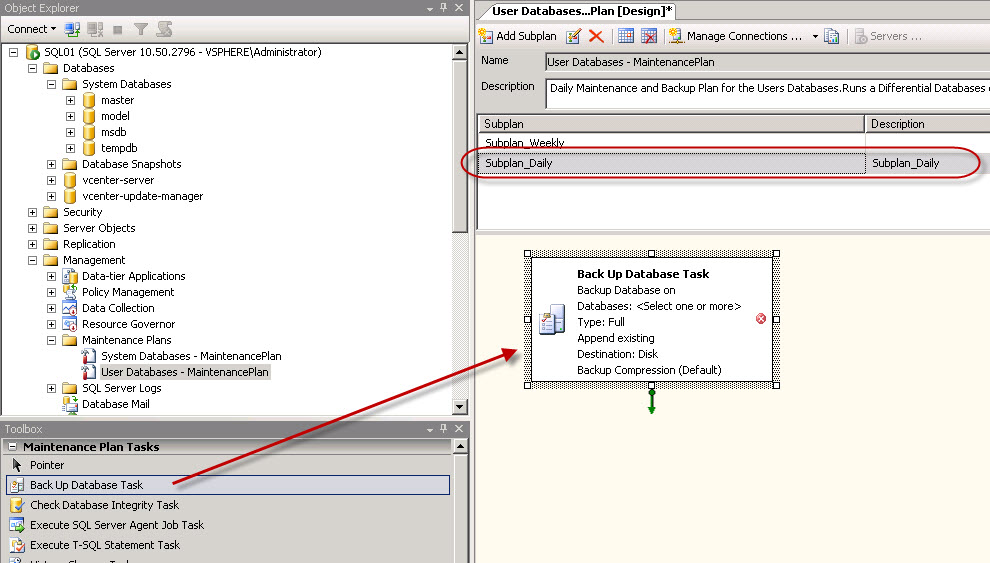
We will now drag and drop the Back Up Database Task into the Subplan_Daily
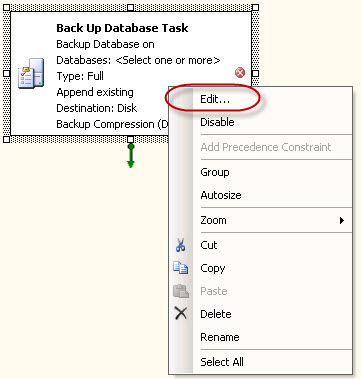
We now edit the Back Up Database Task
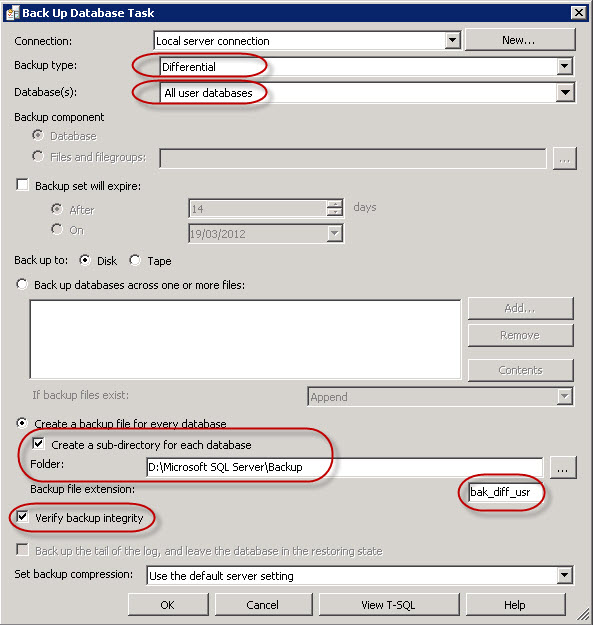
And we modify the Back Up Database Task for Differential Jobs, we also make sure the backups are written in their correct directories, that they are verified, and that the Backup File Extension is BAK_DIFF_USR.
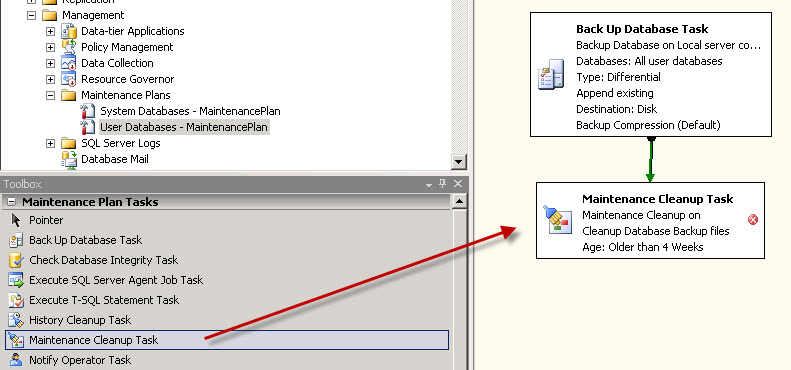
We now add the Maintenance Cleanup Task to this Subplan_Daily job and Linked it to the Back Up Database Task.
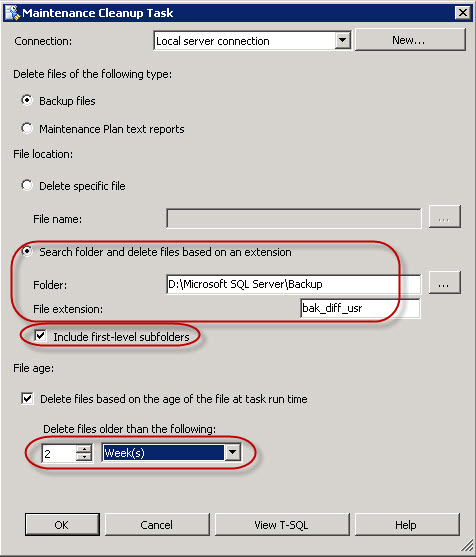
And we will edit the Maintenance Cleanup Task so that we erase the old BAK_DIFF_USR files.
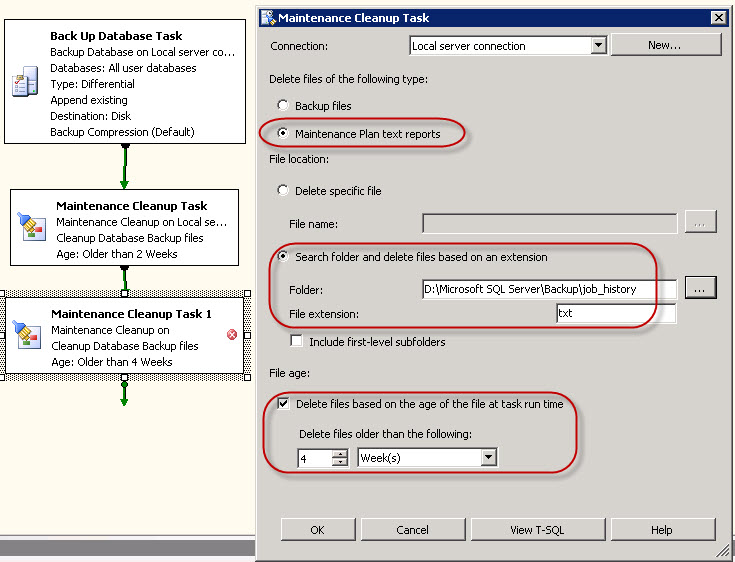
We add a 2nd Maintenance Cleanup Task to clean up the old text reports that are older than 4 weeks.
We are now done with the User Databases Maintenance Plan. Do NOT forget to SAVE the Maintenace Plan before quiting it.
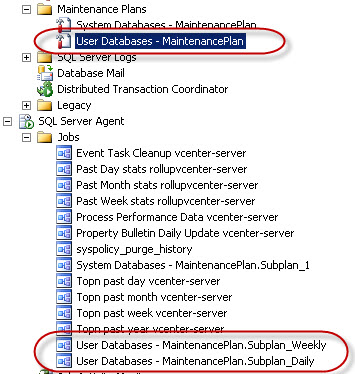
We now have two specific SQL Server Agent Jobs.
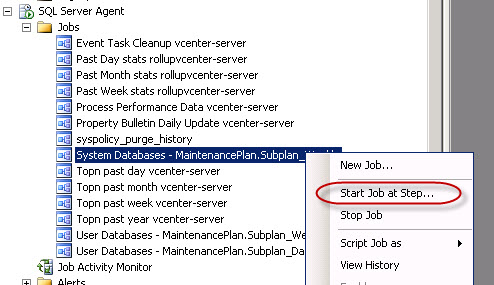
We will now run the Maintenace Plan Jobs. We start with the System Database job using Start Job at Step…
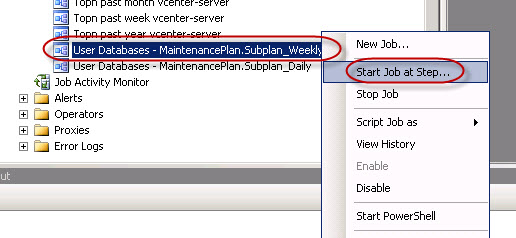
And for the User Databases we will first start the Full Back Up Task, before doing the Differential Back Up Task.
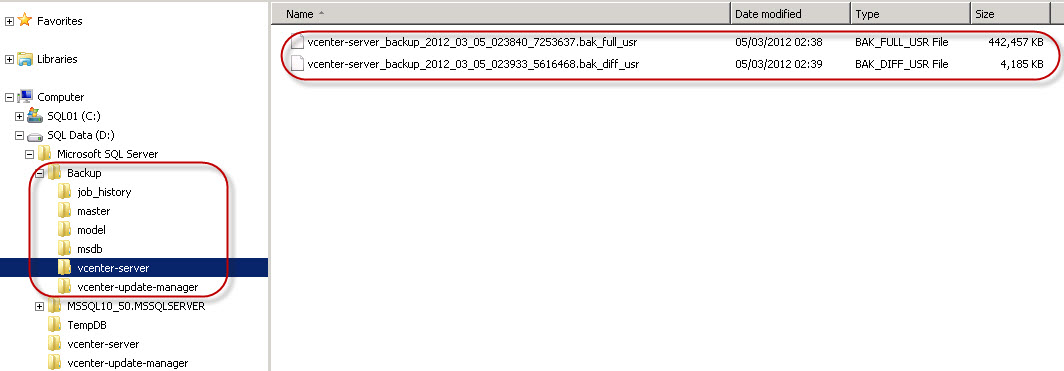
When we check the Backup folder we now have a full back of the System Databases and User Databases (Full and Differential).
There you are with a Maintenance Plan for the SQL Server 2008 R2 running your vCenter, Update Manager and vCloud Director databases.
I hope this will help you.
I have to thank once more my friend Eric Krejci as we have discussed this topic extensively a few months ago and he already wrote the same article on vCenter and SQL Backup and Maintenance on his web blog.
