PKI Infrastructure (01) – Introduction & Certificate Lifetimes

With this first post, I will start a small series of blogs on how to install and configure a Microsoft Public Key Infrastructure (PKI). There are plently of other set of articles on the internet on how to setup PKI solutions on Windows Server and Linux. But I’m writing my own set of articles, also to document my own implementation and to give other people an idea how I’ve down some configs like CRL publications that I have not seen elsewhere. I’m using Powershell and command scripts to deploy the Root CA and the Issuing CA. I also use OpenSSL to create frameworks to create my certificates and document them. I orgininaly started writing this blog post over 2 years ago when I setup my PKI infrastructure on Windows Server 2012 R2, but I have now moved on to Windows Server 2016 for my infrastrucutre and its what I’m going to use for the Root CA, Issuing CA and the Web Server publishing the Certificate Revocation List.

You will also note that my certificate will have much more aggressive expiration that most blogs covering this topic. My reason behind this is to make sure that I need to regularly (each 2 years) work on the PKI Infrastructure to ensure that certs, Issuing CA and Root CA are kept up to date.

Hashing Algorithm are bundled in Cryptographic Service Providers (CSP). A list of the different Microsoft Cryptographic Service Providers (CSP) can be found at Cryptographic Service Providers

My first implementation of a PKI Infrastructure happened in 2003, when I setup a two-tier corporate infrastructure on Windows Server 2003. We started with a Root CA certificate that had a Validity period of 20 years (default used by so many other people). Yet at the half-life of the Root CA in 2013, I needed to refresh the Issuing CA and Root CA. At that point in time the hashing algorithm SHA-1 used in 2003 was being deprecated (SHA-1 Deprecation policy). While changing from a RSA 1024bit to RSA 2048bit key was easy, SHA-2 was not present in the initial Microsoft Cryptographic Service Provider that I selected in 2003. So in 2013 I had to swap for a strong Cryptographic Service Provider causing me to re-install all my PKI from scratch. Selecting the correct Cryptographic Service Provider is primordial.

I used to run two sets of PKI for the past year, one based on the “RSA#Microsoft Software Key Storage Provider” which I labed as a G1 (Generation 1 tier) and the second G2 (Generation 2 tier) based on the Ecliptic Curve Diffie-Hellman (ECDH) algorithm that has been published in the NSA Suite B cryptography. Unfortunately Ecliptic Curve algorithm while being much more secure are not available in most products using certificates. In the past 4 years, I have not been able to use ECDH/ECDSA to encrypt or sign various products. During this implementation of the Two-Tier PKI Infrastructure I will therefore stick to the “RSA#Microsoft Software Key Storage Provider” CSP.

The document Cryptographic Services by Microsoft is a great PKI 101 guide that covers the bases from primitives to secret-key encryption, public-key encryption and digital signatures.

To finish off the first article, I want to talk about Certificates Lifetimes and create the base CApolicy config file for the Root CA and Issuing CA.

The Root Certificate Authority will have a lifetime associated, which can be renewed, but which most likely will be replaced by a new one based on 15 years experience with Public Key Infrastructure.

One of biggest Public Key Infrastructure design question, is the advantages and the disadvantages for the different key size values. The higher the key size, the more secure the certificate is from attackers, but will require more processing to use.  The longer the validity period, the less certificate maintenance required (and potentially some service disruption), but the certificate is more vulnerable to being compromised.

At the Vegas 2009 Microsoft Management Summit (MMS) Chris Adams and Ben Shy from Microsoft presented a breakout session that shared their experience about how they implemented native mode and Internet-based client management in Microsoft.  They shared with customers was their strategy for deciding the key size and validity period.  Their numbers are based on RSA research and how long it would take an attacker to compromise a certificate.  So the higher the key size, the more secure the certificate is (but remember that this comes at the cost of extra processing). Their simple matrix that they presented at MMS looked like this:

  • Key length of 1024:  Validity period = not greater than 6-12 months
  • Key length of 2048:  Validity period = not greater than 2 years
  • Key length of 4096:  Validity period = not greater than 16 years

If we start off the Root Certificate Authority with a Validity of 12 years, the Root CA Key Length should have a key length of 4096, use the Cryptography Next Generation (CNG) Hash Algorithm which is based on SHA-2 and use the implementation hash as SHA256 (which is SHA-2 256bits), SHA384 (SHA-2 384bits) or SHA512 (SHA-2 512bits).

On a Multi-Threaded x64 based platform, the SHA512 is actually faster than the smaller SHA256 (Reference: http://en.wikipedia.org/wiki/SHA-2 )

Here is the beginning of my Root CA & Issuing CA configurations. The CApolicy.inf file will be used during the creation of the Root CA certificate or the Issuing CA certificate.

RootCA – CApolicy.inf

[Certsrv_Server]
RenewalKeyLength=4096
CNGHashAlgorithm=SHA512
AlternateSignatureAlgorithm=0

For the Issuing CA, which has a validity period of 6 years, we should also set the Key Length to 4096.

IssuingCA – CApolicy.inf

[Certsrv_Server]
RenewalKeyLength=4096
CNGHashAlgorithm=SHA512
AlternateSignatureAlgorithm=0

The Issuing Certificate Authority which will issue server/user certificates to be used. The Issuing CA is generally configured to have the half-life of the Root Certificate Authority. Various vendors will now refuse to work with server certificate that have a longer than 2 year certificate lifetime. So you need plan your Root CA, Issuing CA lifetimes properly. Just taking the default is not good enough.

However, you also need to take into account what your CA hierarchy can support. A Certificate Authority cannot issue a certificate with a longer validity period than its own certificate. This one is easy to remember, however, there’s also a ticking time limit because a Certificate Authority cannot issue certificates with a validity period that is longer than its own remaining validity period. This is the reason why we have increased the Root CA validity period from 20 years to 21 years, so that the Issuing CA can stay at 10 years validity.

So lets expand the Root CA and Issuing CA policy.

RootCA – CApolicy.inf

[Certsrv_Server]
RenewalKeyLength=4096
RenewalValidityPeriod = Years
RenewalValidityPeriodUnits = 12
CNGHashAlgorithm=SHA512
AlternateSignatureAlgorithm=0

IssuingCA – CApolicy.inf

[Certsrv_Server]
RenewalKeyLength=4096
RenewalValidityPeriod = Years
RenewalValidityPeriodUnits = 6
CNGHashAlgorithm=SHA512
AlternateSignatureAlgorithm=0


AlternateSignatureAlgorithm = 0

While the Microsoft Press 2008 PKI documentation refers to the DiscreteSignatureAlgorithm, it should really be the AlternateSignatureAlgorithm. With the support of Cryptography Next Generation (CNG) and the new Suite B signature and encryption algorithms, it is necessary to include information about algorithms in both certificate and certificate requests. If this information is not included, an entity processing the certificate or certificate request may not be able to verify the signature of the object.

The AlternateSignatureAlgorithm option, when assigned a value of 1, enables support for the PKCS#1 V2.1 signature format for both the CA certificate and CA certificate requests. If implemented on a Root CA the Root CA will generate a root certificate that includes the PKCS#1 V2.1 signature format. If implanted on a subordinate CA, the subordinate CA will generate a certificate request that includes the PKCS#1 V2.1 signature format.

Warning: A side effect of using the AlternateSignatureAlgorithm=1 option, means that the PKCS#1 V2.1 signature is changed from SHA384RSA to a RSASSA-PSS. This newer Signature algorithm is not recognized by all certificate implementation. It has been found out that some Citrix implementations break in this config.

There are still plenty of other options that we can insert in the CApolicy.inf configuration, but I will not cover them right now. You will see the end result CApolicy.inf in the corresponding blog entries.
Issuing CA Renewal operation

There is a german proverb “Ubung macht den Meister” that I have always tried to apply to my day to day computer science skills. While dealing with my Public Key Infrastructure in the home datacenter (#HomeDC), this means having a proper multi-tier PKI infrastructure with a Standalone Root CA, an Issuing CA, a PKI Web publishing server for Certificates and Certificate Revocation List. Nearly everyone can setup a PKI infrastructure with Microsoft Windows Server using Next Next Next and a 40 years Root Certificate Authority, but I had to make this a bit more challenging and make it so that it needs a yearly maintenance process to keep my PKI skills fresh.

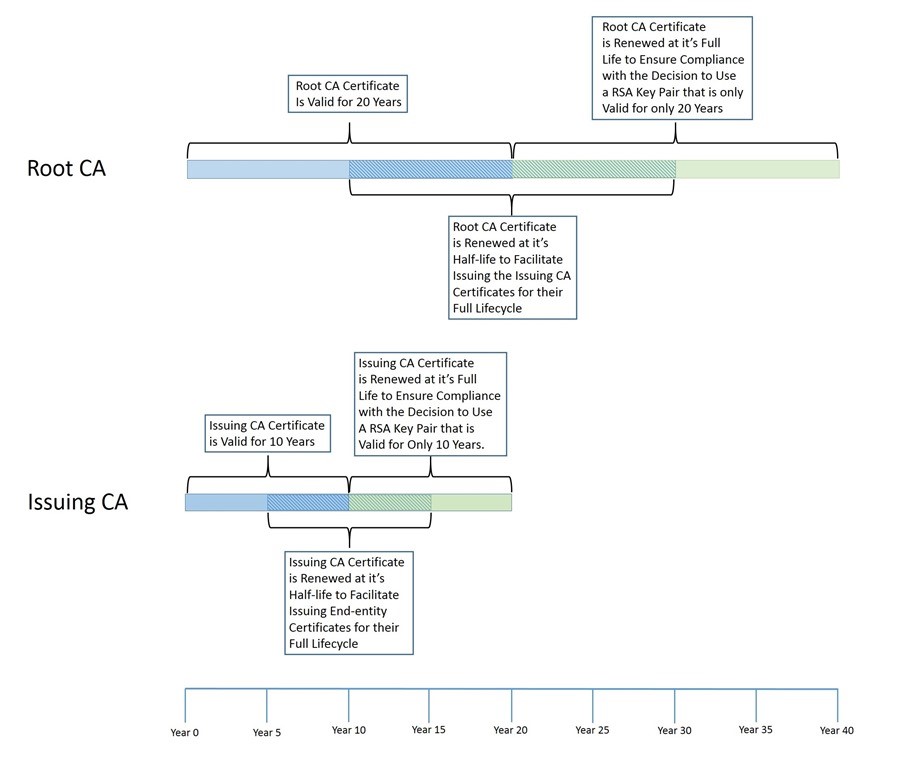
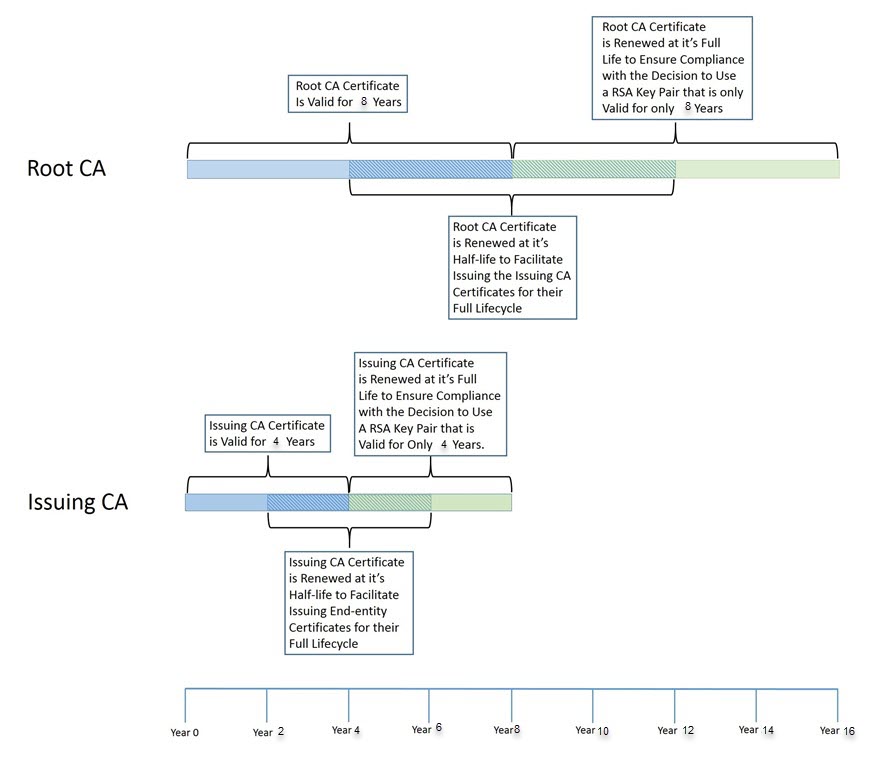
My PKI Certificate Lifecycle is based on the following schema:

You can find the original diagram on this Microsoft PKI Certificate Lifecycle article. So instead of having a Root CA that is valid for 20 years and an Issuing CA that is valid for 10 years, I went with smaller validity periods, like 8 years for the Root CA and 4 years with the Issuing CA.

I use two different set of Generation PKI Infrastructure. The G1 on which this article is written is using a Root CA with a RSA (4096 Bits) Public Key and a sha512RSA Signature Algorithm for my G1 tier and the same for my Issuing CA. The G2 that you will see on some of the screenshots is based on a Root CA with a Elliptic curve cryptography (ECC) P521 and a sha512ECDSA Signature Algorithm.

Since my infrastructure is now running since 2015, I’m now closing in to the half-time of the Issuing CA validity period. What I decided to do is the following renewal:

  • At T+4 years the Issuing CA certificate will be renewed with a new key pair. This action enforces the 4 year lifetime of the RSA key pair as agreed to when designing the PKI and PKI security. This will create a new CA certificate with a new key pair. This will also force the CA to generate a new CRL file, since there is a new key pair. A CRL signed by the “old” key pair will continue to be generated as long as the CA certificate associated with the “old” key pair is still time valid.

When you do a certificate renewal, the new version has a (1) behind it. The certificate request would now be called Issuing CA G1(1).req

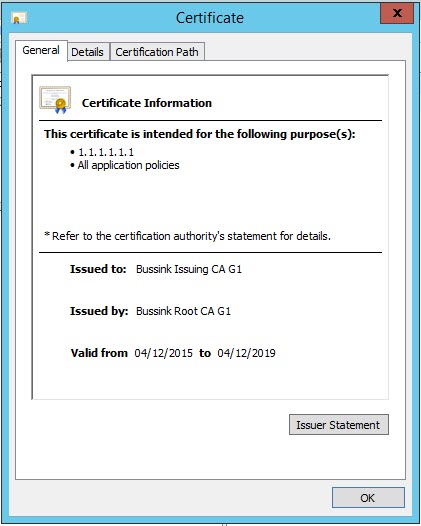
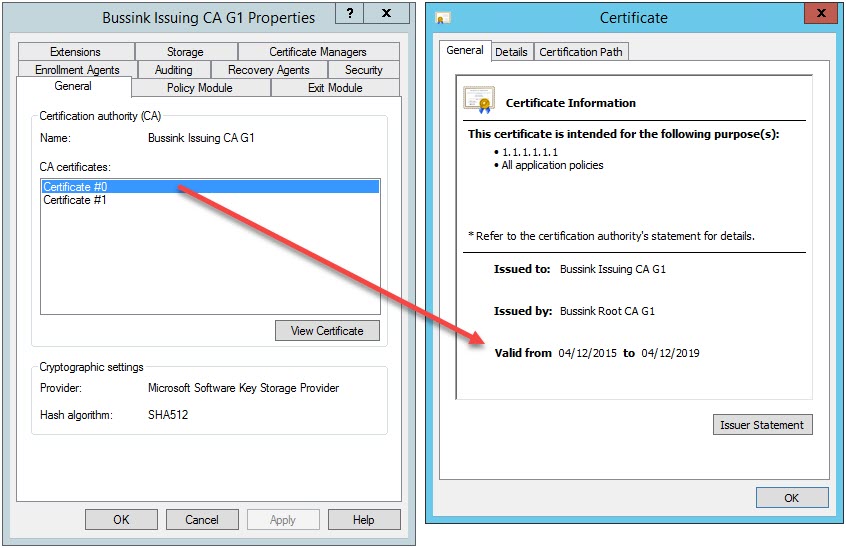
Let’s have a look at the original Issuing CA certificate on the Root CA.

And the Issuing CA detail is

This is now impacting me when I attempt to sign new certificates with a validity of over 24 months. Because those are now limited in their validity until the 4th December 2019.

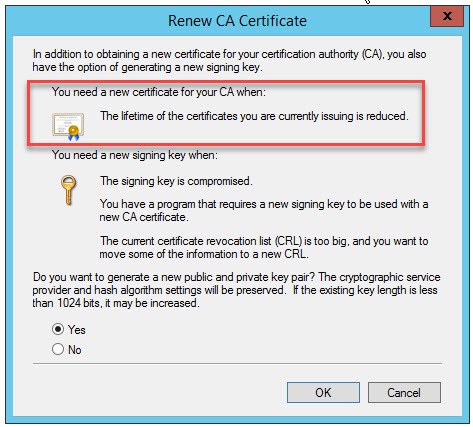
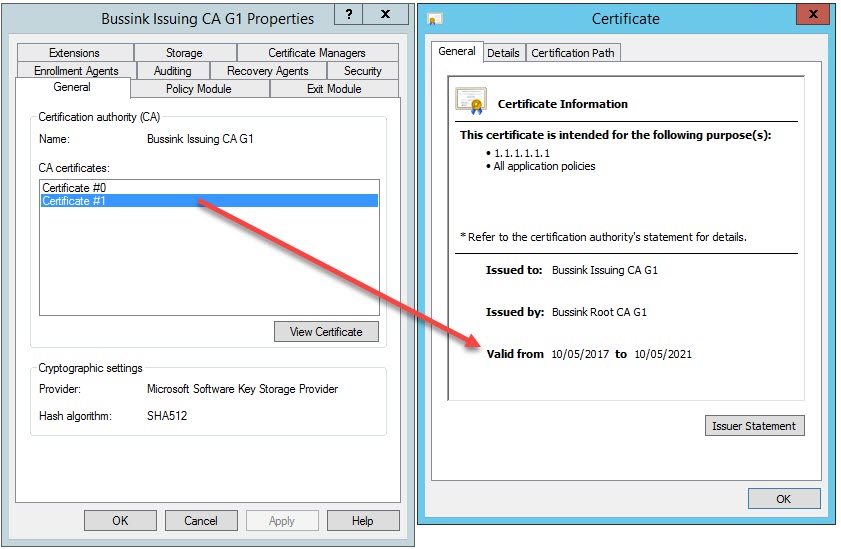
The first step on the Issuing CA is to Stop Service of the PKI and launch the Renew CA Certificate process. I decided to generate a new public and private key, so my new Issuing CA request file is now named Issuing CA G1(1). Take the certificate request to the Root CA. On the Root CA,  Revoke the current Issuing CA certificate as it’s Superseded and Submit new request of the Issuing CA(1) request file. Issue the new SubCA certificate. We now have a Issuing CA certificate with two fields.

I need to export the signed certificate (I used the PKCS #7 .p7b with certificate path format), move it to the Issuing CA and Import CA Certificate.

In the following steps I’m doing a few more operations on the Root CA. Now that I have Revoked (Yeah with insight I might better have not revoked the original Issuing CA… might need to update this article if I run into issues…) it’s time to do the annual publishing of the Certificate Revocation List (CRL).

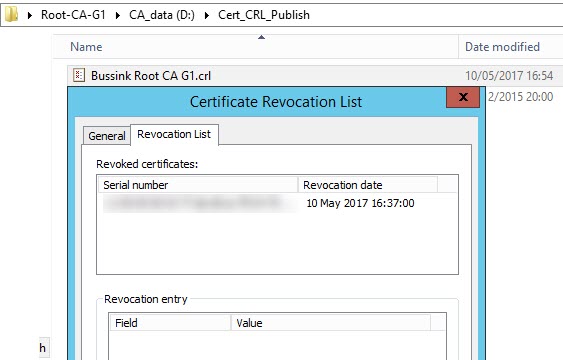
I can see in my Root CA CRL now the old revoked Issuing CA certificate serial number.

Moving along on the Issuing CA in the Active Directory, I’m publishing the update Root CA CRL using certutil -dsPublish RootCA.crl RootCA

For the computers and operating systems that are not in the Active Directory and that cannot check the state of the Certificates from the AD, I have a Windows server with the IIS Web server running that publishes the CRLs. This server while having the FQDN of pki-web.bussink.org is also referred by the alias pki.bussink.org on my network. I copied the updated Issuing CA(1) certificate and the Root CA CRL on the directory mapped by the IIS server.

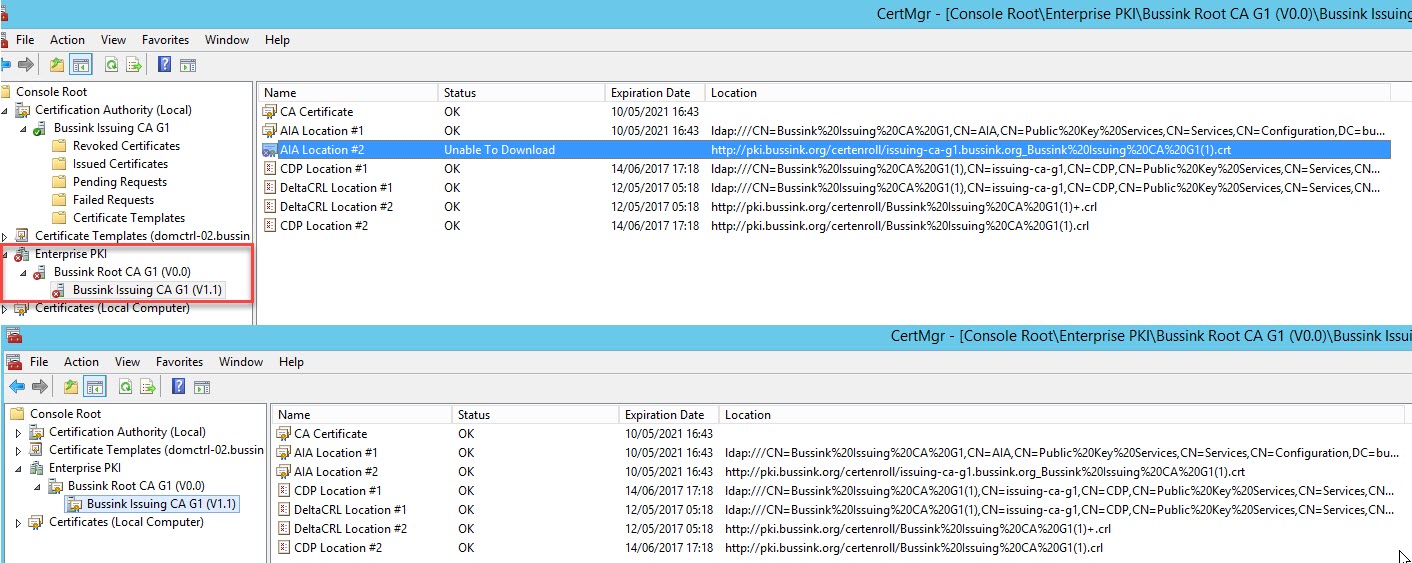
On the Issuing CA in the Enterprise PKI tab, you can ensure that all paths to the Certificates, Certificate Revocation List and Delta CRL work. As you see in the top part of the following screenshot I had not yet copied the Issuing CA(1) certificate. That is corrected in the bottom part of the screenshot.

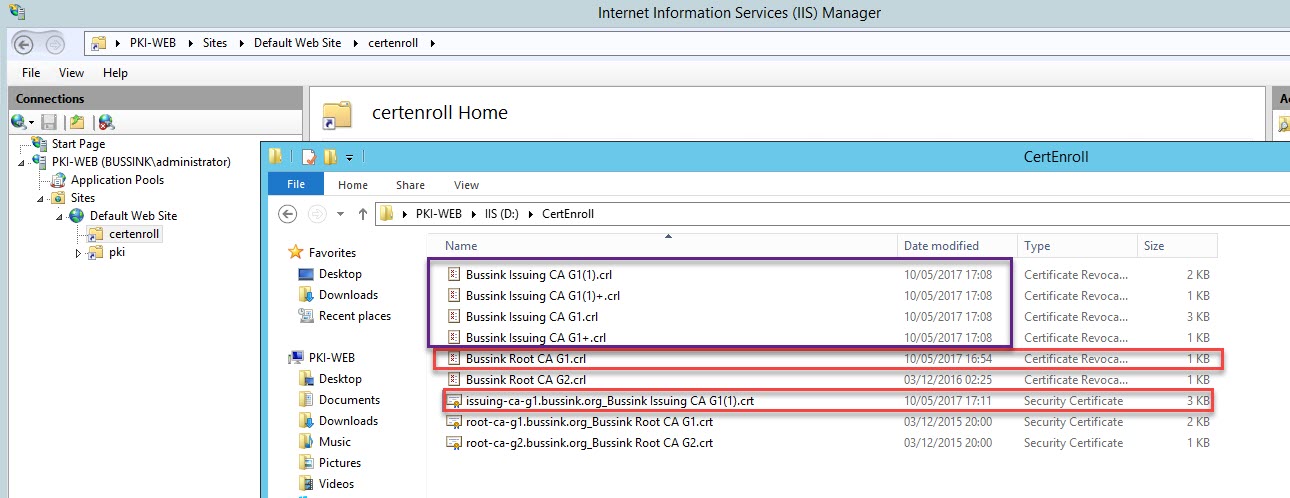
Having the Issuing CA running again, I forced a Publishing of the Issuing CA CRLs. You can now see them below on the Web server in Purple. There are two sets of the CRL, the ones for the original Issuing CA certificate and the set for the updated Issuing CA(1) certificate.

The files in the red boxes are the ones I manually added to my PKI-WEB repository. They are the annual Root CA CRL and the new Issuing CA G1(1) certificate (I already mentionned it above, I might have been a bit premature in removing the original Issuing CA G1 certificate. I will update this article if I run into serious issues).

I wrote this blog article more for myself as a recap of the operations, as I will have to redo it before 2021. While this is only 4 years down the road, I have already I had the opportunity once in my career to setup a Root CA infrastructure in 2004 with Windows Server 2003 and have to renew it completly 10 years later in 2014. This was a lot more complicated as I had to change the PKI CryptoProvider from the old one only support SHA1 to one that supported SHA2. This is a reminder to all professionals, if you setup a PKI, you might have to work on it again a decade later.


Changing Windows uppercase hostnames to lowercase

Working with Windows is not always easy. Windows has it’s quirks. One of them is that sometimes some server will show up in management consoles in Uppercase, and others in lowercase.

NetBIOS Capital names

Microsoft keeps saying that Windows will recognize both Uppercase only hostname and Lowercase hostname without differentiation. Windows DNS is case agnostic. But Unix/Linux DNS is case sensitive.

Unfortunately, I’m a perfectionist, and use Unix/Linux on a regular basis, so I really like all my hostnames to be in lowercase. A few years past, I did try to rename hosts, remove them from Active Directory, and add them to try to change them from Uppercase to lowercase. Only recently, have I found the way to make and enforce these changes without messing account with the system and renaming process.

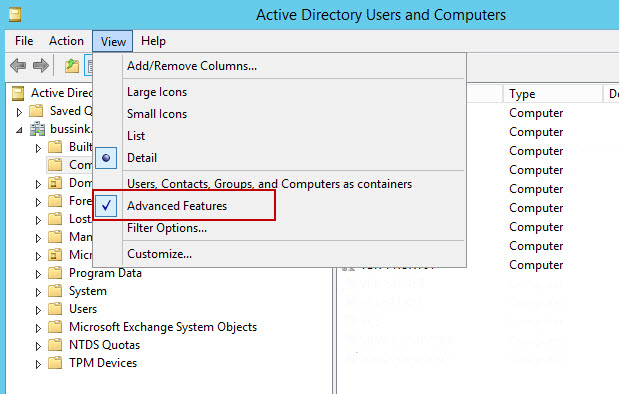
The answer is simple, you just need to head to a domain controller, start the management tool “Active Directory Users and Computer” and enable the Advanced Features under the View tab.

Active Directory Users and Computer Advanced Features

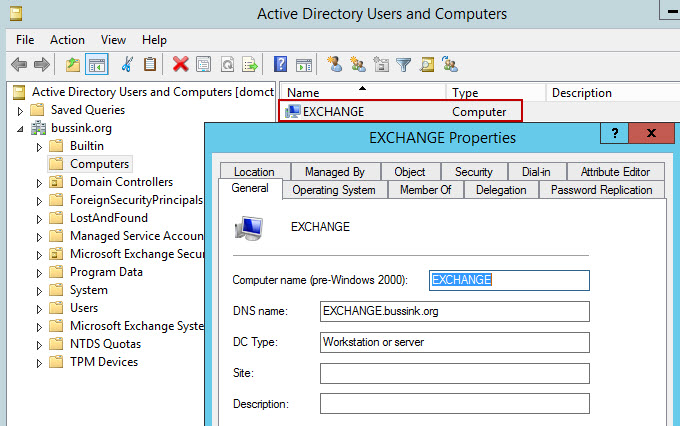
Then we select the hostname that annoys us…

Select Computer properties

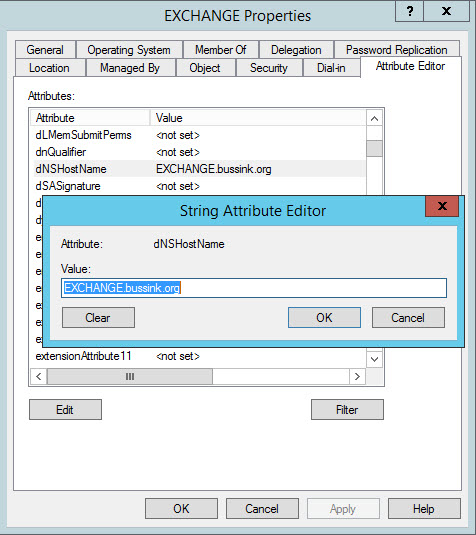
And we head to the Attribute Editor. In the Attribute Editor, you scroll down the dNSHostName attribute, and you edit it.

Locate dNSHostNAme attributes

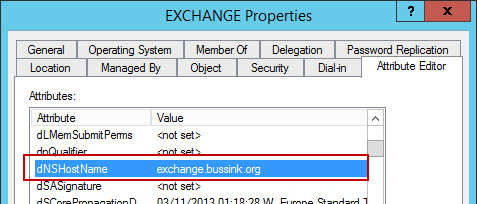
Well there… that hostname is all in Uppercase. Now here you have to be careful in not messing up, but you can edit it and change it to lowercase, and apply the change.

Change to lowercase

You need to find the proper time to restart your server.

And now your host will show up in the Active Directory in lowercase.

Lowercase hostname

There…

simple…

Happy Panda

happy_panda


SQL Server firewall port for Domain and LocalSubnet

I’m a big beliver of Defense in Depth, when it concerns to Information Technology Security.

As such I always leave the default Windows Firewall activated, in my configs.

Every so often I install a SQL Server, and I need to open the port. It’s not just opening a 1433/TCP port from everywhere, but more to add just the right rule to allow Domain computers and LocalSubnet machines to talk to the SQL Server. The following command will do it.

netsh advfirewall firewall add rule name = “Microsoft SQL Server” dir = in protocol = tcp action = allow localport = 1433 remoteip = localsubnet profile = DOMAIN

and if you use the SQL Server 2012 AlwaysOn Availability Groups you might  want to add

netsh advfirewall firewall add rule name = “Microsoft SQL Server Listener Port” dir = in protocol = tcp action = allow localport = 5022 remoteip = localsubnet profile = DOMAIN


The second small entry for myself, is SQLServerManager11.msc to call up the SQL Configuration Manager of a SQL Server 2012 when the icon is missing from the Desktop or Start Menu.

I’ve written this small entry, more for myself, so I can find it back again quickly.

SQL Server Transact-SQL Line Numbering

When you use Microsoft SQL Server on a regular basis with Transact-SQL scripts, it is a sometimes useful to quickly find the proper line of code.

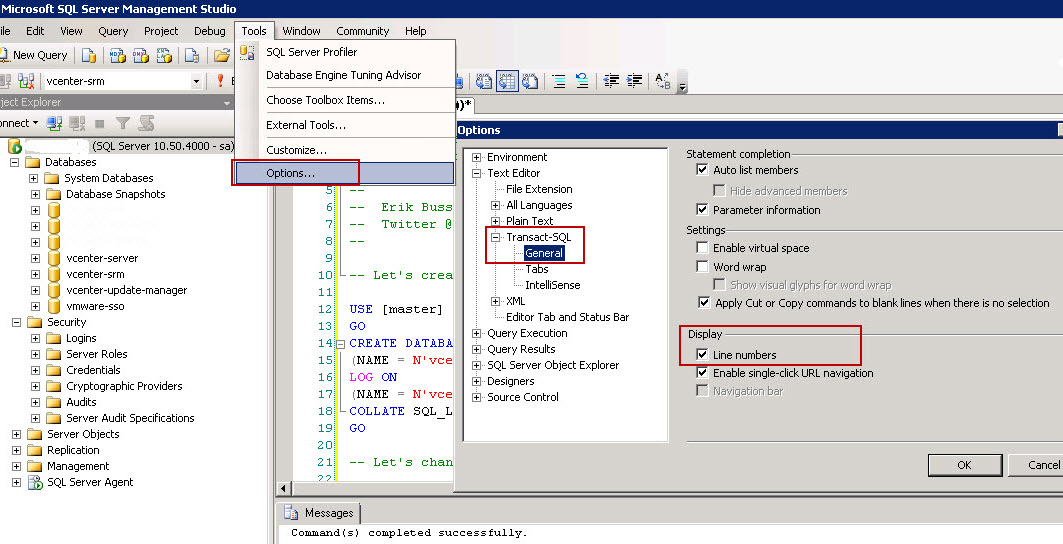
This is a quick tip on how to activate the Line Numbering when working with Transact-SQL.

Activating Line Numbering for Transact-SQL

Activating Line Numbering for Transact-SQL

I hope this will be helpful.


Visio 2013 and Visio Stencils issue (Fixed)

[Update 10/30/2012 Thanks to Maxm]

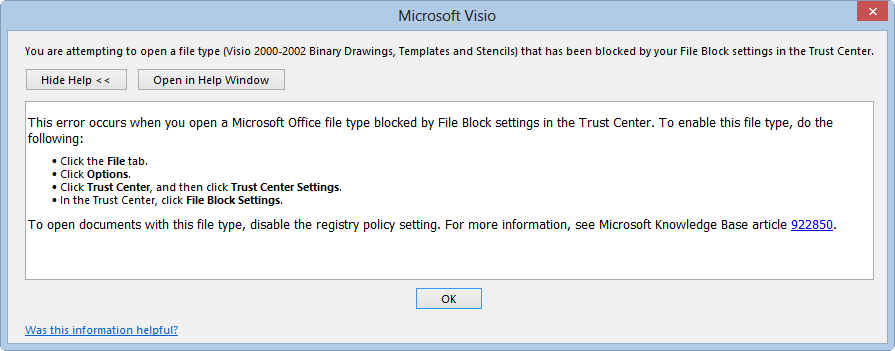
I use Visio a lot to create diagrams for my customers and colleagues. But when I tried to import Cisco Stencils I retrieved from the Cisco website, or HP Proliant Stencils from VisioCafe with the Visio 2013 RTM, you get the following error message.

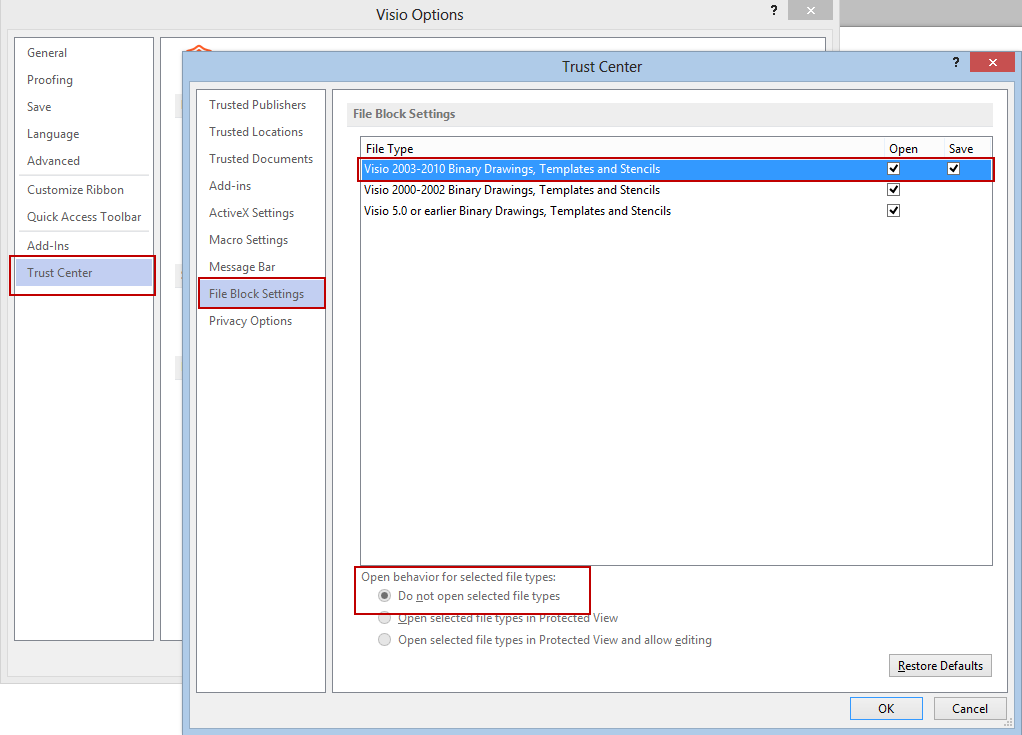
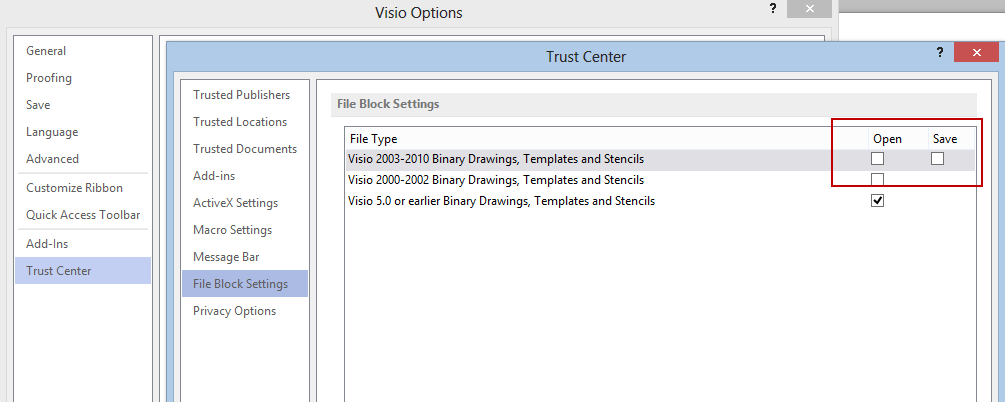
There is a setting in Visio 2013 in the Options, Trust Center, File Block Settings that should enable you to allow Visio 203-2010 Stencils to be opened (HP, Cisco, EMC)
But unfortunately something is wrong… the Option at the bottom cannot be changed from “Do not open selected file types”

So think hard before upgrading to Visio 2013 if you need to use Stencils.

I’ll communicate again on the topic if I find a solution or if Microsoft respond to my ’Send a Frown’

Thanks to Maxm and his reply I found the problem. The trick is to untick the boxes to be able to open Stencils. Seems backwards to me, but that’s Microsoft for you.

Visio 2013 Untick Boxes in File Block Settings

vCenter VM Hardware Upgrade results in Hung vCenter services

Yesterday, while upgrading a new vCenter virtual machine that was created on an ESX 3.5 host, to a new ESXi 5.0 host, we found ourself with a VM that was refusing to start any services.

The virtual machine is running

  • Windows Server 2008 R2 SP1
  • vCenter 5.0 Update 1
  • SQL Server 2008 R2 SP1 (10.50.2792)
  • and the whole suite of vCenter services (vum, syslog, dump, web service).

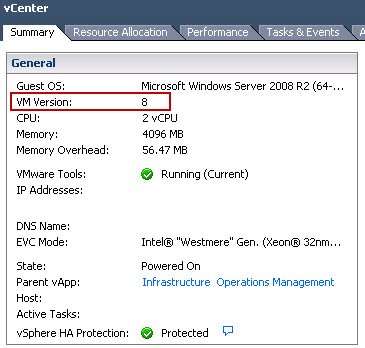
The virtual machine was created  on an ESX 3.5 (Build 604481) and was configured as a VM Version 4.  The target platform was a new ESXi 5.0 Update 1 host (Build 623860). So we cold migrated the vCenter to the new system, via a shared VMFS3 datastore.

At this point, the virtual machine was running fine as a VM Version 4 on the ESXi 5.0 Update 1.

I then started the upgrade process, with the installation of the VMware Tools, to ensure I had all the proper drivers in the VM. I then powered off the virtual machine, and upgraded the hardware to VM Version 8.

vCenter - VM Version 8

The system restarted but there was an issue with the various services. I could not open the network settings, I could not uninstall the VMware Tools as the Windows Installer service was not running. My data and database log disks where not visible, I could not open the disk management control panel.

After much troubleshooting, restarting the virtual machine in safe mode and various other tests, my colleague found this very interesting article Windows Server 2008 computer hang during startup while “applying computer settings” and services configured to start automatically fail to start http://support.microsoft.com/kb/2004121 

The following two paragraphs are taken from the Microsoft Support Article.

Cause

The problems described in the symptoms section occur because of a lock on the Service Control Manager (SCM) database.  As a result of the lock, none of the services can access the SCM database to initialize their service start requests. To verify that a Windows computer is affected by the problem discussed in this article, run the following command from the command Prompt:

[box]sc querylock

The output below would indicate that the SCM database is locked:

QueryServiceLockstatus – Success

IsLocked : True

LockOwner : .\NT Service Control Manager

LockDuration : 1090 (seconds since acquired)

[/box]

Let me fix it myself

you can modify the behavior of HTTP.SYS to depend on another service being started first.  To do this, perform the following steps:
[box]

  • Open Registry Editor
  • Navigate to HKLM\SYSTEM\CurrentControlSet\Services\HTTP and create the following Multi-string value: DependOnService
  • Double click the new DependOnService entry
  • Type CRYPTSVC in the Value Data field and click OK.
  • Reboot the server

[/box]

NOTE: Please ensure that you make a backup of the registry / affected keys before making any changes to your system.

After having made the registry modification and a final restart, the virtual machine was working again as expect. This was a very strange and bizarre error I have never heard someone run into. So here it is resumed, and may it be usefull someday to someone else…


Windows Server 8 Beta (Server Core) AD-DS install inside Workstation 2012 Tech Preview

I’ve spend a frustrating day with Workstation Tech Preview 2012 and with Windows Server 8 Beta en_windows_server_8_beta_x64_dvd_810648.iso

I’ve create numerous virtual machines named DC1, as I’m trying to use the Microsoft Windows Server “8” Beta Base Configuration Test Lab Guide (TLG) that is located at http://go.microsoft.com/fwlink/p/?LinkId=236358.

I have used these VMs with the VMware Tools from the TechPreview, without the VMware Tools, and with a Custom implementation without the SVGA graphic drivers. I’ve attemped my test on both the Windows Server 8 Beta with GUI and in Server Core.

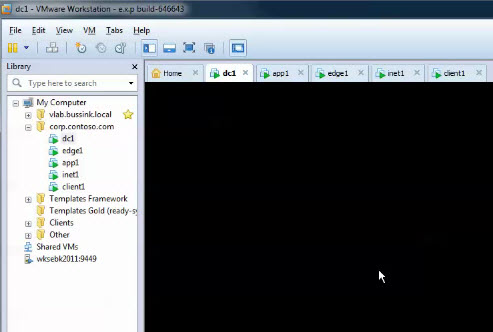
Workstation 2012 Tech Preview and Windows Server 8 Beta AD-DS install blank screen bug

As soon as I try to install and configure the Active Director Domain Services, the VM needs to reboot. Once it has rebooted, it goes in a blank screen, and there is nothing I can do. Workstation thinks the VM is running, but there is no response via the GUI in the VM, no response to ping traffic to the VM or RDP.

I installed Workstation Technology Preview 2012 on two different computers and re-downloaded the en_windows_server_8_beta_x64_dvd_810648.iso from Microsoft twice. I just can proceed with using the Workstation Technology Preview 2012 to test Windows Server 8 Domain controllers.

I made a small video of the process, which is appended to this article.

Windows Server 8 Beta (Server Core) AD-DS install inside Workstation 2012 Tech Preview

In addition it’s available on Youtube at http://www.youtube.com/watch?v=6qvptvC0Usc

Here I’m trying to install the Active Directory Domain Services on a Windows Server 8 Beta running inside the VMware Workstation 2012 Tech Preview. The install of the AD-DS and DNS service work fine, but when the domain controller reboots, there is no GUI left. In this VM the VMware Tools where not installed.

 The commands used in this video are

00:03 ipconfig

00:08 sconfig

00:30 Install-WindowsFeature AD-Domain-Services -IncludeManagementTools

01:55 Install-ADDSForest -DomainName corp.contoso.com

Once the newly promoted domain controller reboots, the GUI does not come back, and the IP addresse cannot be pinged anymore.

Workstation 2012 Tech Preview Blank Screen


Update: Well in VMware Workstation 2012 Tech Preview, if you select the a Windows 7 version or Windows Server 2008 version instead of the Windows 8 setting, your V will NOT go black screen on the dcpromo.

Creating a Maintenance Plan for SQL Server 2008 R2 for vCenter/UpdateMgr/vCloud

I shall start by saying that I’m by no way a Database Administrator, but over the years I have picked up some knowledge and I have talked to a few guys that have more Knowledge on the topic to learn small tips & tricks. I have created in previous posts how to quickly create a vCenter Database using Transact-SQL scripts, and how to create a vCloud Director database using Transact-SQL script. It this small article, I will just resume how to create some Maintenance Plans to ensure that your vCenter/UpdateManager/vCloudDirector databases are backed up. I’m not using the Full Recovery model in SQL Server 2008 R2 for my lab and my clients, so these maintenance jobs should be fine. I believe that if you have a large enough environment that is critical to your day-to-day operations, you should use the Full Recovery model, but you would then also have a real Database Administrator onsite that could manage, nurture and keep your databases in proper running condition.

I have seem my share of transaction log databases for VMware vCenter go haywire, such that the Roll-Up jobs are not running anymore (Check your History Log) and the transaction log databases explodes. My personal worse situation was last year at a client that didn’t check their database and the transaction log database run out of storage on the disk when it passed the 90GB. There are procedures on the VMware Knowledge Base on how to compact and roll-up these huge transaction database, but it takes a lot of time. In most cases, we cut out losses and just purge the transactions logs.

Coming back to my Maintenance plan. We will create to sets of database maintenance plans, one for the System Dababases and one for the User databases. I need to thank my friend Eric Krejci for showing me how to separate the two maintenance plans.

System Maintenance Plan

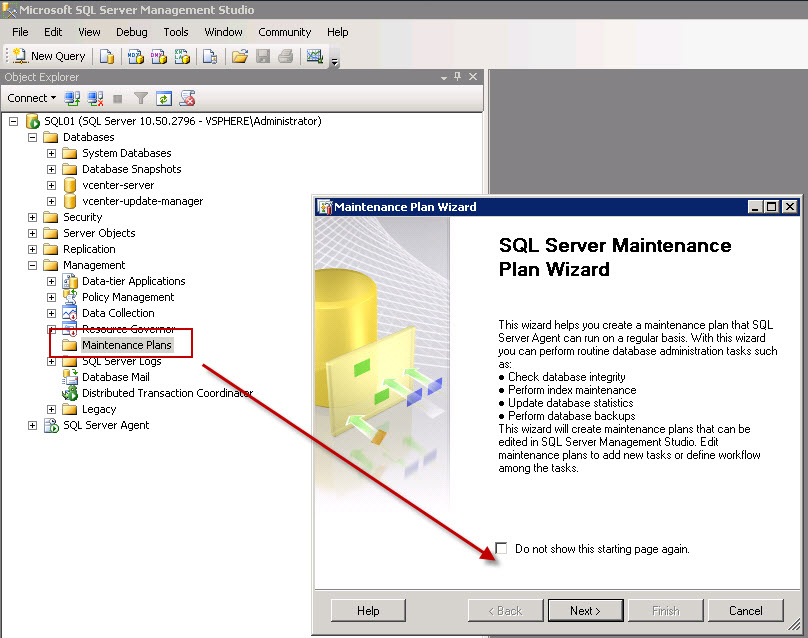
We need to connect to our database server using the SQL Server Management Studio program. And from the Management folder, select the Maintenance Plan and start the Wizard.

Start Maintenance Plan Wizard

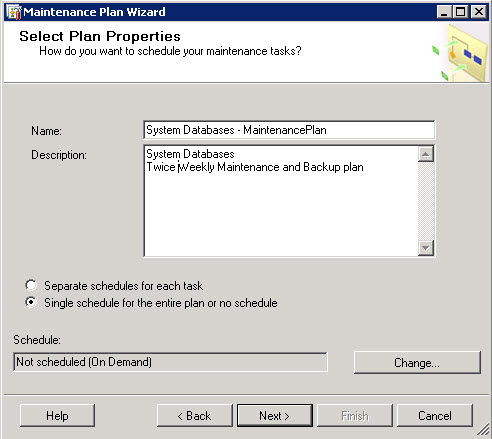
The System databases is comprised of the Master, Model, MSDB and TempDB databases. These database don’t change much, but I will select to make a Twice Weekly maintenance and Backup Plan. Please note that the MSDB database contains all the Stored Procedures for your vCenter & Update Manager database.

Define Maintenace Plan

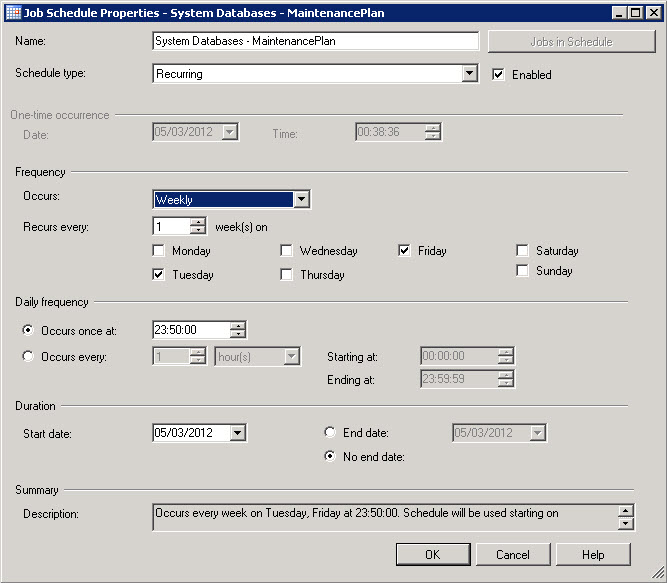
And let’s Schedule the Plan for two runs per week on Tuesday evening and Friday evening.

Job Schedule Properties

You can select any other pattern that you wish.I for one also use VMware Data Recovery 2.0 for making daily backup of my virtual machines, so I make sure that my  VMware Data Recovery schedule does not run on my databases between 23:00 and 01:00.

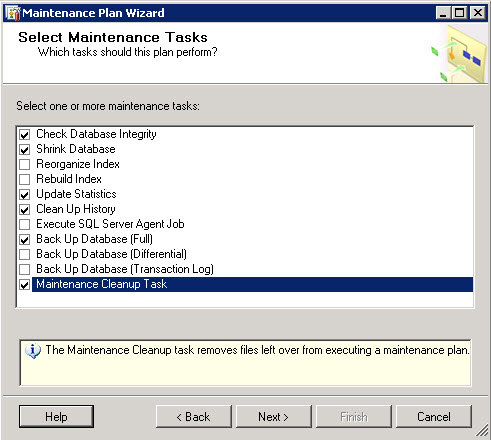
Now we can select the various Maintenance Tasks we want to run.

Select Maintenance Tasks

I have selected

  • Check Database Integrity
  • Shrink Database
  • Update Statistics
  • Clean Up History
  • Back Up Database (Full)
  • Maintenance Cleanup Task.

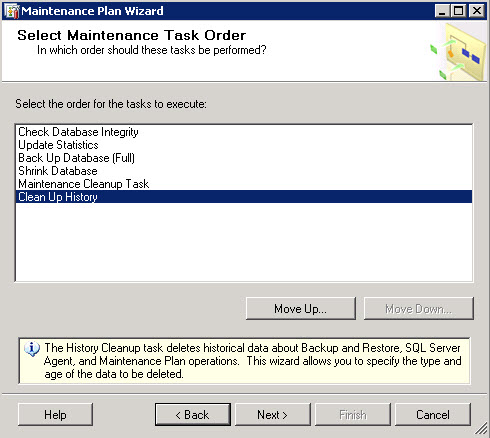
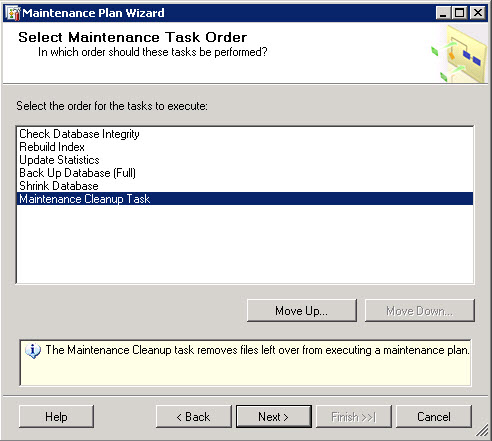
And I have changed their Order around on Select Maintenance Task Order step.

Select Maintenance Task Order

So we run

  1. Check Database Integrity
  2. Update Statistics
  3. Back Up Database (Full)
  4. Shrink Database
  5. Maintenance Cleanup Task
  6. Clean Up History

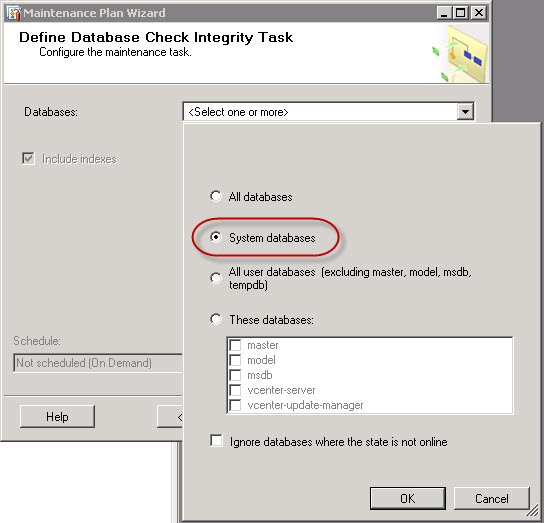
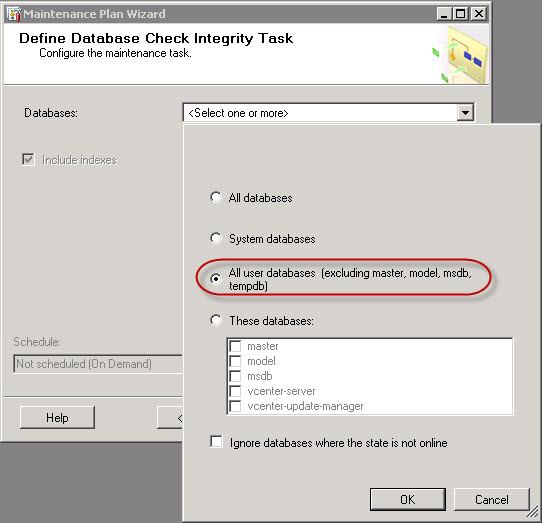
Now let’s configure the Maintenance Tasks – Define Check Database Integrity. I have selected for this first Maintenance Plan the System Databases.

Define Database Check Integrity Task – System Databases

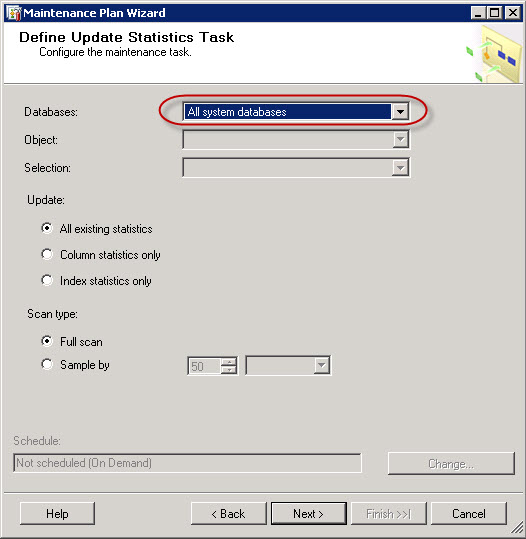
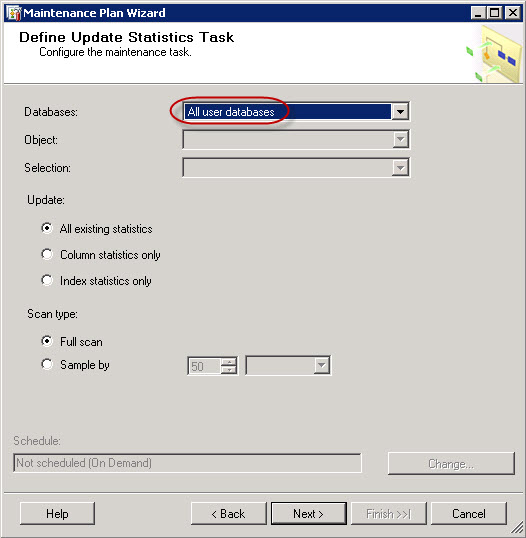
We now Define Update Statistics Task for the System Databases

Define Update Statistics Task – System Databases

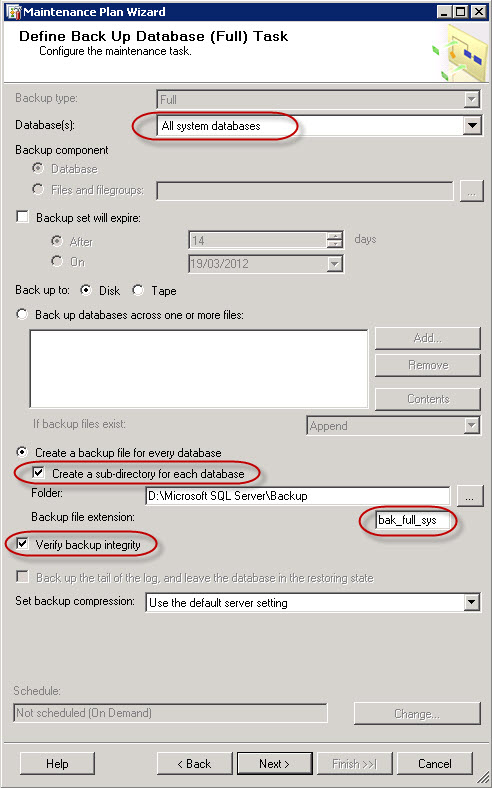
The next step is the definition of the back up job. Define Back Up Database (Full) Task. Please note that we have added the option to create a sub-directory for each database, and to verify the backup integrity. I have also modified the Backup File Extention to BAK_FULL_SYS so that we can make better use and more flexible backup cleanup maintenance job later in this article.

Define Back Up Database (Full) Task – System Databases

There is always a good discussion if you have enough Compute power to create a compressed backup or not.

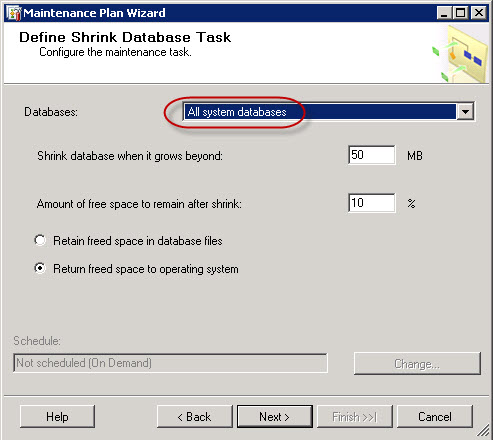
Now that we have a good full backup for the system databases we can do some database shrinkage. Define Shrink Database Task.

Update 22/03/2013. Since I created this post, I’ve stopped using the Shrink task in the maintenance plan. I rather do it sparingly manually than automate it.

Define Shrink Database Task – System Databases

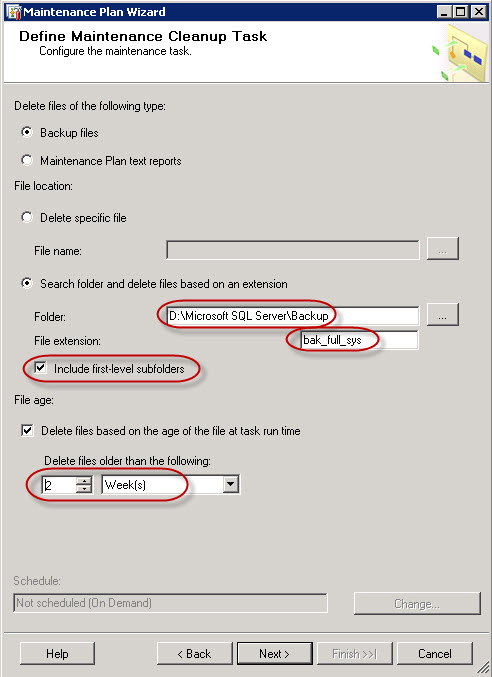
Now remember that we modified the Backup File Extension earlier. We we will now Define Maintenance Cleanup Task to erase all System Databases backups that are older than two weeks, and we will use the various sub-folders for the backups.

Define Maintenance Cleanup Task – System Databases

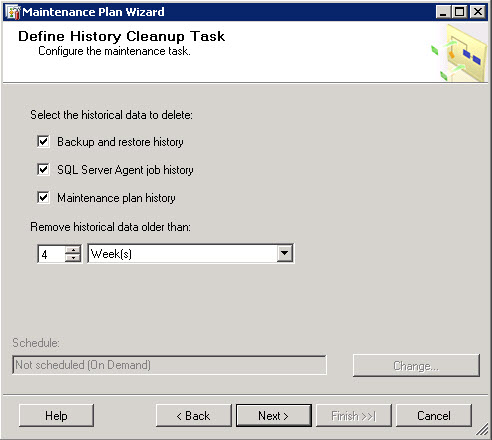
And  last we Define History Cleanup Task for the whole SQL Server 2008 R2 instance. I did not modify the settings of this tab. This Maintenance Task will cleanup the Backup and Restory History, the SQL Server Agent job history and the Maintenance Plan History.

Define History Cleanup Task

We will also save a copy the Maintenance Plan actions to a text file in the same directory as where the backup files are stored.

Select Report Option for Maintenance Plan

We now have a resume of the Maintenance Plan we can complete.

Maintenance Plan Wizard Complete

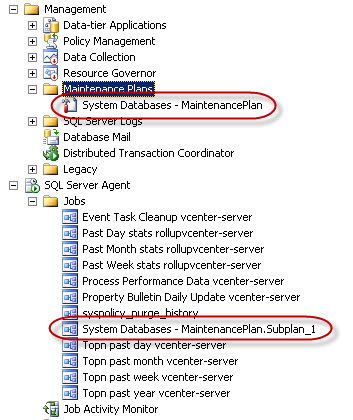
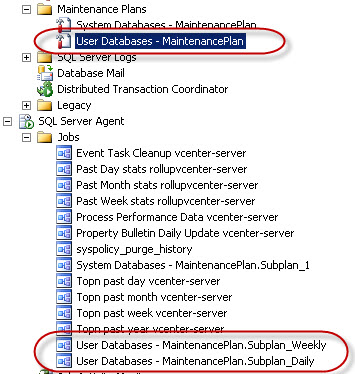
We see the new job in the Maintenance Plans section and the new job in the SQL Server Agent

Maintenance Plans & SQL Agent Jobs


User Maintenace Plan

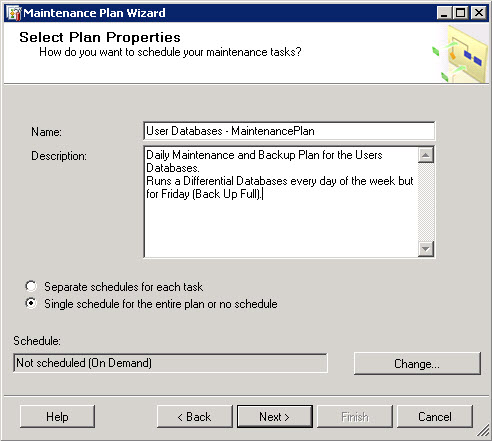
We now attack the User Databases Maintenance Plan. We start our Maintenance Plan Wizard and start the definition of the plan properties. I’m creating a Maintenance Plan for the Users Databases that will create a Differential Back Up every day, and a Full Back Up on Friday.
Users Database Maintenance Plan Properties

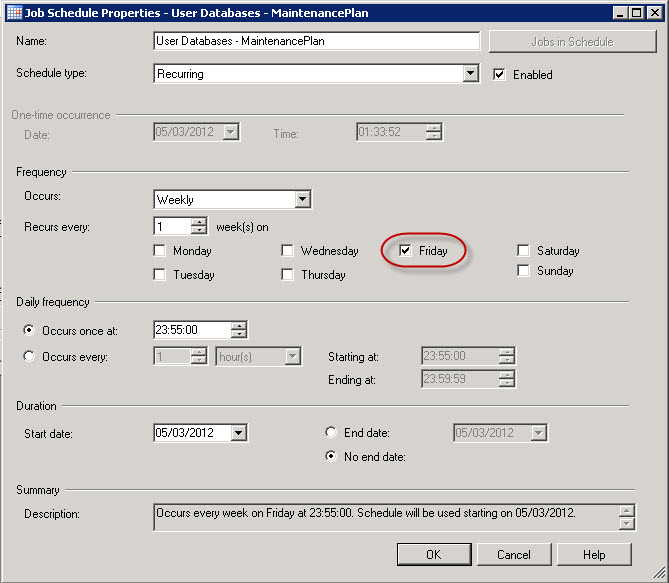
I modify the Schedule so that the main part of this Maintenance Plan including the Full Back Up happens each Friday. I will then later add a subplan to do the Differential plan each day.

User Databases Maintenance Plan – Job Schedule

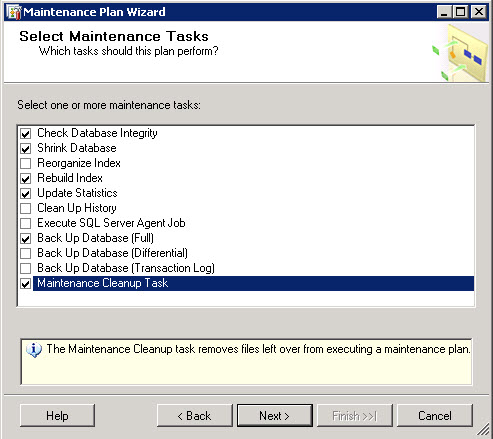
We now add the various Maintenance Tasks for our Users Databases.
Select Maintenance Tasks

I have selected

  • Check Database Integrity
  • Shrink Database
  • Rebuild Index
  • Update Statistics
  • Back Up Database (Full)
  • Maintenance Cleanup Task

And we Select Maintenance Task Order to move down the Shrink Database task after the Back Up Database (Full).

Select Maintenance Task Order

So we run

  1. Check Database Integrity
  2. Rebuild Index
  3. Update Statistics
  4. Back Up Database (Full)
  5. Shrink Database
  6. Maintenance Cleanup Task

The first Task to run is the Database Check Integrity Task where we select the Users Databases

Database Check Integrity Task – User Databases

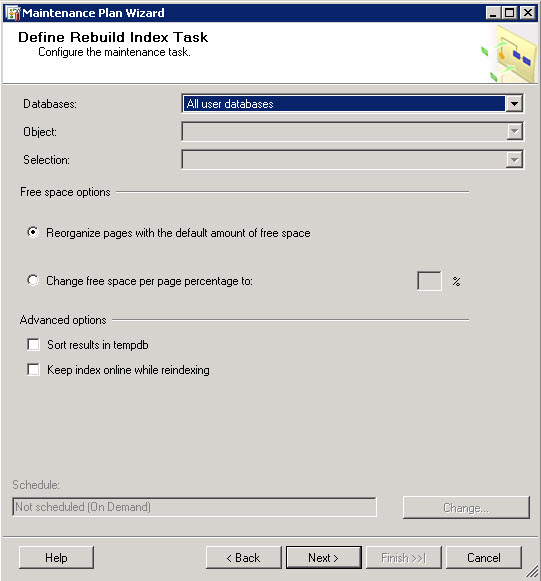
We then Rebuild Index Task for the Users Databases

Rebuild Index Task – User Databases

We Define Update Statistics Task for the User Databases.
Update Statistics Task – User Databases

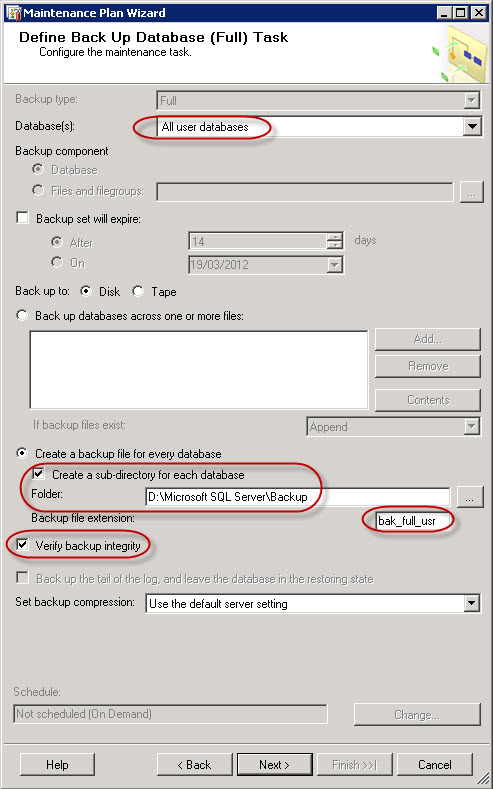
We now do the Back Up Database (Full) Task for the User Databases. Note that we use sub-directories for each database, we changed teh Backup File extionsion to BAK_FULL_USR and we verify the integrity of the backup.
Back Up Database (Full) Task – User Databases

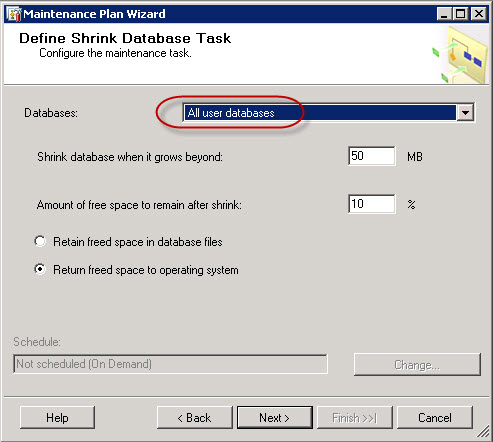
Once we have the Full Back Up of the User Databases we can launch the Shrink Database Task.

Shrink Database Task – User Databases

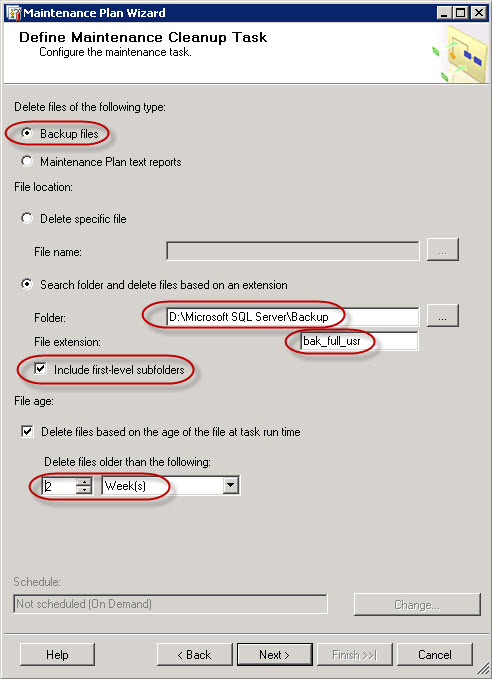
We now setup the Maintenance Cleanup Task for the User Databases so that we keep only the last two weekly full backups.

Maintenance Cleanup Task – User Databases

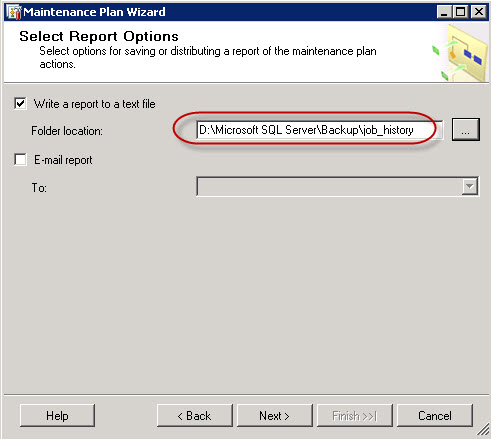
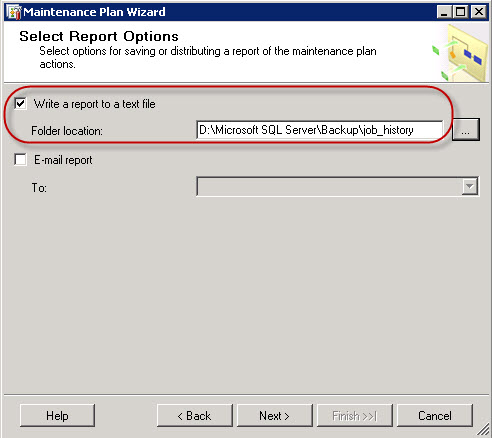
And we save the Maintenance Plan Report to the job_history directory.

Maintenance Plan Report Path

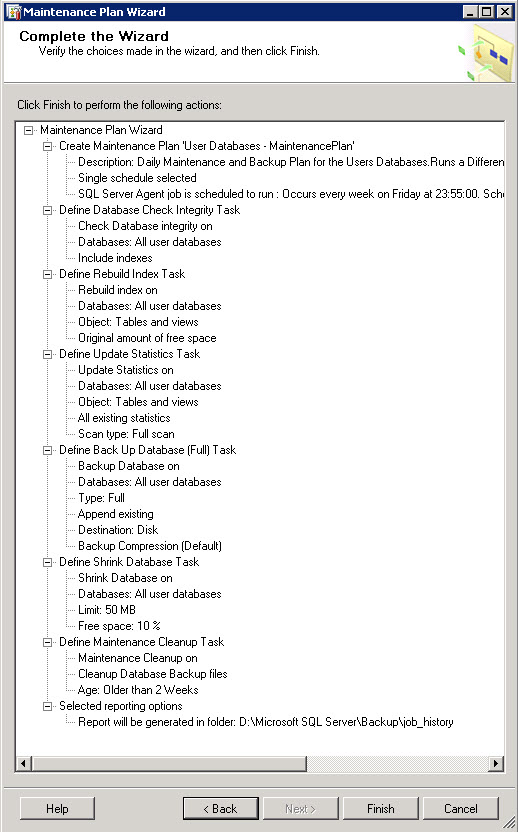
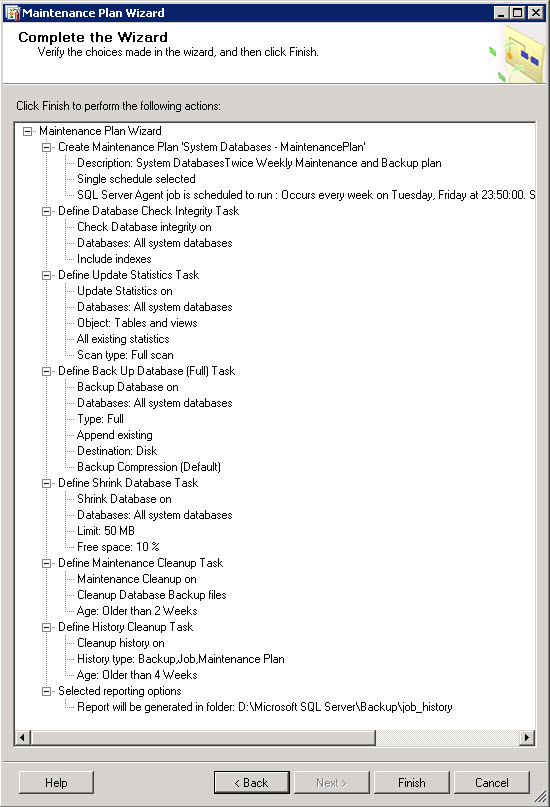
We now have a complete Maintenace Plan ready.

User Databases Maintenance Plan Wizard Complete

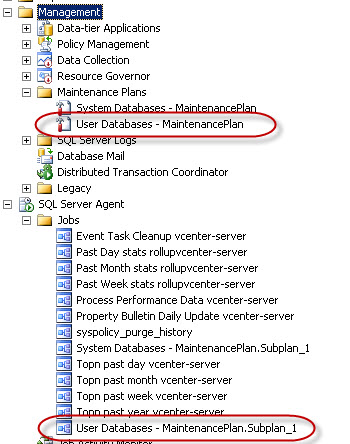
This creates the new Maintenance Plan and the SQL Agent Job.

Maintenance Plan & SQL Agent Jobs

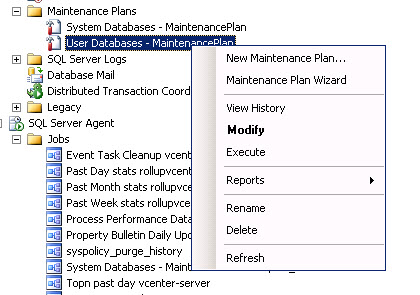
We now select to Modify the User Databases – MaintenancePlan

Modify User Databases Maintenance Plan

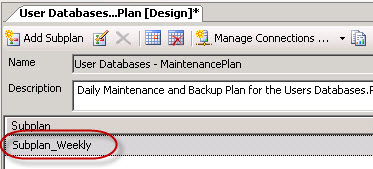
And let’s quickly rename the Subplan_1 to Subplan_Weekly in the Subplan menu.

Rename Subplan_1 to Subplan_Weekly

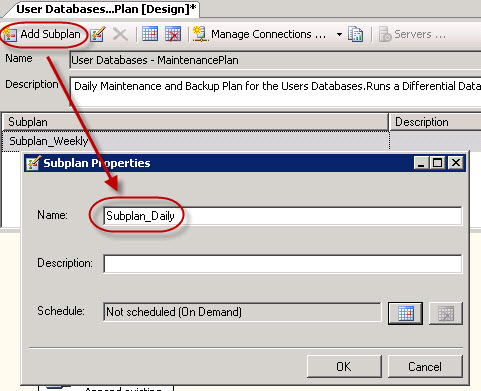
So we can now Add Subplan to this Maintenance Task

Add Subplan_Daily

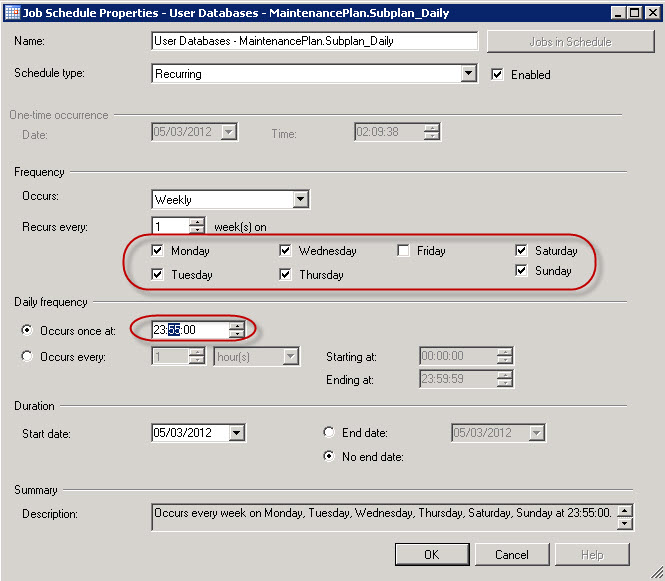
And we edit the Job Schedule to run everyday but Friday at the same time.

Job Schedule Subplan_Daily

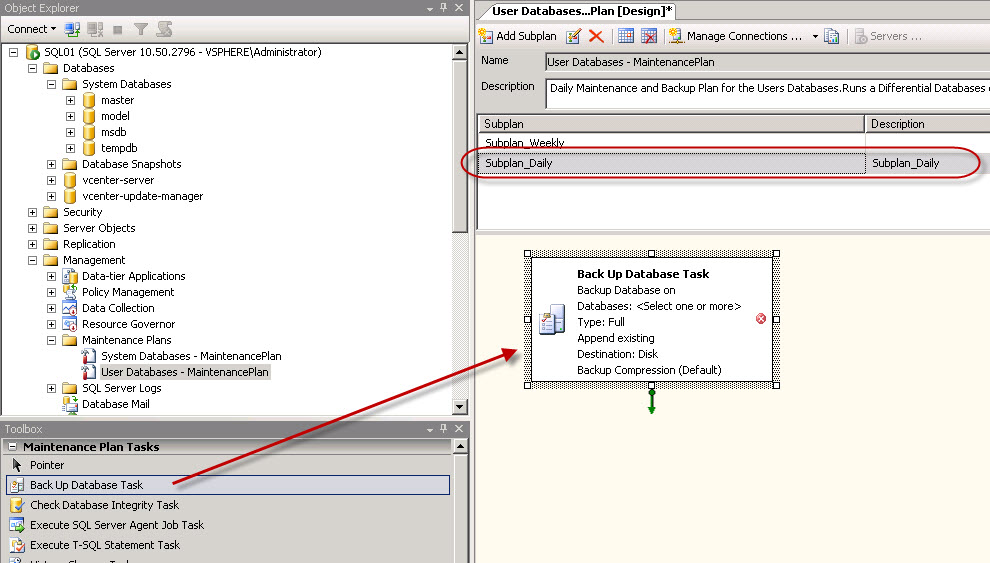
We will now drag and drop the Back Up Database Task into the Subplan_Daily

Back Up Database Task in Subplan_Daily

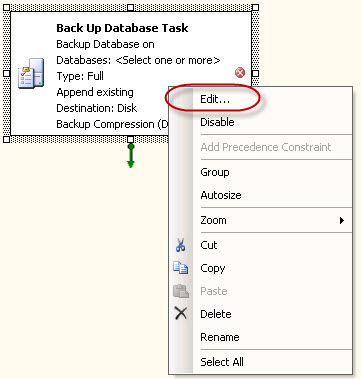
We now edit the Back Up Database Task

Edit Back Up Database Task

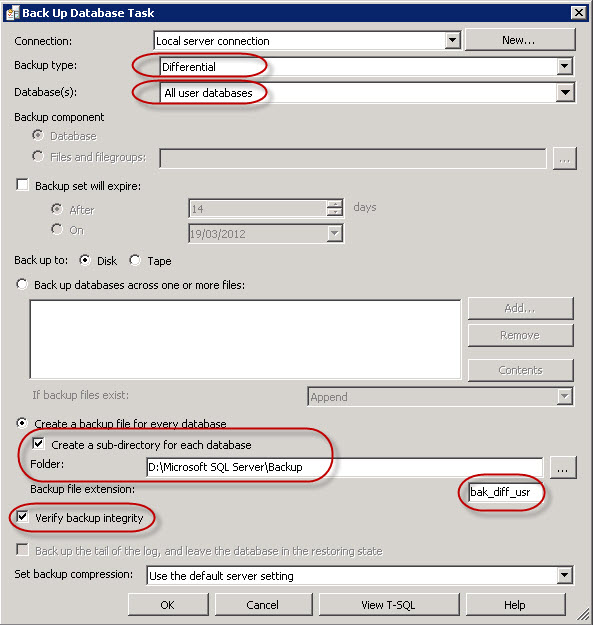
And we modify the Back Up Database Task for Differential Jobs, we also make sure the backups are written in their correct directories, that they are verified, and that the Backup File Extension is BAK_DIFF_USR.

Back Up Database Task – User Databases – Differential Job

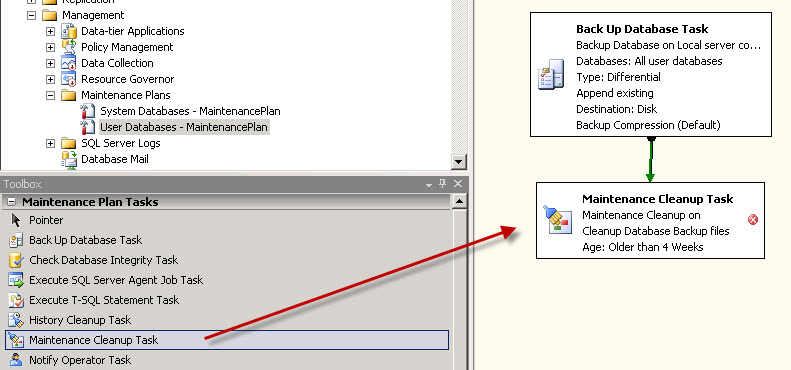
We now add the Maintenance Cleanup Task to this Subplan_Daily job and Linked it to the Back Up Database Task.

Add Maintenance Cleanup Task

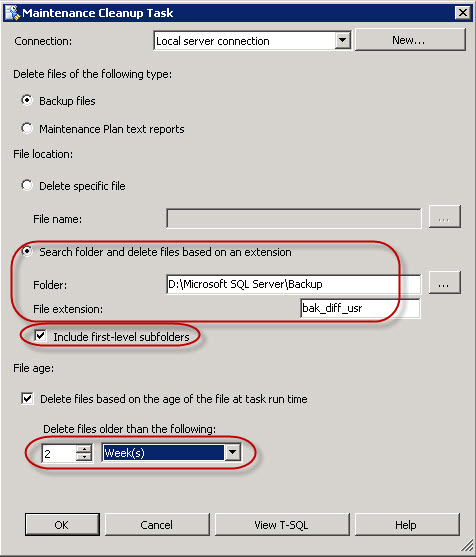
And we will edit the Maintenance Cleanup Task so that we erase the old BAK_DIFF_USR files.

Maintenance Cleanup Task 1 – Backup Files

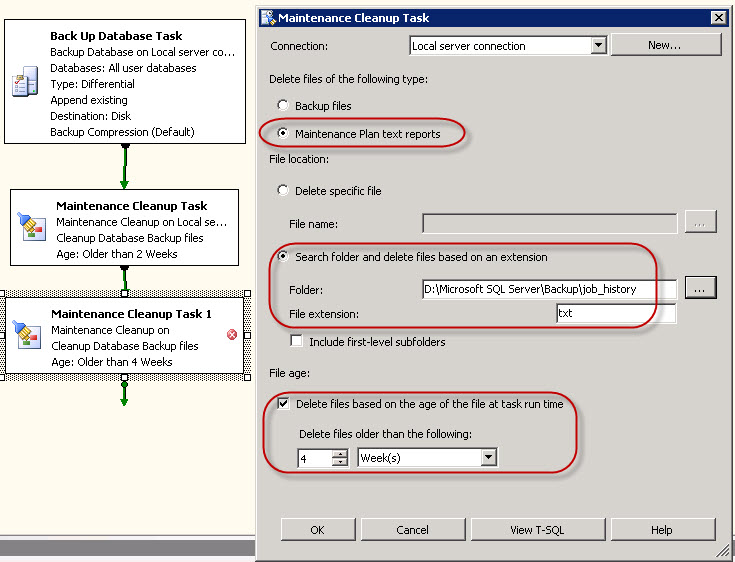
We add a 2nd Maintenance Cleanup Task to clean up the old text reports that are older than 4 weeks.

Maintenance Cleanup Task 2 – Text Reports

We are now done with the User Databases Maintenance Plan. Do NOT forget to SAVE the Maintenace Plan before quiting it.

We now have two specific SQL Server Agent Jobs.

SQL Server Agent Jobs


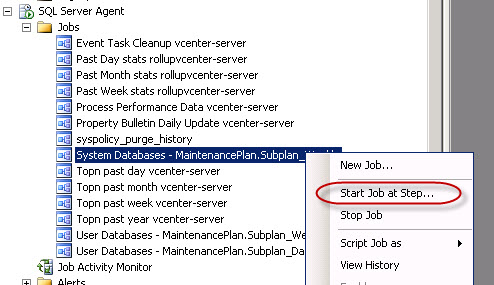
We will now run the Maintenace Plan Jobs. We start with the System Database job using Start Job at Step…

Running Maintenace Plan Jobs – System Databases

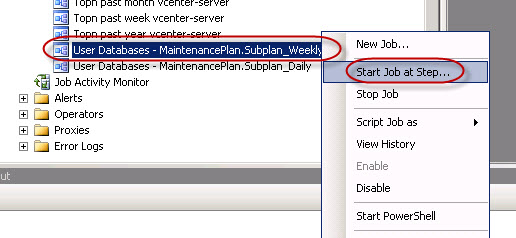
And for the User Databases we will first start the Full Back Up Task, before doing the Differential Back Up Task.

Running Maintenance Plan – User Database – Subplan_Weekly

Running Maintenance Plan – User Database – Subplan_Daily

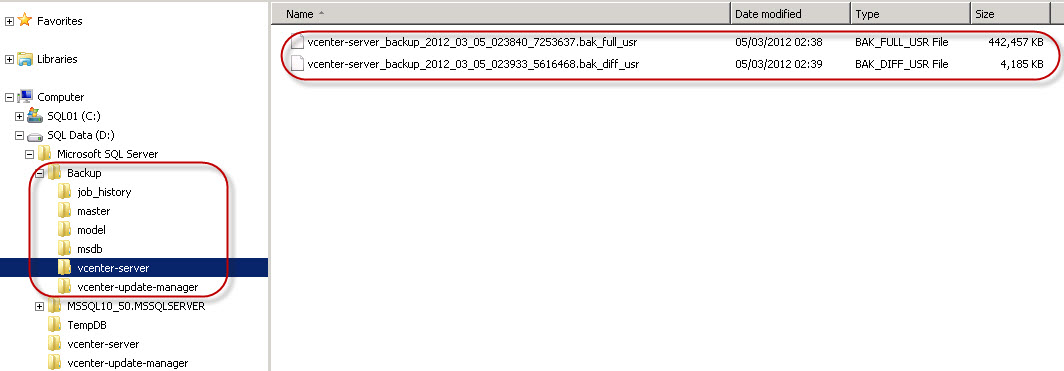
When we check the Backup folder we now have a full back of the System Databases and User Databases (Full and Differential).

vCenter Server Backup Full and Diff

There you are with a Maintenance Plan for the SQL Server 2008 R2 running your vCenter, Update Manager and vCloud Director databases.

I hope this will help you.

I have to thank once more my friend Eric Krejci as we have discussed this topic extensively a few months ago and he already wrote the same article on vCenter and SQL Backup and Maintenance on his web blog.

Windows Mobile 5.0 AKU 3.3 Improved performance

HTC TytnI’ve purchased last year a Swisscom XPA v1605 (HTC TyTN, HERMES or Qtek 9600) PocketPC Phone. It’s a PocketPC sized phone that supports GSM & UMTS communications. It came with Windows Mobile 5.0 and had a few Service provider installed applications (F-Secure Anti-Virus, TomTom Navigator 5 for Switzerland, SBB Timetable) and the Swisscom Mobile Assistant tools. While the phone looked good, I have not been too happy about the performance of the user interface. Additional programs like the SPB Pocket Plus also gave me lots trouble, and the worse, was the high quanity of missed calls.Swisscom has made available on their support pages an upgrate to Windows Mobile 5.0 AKU 3.3 (Update V2.08.170.1). After having installed the memory card software for the XPA v1605 on a brand new 2GB MicroSD, I upgraded the Swisscom XPA v1605 to the latest firmware version. I added the two excellent versions of SPB Pocket Plus and SPB Diary.

The result is a Windows Mobile 5.0 device that feels a lot more snappy at usage, faster loading, using smaller memory footprint and supports the latest Direct Push Technology from Microsoft.

Warning: A small note for SPB Backup users, the backup created on the previous version of Windows Mobile 5.0 didn’t load up properly under AKU 3.3, I had to retrieve all my original contacts from an old Outlook contact list.