With this first post, I will start a small series of blogs on how to install and configure a Microsoft Public Key Infrastructure (PKI). There are plently of other set of articles on the internet on how to setup PKI solutions on Windows Server and Linux. But I’m writing my own set of articles, also to document my own implementation and to give other people an idea how I’ve down some configs like CRL publications that I have not seen elsewhere. I’m using Powershell and command scripts to deploy the Root CA and the Issuing CA. I also use OpenSSL to create frameworks to create my certificates and document them. I orgininaly started writing this blog post over 2 years ago when I setup my PKI infrastructure on Windows Server 2012 R2, but I have now moved on to Windows Server 2016 for my infrastrucutre and its what I’m going to use for the Root CA, Issuing CA and the Web Server publishing the Certificate Revocation List.
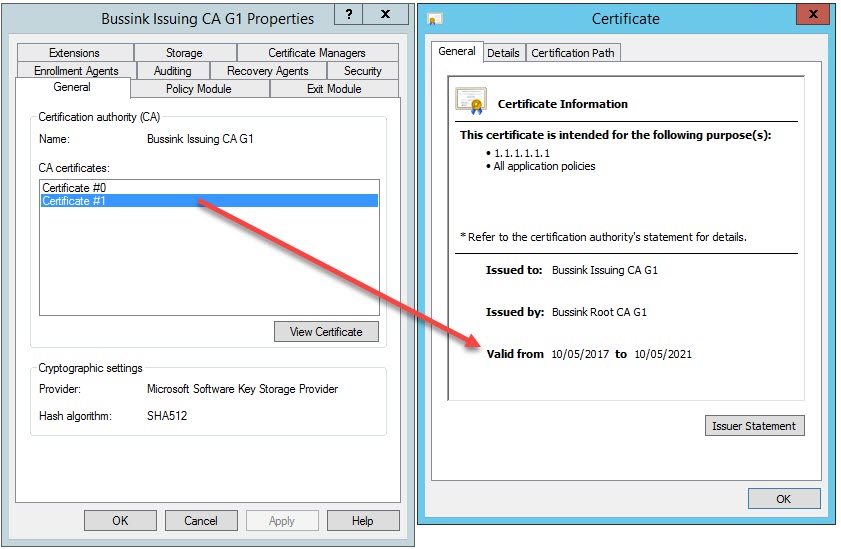
You will also note that my certificate will have much more aggressive expiration that most blogs covering this topic. My reason behind this is to make sure that I need to regularly (each 2 years) work on the PKI Infrastructure to ensure that certs, Issuing CA and Root CA are kept up to date.
Hashing Algorithm are bundled in Cryptographic Service Providers (CSP). A list of the different Microsoft Cryptographic Service Providers (CSP) can be found at Cryptographic Service Providers.
My first implementation of a PKI Infrastructure happened in 2003, when I setup a two-tier corporate infrastructure on Windows Server 2003. We started with a Root CA certificate that had a Validity period of 20 years (default used by so many other people). Yet at the half-life of the Root CA in 2013, I needed to refresh the Issuing CA and Root CA. At that point in time the hashing algorithm SHA-1 used in 2003 was being deprecated (SHA-1 Deprecation policy). While changing from a RSA 1024bit to RSA 2048bit key was easy, SHA-2 was not present in the initial Microsoft Cryptographic Service Provider that I selected in 2003. So in 2013 I had to swap for a strong Cryptographic Service Provider causing me to re-install all my PKI from scratch. Selecting the correct Cryptographic Service Provider is primordial.
I used to run two sets of PKI for the past year, one based on the “RSA#Microsoft Software Key Storage Provider” which I labed as a G1 (Generation 1 tier) and the second G2 (Generation 2 tier) based on the Ecliptic Curve Diffie-Hellman (ECDH) algorithm that has been published in the NSA Suite B cryptography. Unfortunately Ecliptic Curve algorithm while being much more secure are not available in most products using certificates. In the past 4 years, I have not been able to use ECDH/ECDSA to encrypt or sign various products. During this implementation of the Two-Tier PKI Infrastructure I will therefore stick to the “RSA#Microsoft Software Key Storage Provider” CSP.
The document Cryptographic Services by Microsoft is a great PKI 101 guide that covers the bases from primitives to secret-key encryption, public-key encryption and digital signatures.
To finish off the first article, I want to talk about Certificates Lifetimes and create the base CApolicy config file for the Root CA and Issuing CA.
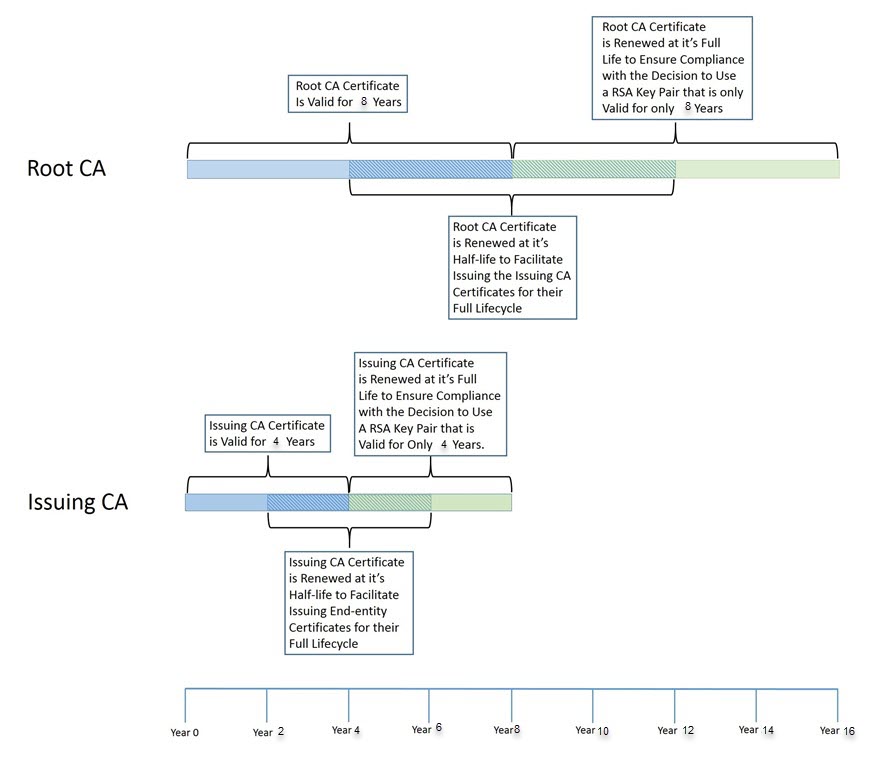
The Root Certificate Authority will have a lifetime associated, which can be renewed, but which most likely will be replaced by a new one based on 15 years experience with Public Key Infrastructure.
One of biggest Public Key Infrastructure design question, is the advantages and the disadvantages for the different key size values. The higher the key size, the more secure the certificate is from attackers, but will require more processing to use. The longer the validity period, the less certificate maintenance required (and potentially some service disruption), but the certificate is more vulnerable to being compromised.
At the Vegas 2009 Microsoft Management Summit (MMS) Chris Adams and Ben Shy from Microsoft presented a breakout session that shared their experience about how they implemented native mode and Internet-based client management in Microsoft. They shared with customers was their strategy for deciding the key size and validity period. Their numbers are based on RSA research and how long it would take an attacker to compromise a certificate. So the higher the key size, the more secure the certificate is (but remember that this comes at the cost of extra processing). Their simple matrix that they presented at MMS looked like this:
- Key length of 1024: Validity period = not greater than 6-12 months
- Key length of 2048: Validity period = not greater than 2 years
- Key length of 4096: Validity period = not greater than 16 years
If we start off the Root Certificate Authority with a Validity of 12 years, the Root CA Key Length should have a key length of 4096, use the Cryptography Next Generation (CNG) Hash Algorithm which is based on SHA-2 and use the implementation hash as SHA256 (which is SHA-2 256bits), SHA384 (SHA-2 384bits) or SHA512 (SHA-2 512bits).
On a Multi-Threaded x64 based platform, the SHA512 is actually faster than the smaller SHA256 (Reference: http://en.wikipedia.org/wiki/SHA-2 )
Here is the beginning of my Root CA & Issuing CA configurations. The CApolicy.inf file will be used during the creation of the Root CA certificate or the Issuing CA certificate.
RootCA – CApolicy.inf
[Certsrv_Server]
RenewalKeyLength=4096
CNGHashAlgorithm=SHA512
AlternateSignatureAlgorithm=0
For the Issuing CA, which has a validity period of 6 years, we should also set the Key Length to 4096.
IssuingCA – CApolicy.inf
[Certsrv_Server]
RenewalKeyLength=4096
CNGHashAlgorithm=SHA512
AlternateSignatureAlgorithm=0
The Issuing Certificate Authority which will issue server/user certificates to be used. The Issuing CA is generally configured to have the half-life of the Root Certificate Authority. Various vendors will now refuse to work with server certificate that have a longer than 2 year certificate lifetime. So you need plan your Root CA, Issuing CA lifetimes properly. Just taking the default is not good enough.
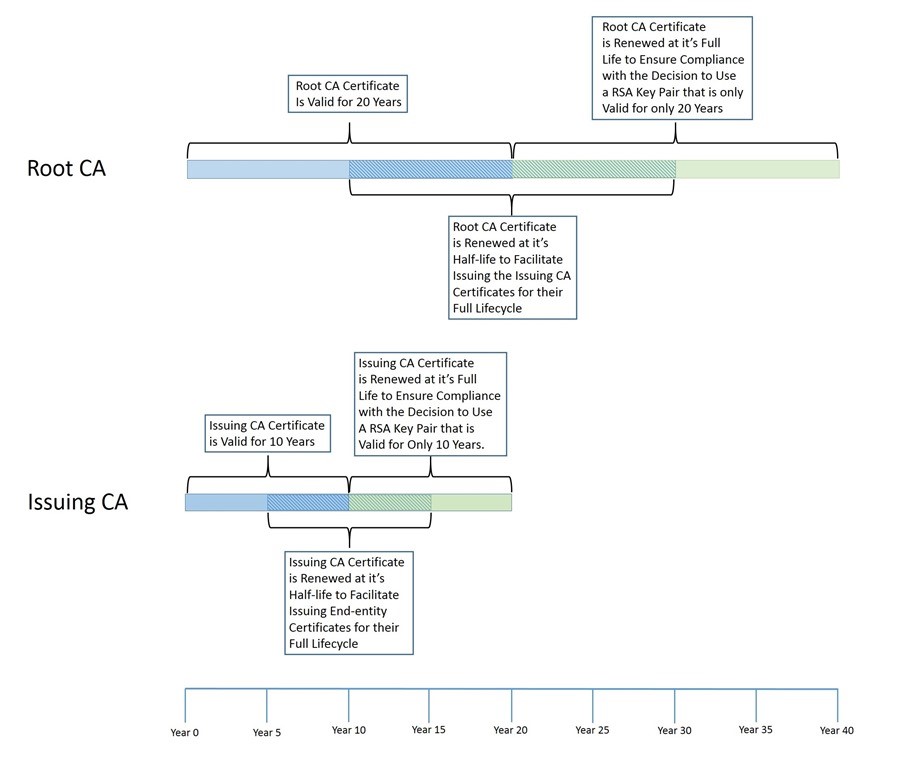
However, you also need to take into account what your CA hierarchy can support. A Certificate Authority cannot issue a certificate with a longer validity period than its own certificate. This one is easy to remember, however, there’s also a ticking time limit because a Certificate Authority cannot issue certificates with a validity period that is longer than its own remaining validity period. This is the reason why we have increased the Root CA validity period from 20 years to 21 years, so that the Issuing CA can stay at 10 years validity.
So lets expand the Root CA and Issuing CA policy.
RootCA – CApolicy.inf
[Certsrv_Server]
RenewalKeyLength=4096
RenewalValidityPeriod = Years
RenewalValidityPeriodUnits = 12
CNGHashAlgorithm=SHA512
AlternateSignatureAlgorithm=0
IssuingCA – CApolicy.inf
[Certsrv_Server]
RenewalKeyLength=4096
RenewalValidityPeriod = Years
RenewalValidityPeriodUnits = 6
CNGHashAlgorithm=SHA512
AlternateSignatureAlgorithm=0
AlternateSignatureAlgorithm = 0
While the Microsoft Press 2008 PKI documentation refers to the DiscreteSignatureAlgorithm, it should really be the AlternateSignatureAlgorithm. With the support of Cryptography Next Generation (CNG) and the new Suite B signature and encryption algorithms, it is necessary to include information about algorithms in both certificate and certificate requests. If this information is not included, an entity processing the certificate or certificate request may not be able to verify the signature of the object.
The AlternateSignatureAlgorithm option, when assigned a value of 1, enables support for the PKCS#1 V2.1 signature format for both the CA certificate and CA certificate requests. If implemented on a Root CA the Root CA will generate a root certificate that includes the PKCS#1 V2.1 signature format. If implanted on a subordinate CA, the subordinate CA will generate a certificate request that includes the PKCS#1 V2.1 signature format.
Warning: A side effect of using the AlternateSignatureAlgorithm=1 option, means that the PKCS#1 V2.1 signature is changed from SHA384RSA to a RSASSA-PSS. This newer Signature algorithm is not recognized by all certificate implementation. It has been found out that some Citrix implementations break in this config.
There are still plenty of other options that we can insert in the CApolicy.inf configuration, but I will not cover them right now. You will see the end result CApolicy.inf in the corresponding blog entries.