I’ve been looking for a while for a new more powerful homelab (for home), that scales and passes the limits I currently have. I had a great success last year with the Supermicro X9SRL-F motherboard for the Home NAS (Running NexentaStor 3.1.5), so I know I loved the Supermicro X9 Single LGA2011 series. Because of the Intel C600 series of chipset, you can break the barrier of the 32GB you find on most motherboards (Otherwise the X79 chipset allows you upto 64GB).
As time passes, and you see product solutions coming out (vCOPS, Horizon View, vCAC, DeepSecurity, ProtectV, Veeam VBR, Zerto) with memory requirements just exploding. You need more and more memory. I’m done with the homelab, where you really need to upgrade just because you can’t upgrade the top limit of the memory. So bye bye the current cluster of four Shuttle XH61v with 16GB.
With the Supermicro X9SRH-7TF (link) you can go to 128GB easy (8x16GB) for now. It’s really just a $$$ choice. 256GB (8x32GB) is still out of reach for now, but that might change in 2 years.
I have attempted to install PernixData FVP 1.5 on my Homelab 2013 Shuttle XH61v, but the combo of the motherboard/AHCI/Realtek R8168 makes for an unstable ESXi 5.5. Sometimes the PernixData FVP Management Server sees the SSD on my host, then it looses it. I did work with PernixData engineers (and Satyam Vaghani), but my homelab is just not stable. Having been invited to the PernixPro program, doesn’t give me the right to use hours and hours of PernixData engineers time to solve my homelab issues. This has made the choice for my two X9SRH-7TF boxes much easier.
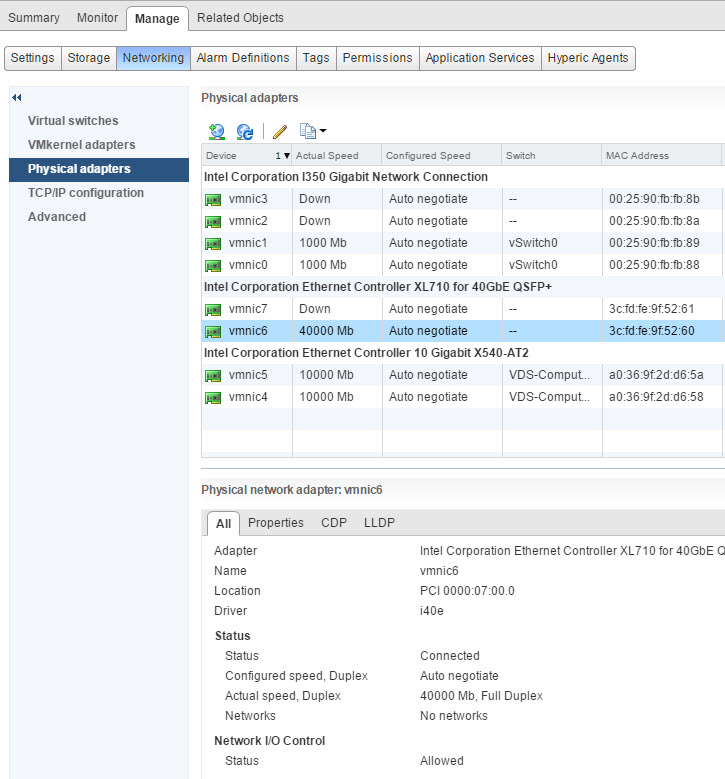
The Motherboard choice of the Supermicro X9SRH-7TF (link) is great because of the integrated management, the F in the X9SRH-7TF. Its a must these day. Having the Dual X540 Intel 10GbE Network Card on the motherboard will allow me to start using the network with a dual gigabit link, and when I have the budget for a Netgear XS708E or XS712T it will scale to dual 10Gbase-T. In the meantime I can also have a single point-to-point 10GbE link between the two X9SRH-7TF boxes for vMotion and the PernixData data synchronization. The third component that comes on the X9SRH-7TF is the integrated LSI Storage SAS HBA, the LSI 2308 SAS2 HBA. This will allow me to build a great VSAN cluster, once I go from two to three serverss at a later date. Its very important to ensure you have a good storage adapter for VSAN. I have been using the LSI adapters for a few years and I trust them. Purchasing a motherboard, then adding the Dual X540 10GbE NIC and a LSI HBA would have cost a lot more than the X9SRH-7TF.
For the CPU, Frank Denneman (@FrankDenneman) and me came to the same conclusion, the Intel Xeon E5-1650 v2 is the perfect choice between number of cores, cache and speed. Here is an another description of the Intel Xeon E5-1650 v2 launch (CPUworld).
For the Case, I have gone just like Frank Denneman’s vSphere 5.5 home lab choice with the Fractal Design Define R4 (Black). I used a Fractal Design Arc Midi R2 for my Home NAS last summer, and I really liked the case’s flexibility, the interior design, the two SSD slots below the motherboard. I removed the default two Fractal Design Silent R2 12cm cooling fans in the case and replaced with two Noctua NH-A14 FLX fans that are even quieter, and are connected using rubber holders so they vibrate even less. It’s all about having a quiet system. The Home NAS is in the guest room, and people sleep next to it without noticing it. Also the Define R4 case is just short of 47cm in height, meaning you can lie it down in a 19″ rack if there is such a need/opportunity.
For the CPU Cooler, I ordered two Noctua NH-U12DX i4 coolers which support the Narrow ILM socket. Its a bit bigger than the NH-U9DX i4 that Frank ordered, so we will be able to compare. I burned myself last year with the Narrow ILM socket. I puchased a water cooling solution for the Home NAS and it just couldn’t fit it on the Narrow ILM socket. That was before I found out the difference between a normal square LGA2011 socket and the Narrow ILM sockets used on some of the Supermicro boards. Here is a great article that explains the differences Narrow ILM vs Square ILM LGA 2011 Heatsink Differences (ServeTheHome.com)
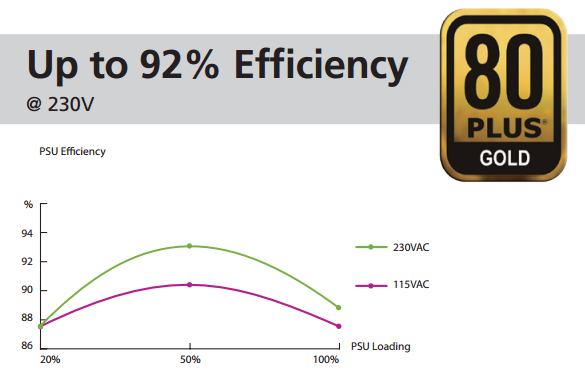
For the Power supply, I invested last year in an Enermax Platimax 750W for the Home NAS. This time the selection is the Enermax Revolution X’t 530W power supply. This is a very efficient 80 Gold Plus PSU. which supports ATX 12V v2.4 (can drop to 0.5W on standby) and uses the same modular connectors of my other power supplies. These smaller 500W power supplies are very efficient when they run at 20% to 50% charge. This should also be a very quiet PSU.
I made some quick calculations yesterday for the Power Consumption, I expect the max power that can be consumed by this new X9SRH-7TF build should be around 180-200W, but it should be running around the 100-120W on a normal basis. At normal usage, I should hit the 20% of the power supply load, so my Efficiency of the PSU should be at around 87%, a bit lower than Frank’s choice of the Corsair RM550. This is the reason why I attempt to take a smaller PSU rather than some of the large 800W or even 1000W PSU.
For the Memory, I’m going to reuse what I purchased last year for my Home NAS. So each box will receive 4x16GB Kingston 1600Mhz ECC for now.
My current SSDs that I will use in this rig are the Intel SSD S3700 100GB enterprise SSD and some Samsung 840 Pro 512GB. What is crucial for me in the the Intel S3700 is that its Endurance design is 10 drive writes per day for 5 years. For the 100GB, it means that its designed to write 1TB each day. This is very important for solutions like PernixData or VSAN. Just to compare, the latest Intel Enthusiast SSD, the SSD 730 240GB that I purchased for my wife’s computer, its endurance design is set to 50GB per day for 5 years (70GB for the 480GB model). The Intel SSD 730 just like it’s Enterprise cousins (S3500 and S3700) come with a Enhanced power-loss data protection using power capacitors. The second crucial design in an Enterprise SSD, is its Sustained IOPs rating.
I’m also adding a Intel Ethernet Server Adapter I350-T2 Network Card for the vSphere Console management. I’m used to have a dedicated Console Management vNIC on my ESXi hosts. These will be configured in the old but trusty vSwitch Standard.
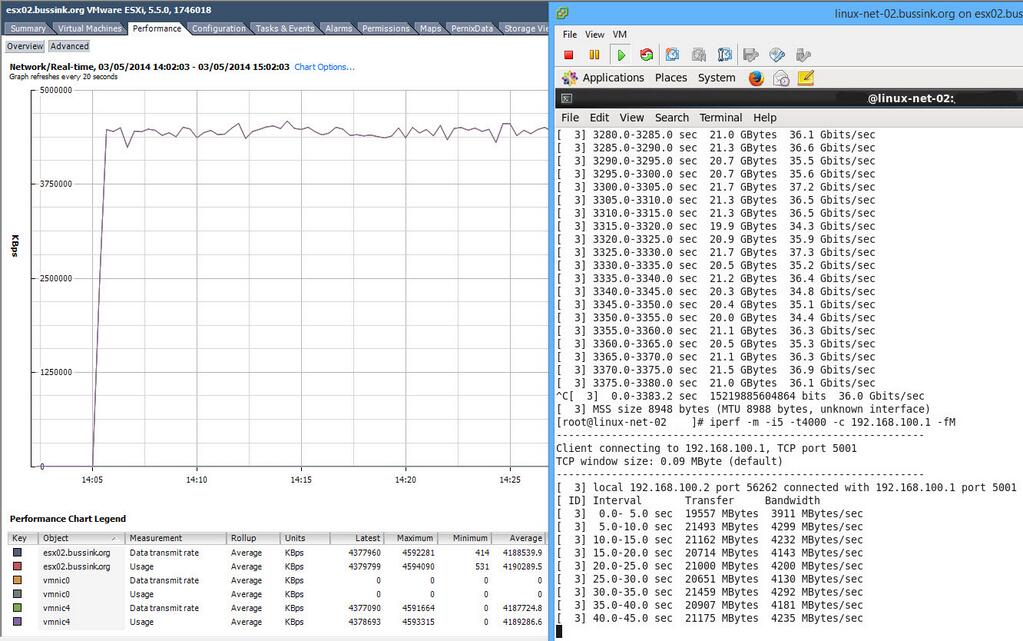
Another piece of equipment that I already own and that I will plug on the new X9SRH-7TF are the Mellanox ConnectX-3 Dual FDR 56Gb/s InfiniBand Adapters I purchased last year. This will allow me to test and play with a point-to-point 56Gb/s link between the two ESXi hosts. Some interesting possibilities here… I currently don’t have a QDR or FDR InfiniBand switch, and these switches are also very noisy, so that is something I will look at in Q3 this year.
I live in Switzerland, so my pricing will be a bit more expensive than what you find in other European countries. I’m purchasing my equipment with a large distribor in switzerland, Brack.ch . Even if the Supermicro X9SRH-7TF is not on their pricing list, they are able to order them for me. The price I got for the X9SRH-7TF is at 670 Swiss Francs, and the Intel E5-1650v2 at 630 Swiss Francs. As you see the Cost of one of these server is closing in the 1800-1900 Euro price range. I realize it’s Not Cheap. And it’s the reason of my previous article on the increase costs for a dedicated homelab, the Homelab shift…
Last but not least, in my Homelab 2013 I focus a lot on the Wife Acceptance Factor (WAF). I aimed for Small, Quiet, Efficence. This time, the only part that I will not be able to keep, is the Small. This design is still a Quiet and Efficient configuration. Lets hope I won’t get into too much problems with the wife.
I also need to thank Frank Denneman (@FrankDenneman) as we discussed extensively this home lab topic over the past 10 days, fine tuning the design on some of the choice going into this design. My prior design for the homelab 2014 might have gone with the Supermicro A1SAM-2750F without his input. A nifty little motherboard with Quad Gigabit, 64GB memory support, but lacking on the CPU performance. Thanks Frank.