Network core switch Cisco Nexus 3064PQ

Here is my new network core switch for the Home Datacenter, a Cisco Nexus 3064PQ-10GE.

Cisco Nexus 3064PQ-10GE (48x SFP+ & 4x QSFP+)

Cisco Nexus 3064PQ-10GE (48x SFP+ & 4x QSFP+)

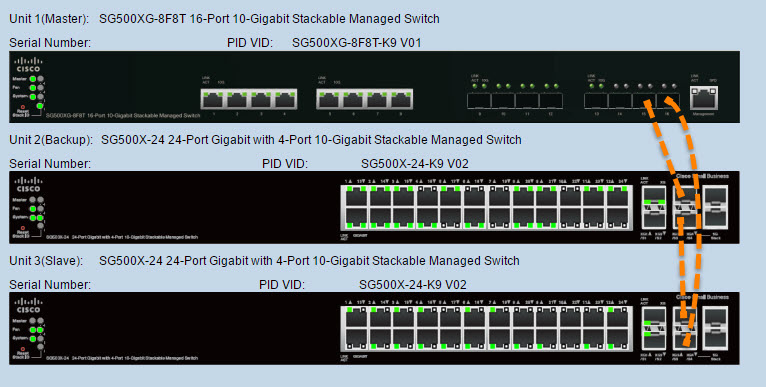
But before I speak more about the Cisco Nexus 3064PQ-10GE, let me just bring you back in time… Two years ago, I purchased a Cisco SG500XG-8F8T 16-port 10-Gigabit Stackable Managed Switch. This was first described in my Homelab 2014 build. This was my most expensive networking investment I ever did. During the past two years, as the lab grew, I used the SG500XG and two SG500X-24 for my networking stack. This stack is still running on the 1.4.0.88 firmware.

sg500xg_stack

During these past two years, I have learned the hard way that network chipsets for 10GbE using RJ-45 cabling was outputting so much more heat than the SFP+ chipset. My initial Virtual SAN Hybrid implementation using a cluster of three ESXi host with Supermicro X9SRH-7TF (Network chipset is Intel X540-AT2) crashed more than once, when the network chipset became so hot that I lost my 10G connectivity, but the ESXi host kept on running. Only a powerdown & cool off of the motherboard, would allow my host to restart with the 10G connectivity. This also lead me to expand the VSAN Hybrid cluster from three to four hosts and to have a closer look at the heating issues when running 10G over RJ45.

Small business network switches with 10GBase-T connectivity are more expensive than the more enterprise oriented SFP+ switch, but they also output so much more heat (Measured in BTU/hr). Sure once the 10GBase-T switch is purchased, the cost of Category 6A cables is cheaper than getting the Passive Copper cables, who are limited to 7 meters.

The Cisco SG500XG-8F8T is a great switch as it allows me to connect using both RJ-45 and SFP+ cables.

As the lab expanded, I started to ensure that my new hosts have either no 10GBase-T adapters on the motherboard, or use the SFP+ adapter (Like my recent X10SDV-4C-7TP4F ESXi host). I have started using the Intel X710 Dual SFP+ adapters on some of my host. I like this Intel network adapter, as the network chipset gives out less heat than previous generations chipset, and has a firmware update function that can done from the command prompt inside of vSphere 6.0.

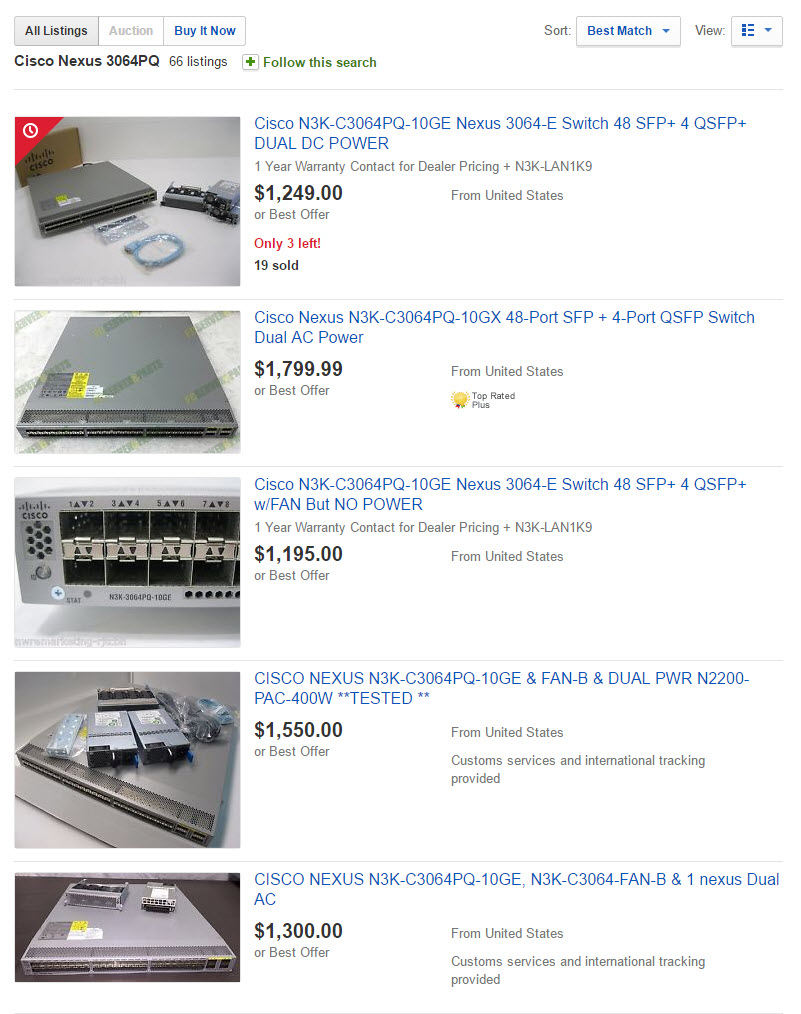
This brings me to the fact that I was starting to run out of SFP+ ports as the labs expands. I have found on ebay some older Cisco Nexus switch, and the one that caught my eye for it’s amount of ports, it price and it’s capabilities is the Cisco Nexus 3064PQ-10GE. These babies are going for about $1200-$1500 on ebay now.

3064pq_on_ebay

The switch comes with 48-ports SFP+ and 4-ports in QSFP+ format. These four ports can be configured in either 16x10G using fan-out cables or 4x40G. This is a software command that can be put on the switch to change from one mode to the other.

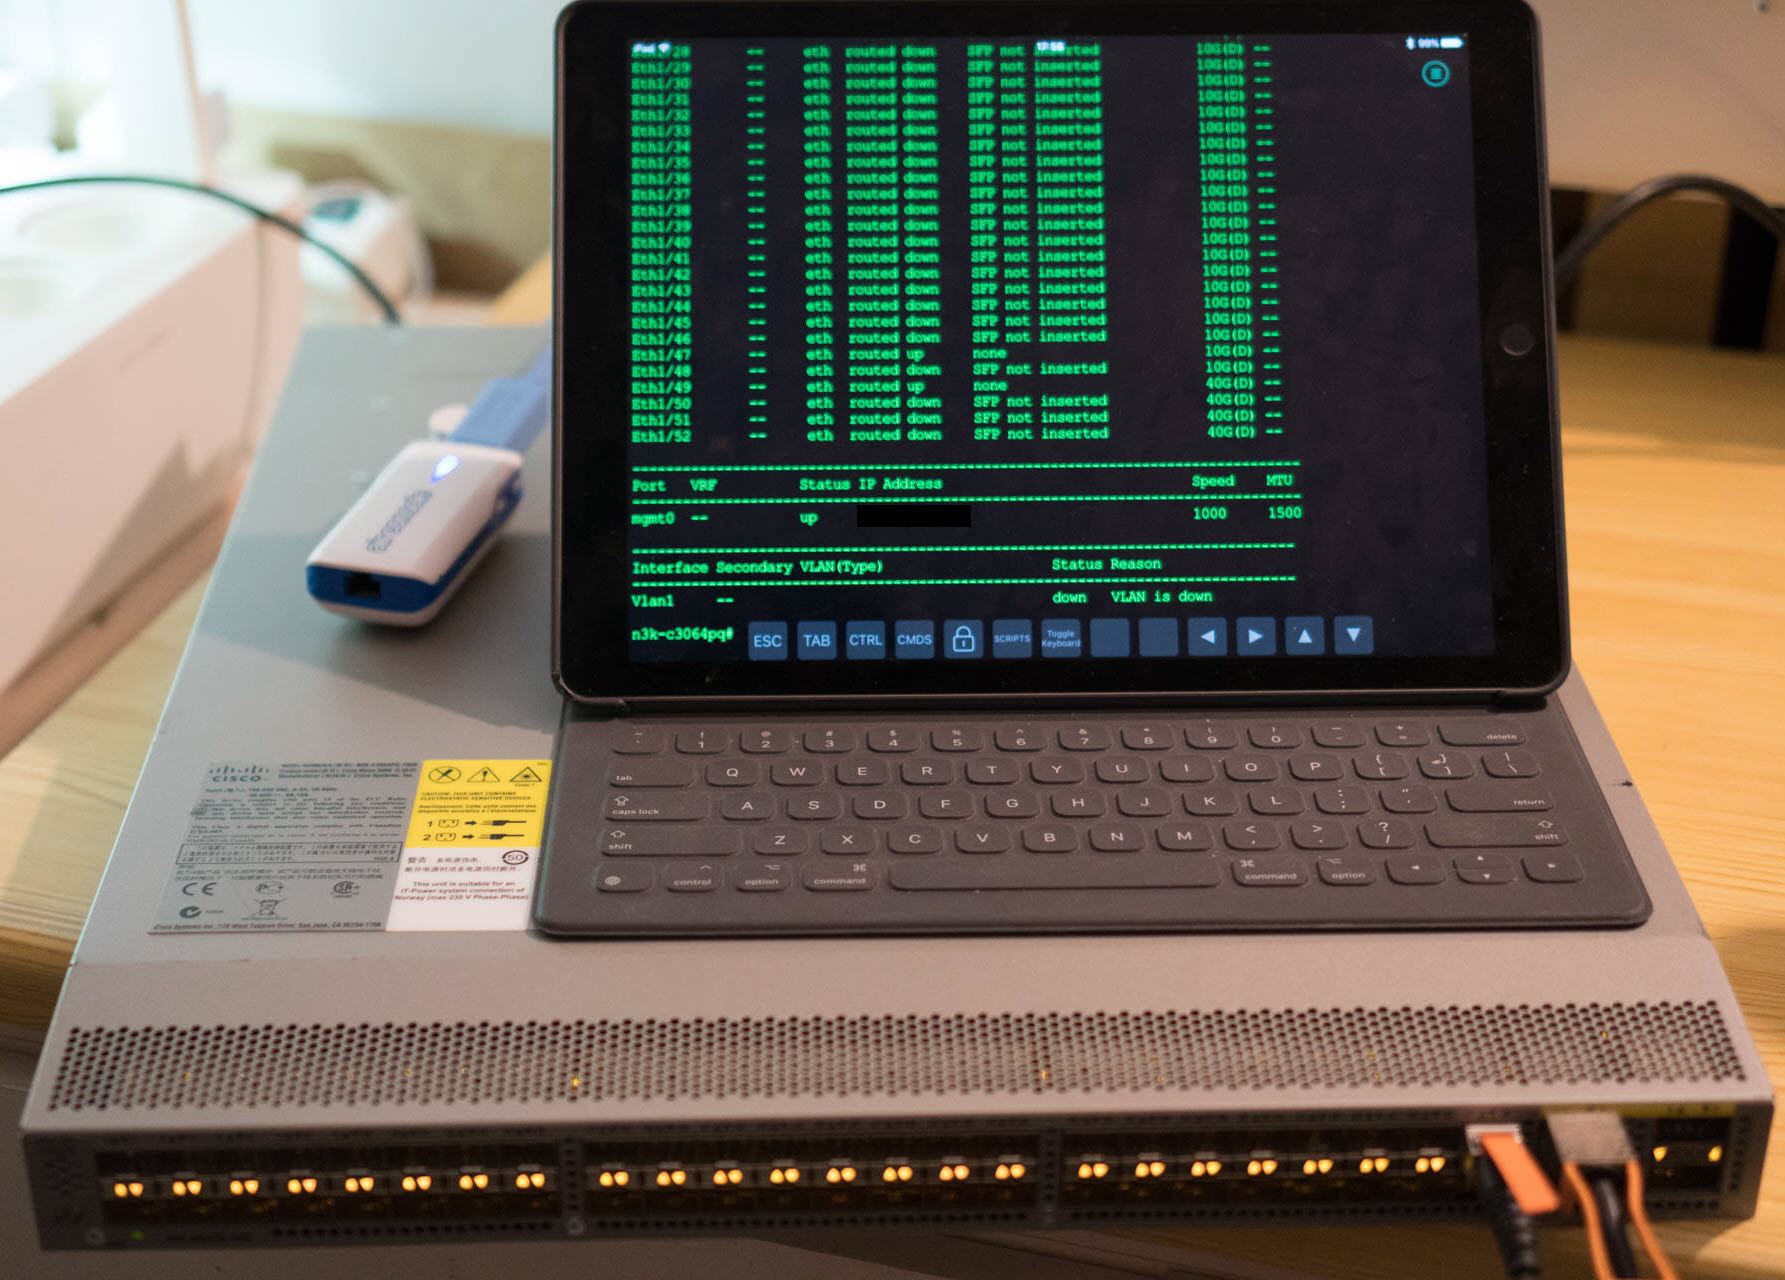
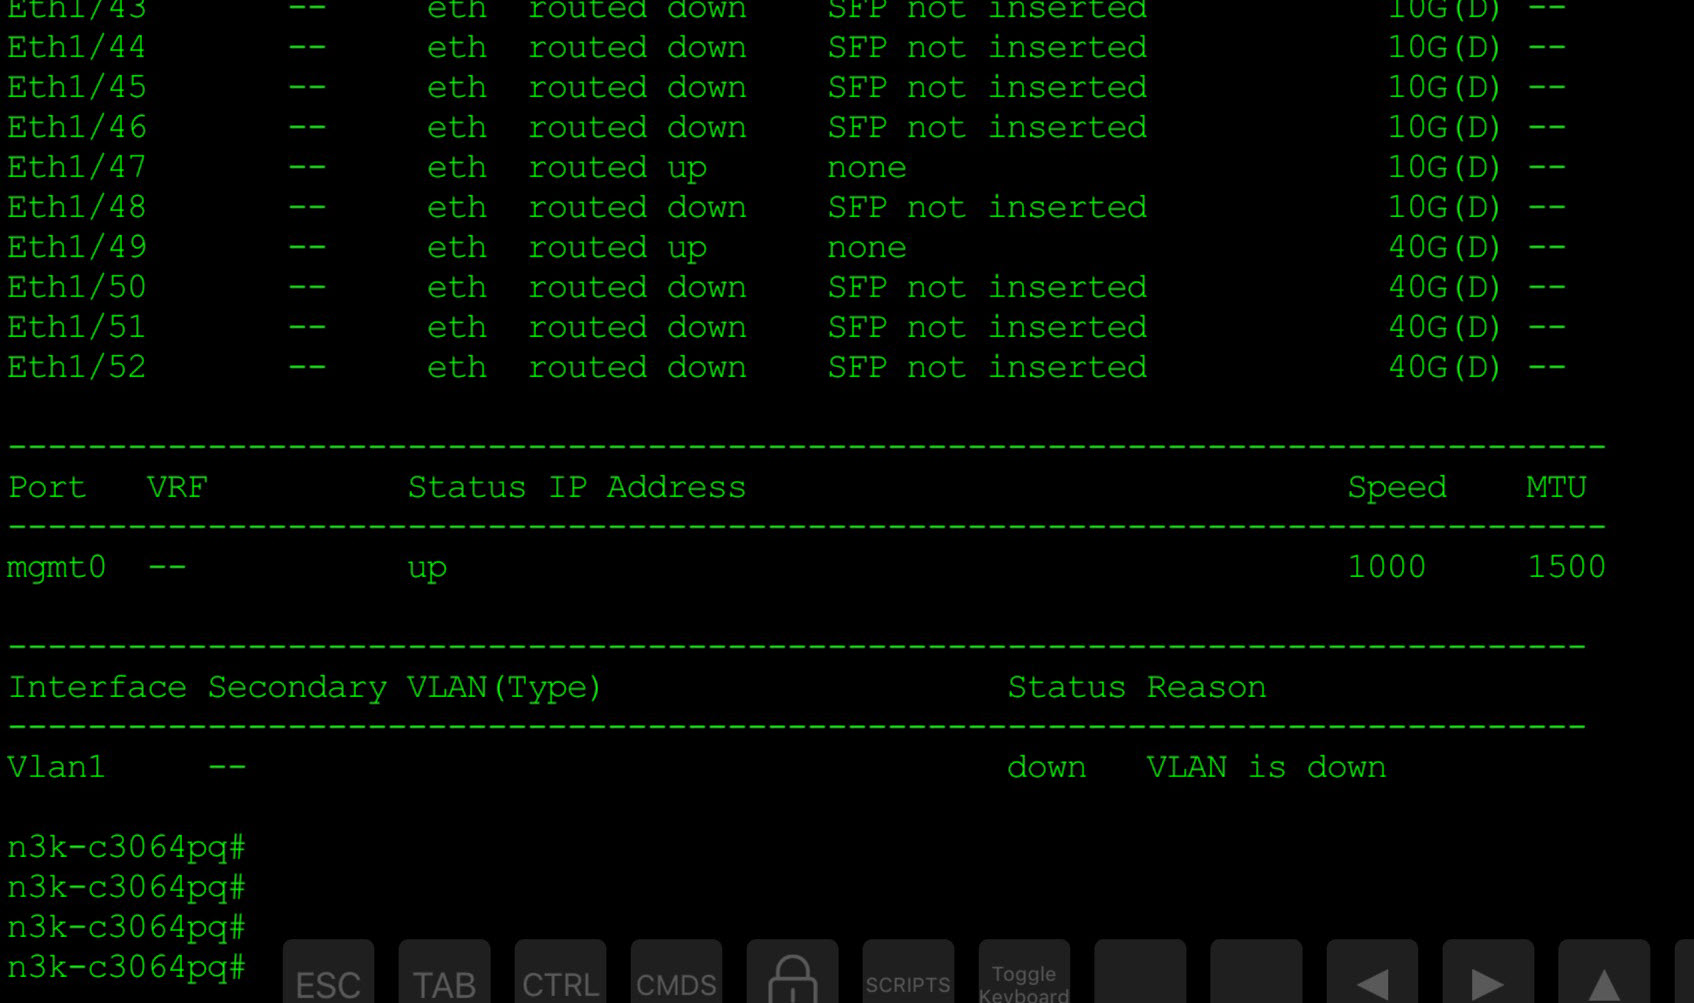
Here is my switch with the interface output. I’m using a Get-Console Airconsole to extend the console port to my iPad over Bluetooth.

nexus_3064pq_10g_40g-1

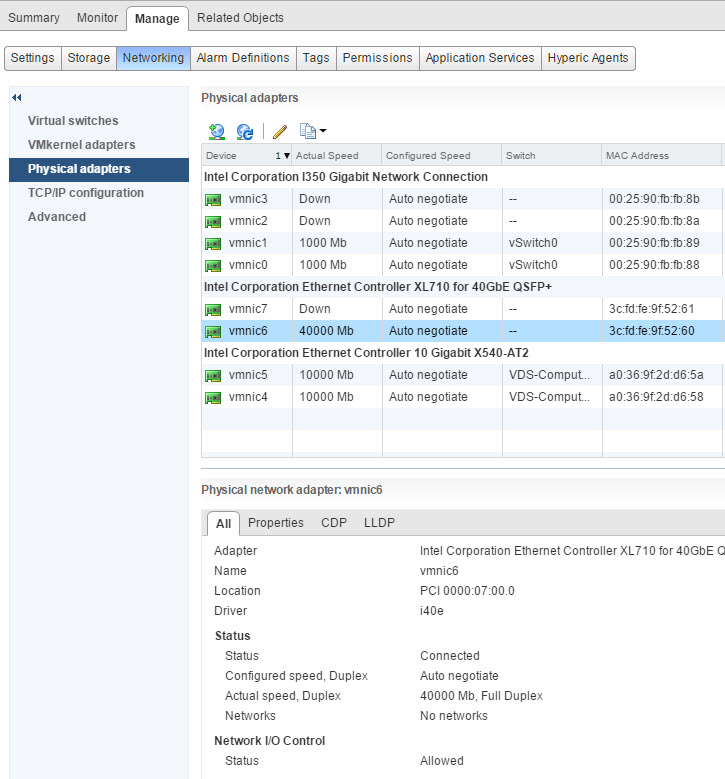
My vSphere 6.0 host is now connected to the switch using an Intel XL710-QDA2 40GbE network adapter and a QSFP+ copper cable.

esxi_40G

I’m going to use the four QSFP+ connectors on the Cisco Nexus 3064PQ-10GE to connect my Compute cluster with NSX and VSAN All-Flash.

3064_10g_40g_show_int


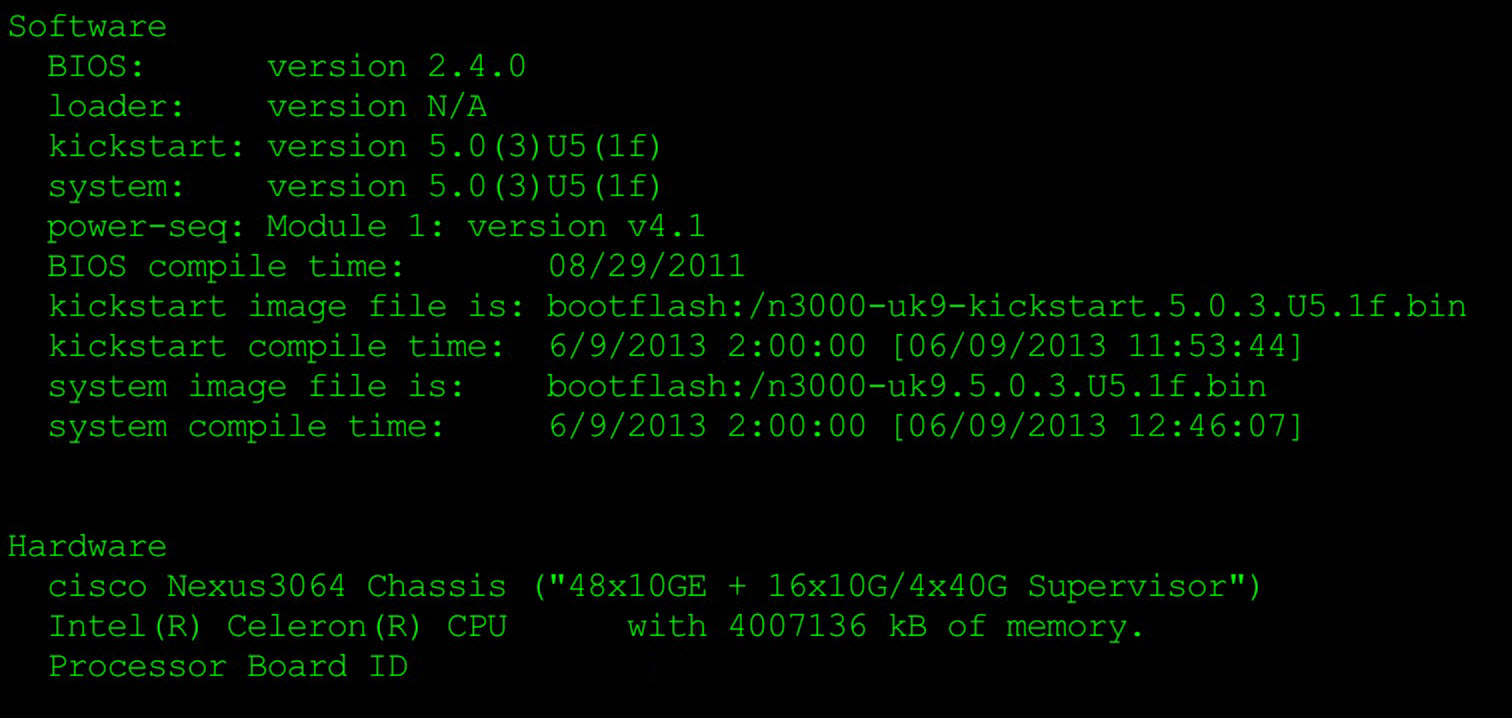
The switch came with NX-OS 5.0(3)U5(1f).

3068_nx-os


Concerning the heat output of the Cisco Nexus 3064PQ-10GE (datasheet) I was pleasantly surprised to note that it’s output is rather small at 488 BTU/hr when all 48 SFP+ are used. I also noted that the noise level of the fans was linked to the fan speed and the charge of the switch. Going from 59 dBA at 40% duty cycle to 66 dBA at 60% duty cycle to 71 dBA when at 100% duty cycle.

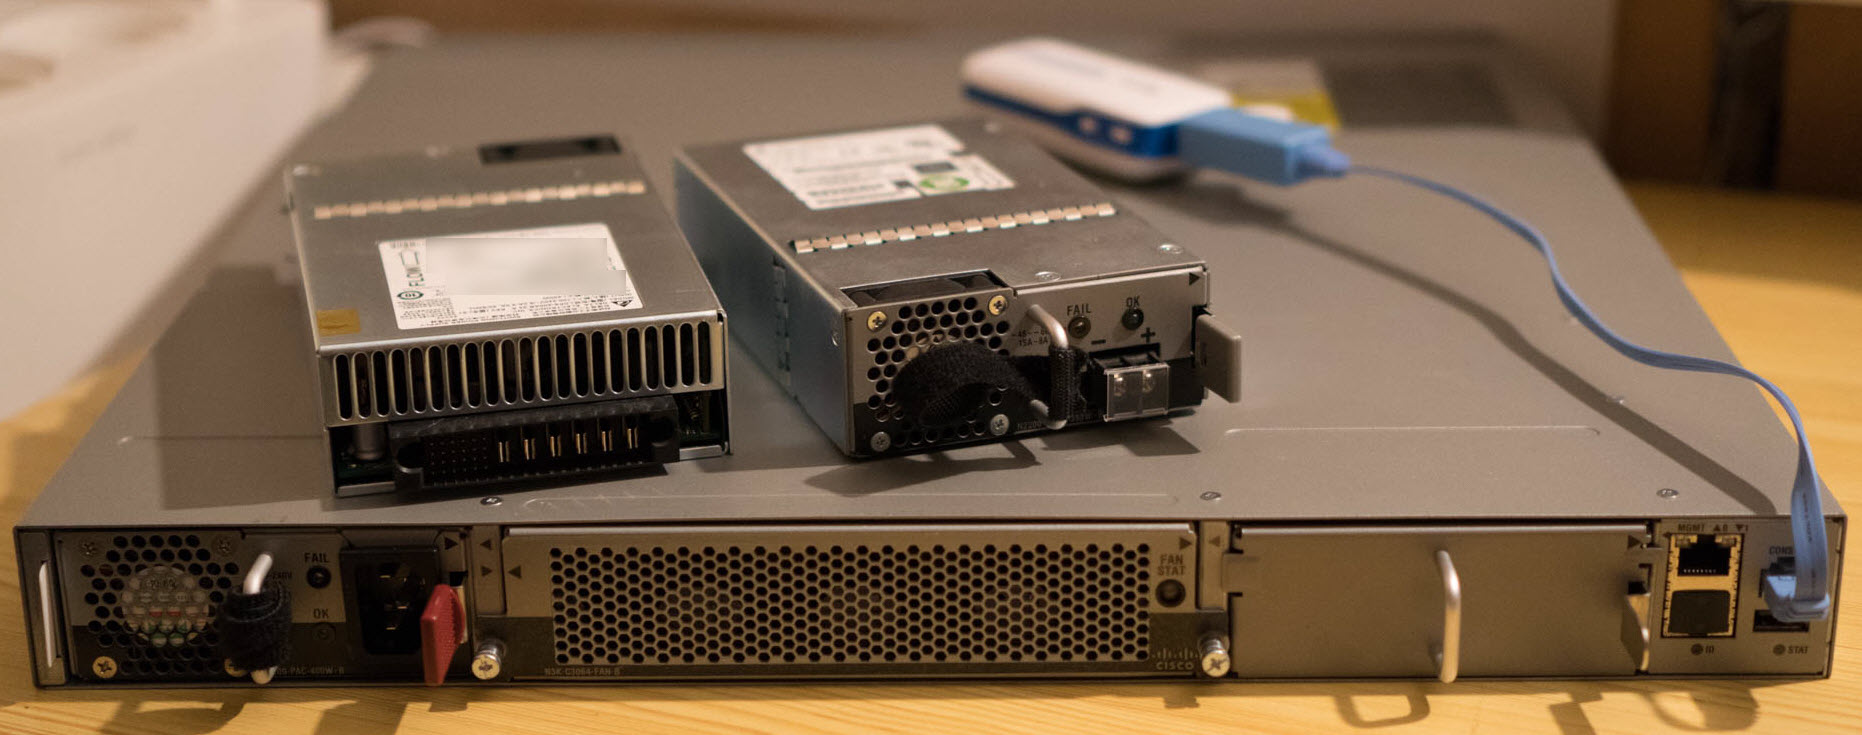
Here is the back of the Cisco Nexus 3064PQ-10GE. I did purchase the switch with a DC power (top of switch to the right), because the switch I wanted had both the LAN_BASE_SERVICES and the LAN_ENTERPRISE_SERVICES license. I sourced two N2200-PAC-400W-B power supply from another place.

nexus_3064pq_back-1

Link to the Cisco Nexus 3064PQ Architecture.


Using virtual synology in a scale out distributed storage architecture

I’ve recently finished upgrading the Home Datacenter (#HomeDC) to vSphere 6.0 with four hosts running VSAN 6.0 with dual 10GbE networking for each host.
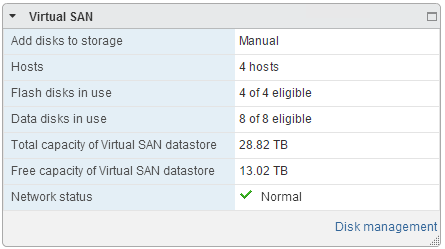
vsan

Even running a few large virtual machines on the VSAN Datastore like VDP 6.0 with a 4TB backed disk, I found myself with a lot of spare storage. I’ve invested in the SAS disks (Seagate Enterprise Capacity 4TB SAS 7200rpm) backing the VSAN datastore, so the budget is gone for replacing the aging Synology DS1010+.

I’ve recently studied various reviews on the Synology DS2015xs, but found the CPU a bit lacking to drive the dual 10GbE SFP+ links, and the Synology DS3615xs is a bit expensive. So why not leverage the 10GbE NICs in my management cluster for ultra fast connections, the fast CPUs on my hosts are a nice addition too. The biggest advantage is “cheap” 10GbE file server connections.

The rest of the blog is going in a grey zone… it’s #unsupported

Let me show you the goods first.
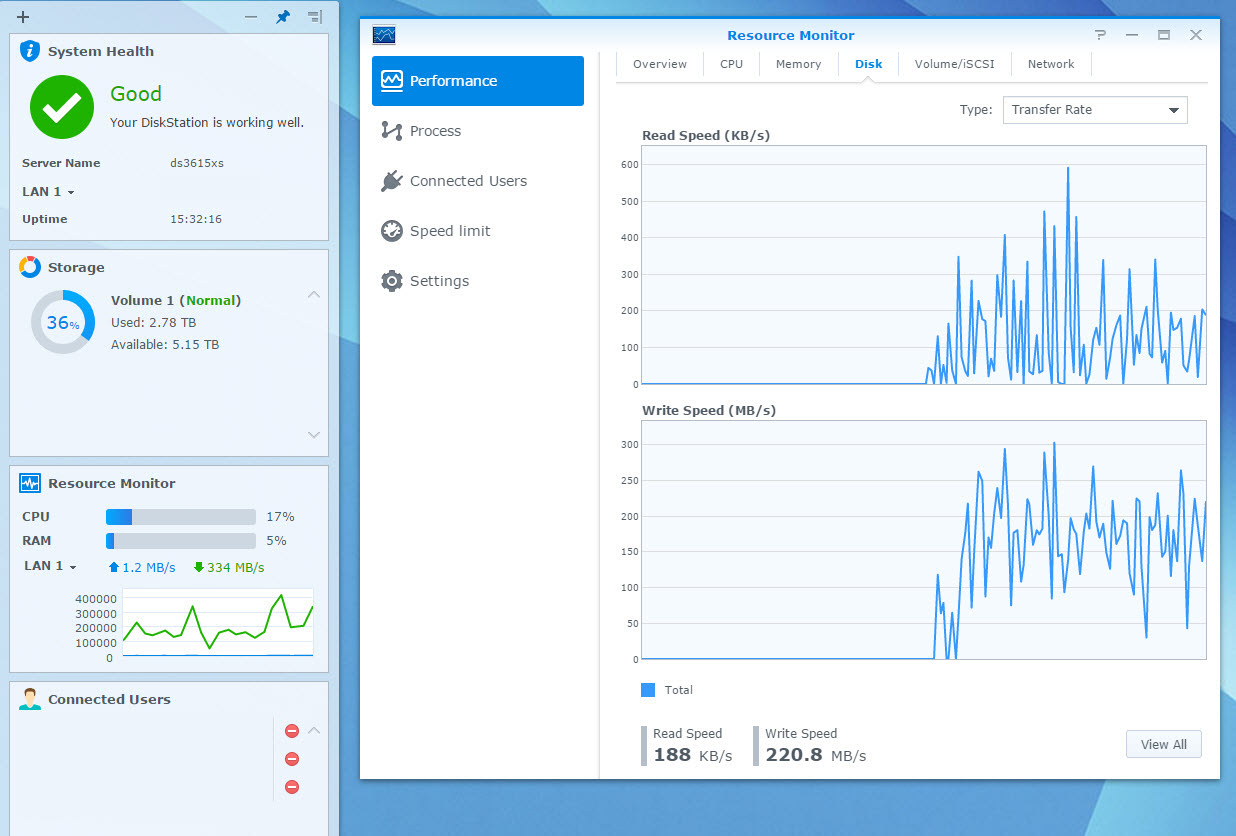
virtual Synology DS3615xs running on VSAN datastore

The concept is to create a storage appliance, that leverages the VSAN datastore and its accelerations of read/writes, and provides a flexible structure, where you could increase the storage on an as needed basis, or create a temporary storage while migrating from one Synology to a newer one. All this running on a vSphere host. A concept that a lot of other companies are doing with their Virtual Storage Appliances.

I’m going to use the XPEnology operating system, which is based on the Synology DiskStation Manager (DSM).

  • In my design and implementation that I will describe here, the virtual synology has a 8TB disk. The appliance is not doing any RAID functions on this disk, as its already protected on the VSAN datastore using a number of failures to tolerate of 1 policy (FTT=1).
  • Another way would be to create two or four virtual disks with a number of failures to tolerate of 0, and do a Software RAID in the appliance.
  • A third way could be to use four physical disks and two SSDs on a host, create RDM links, and present all these disks to the virtual Synology appliance and do Software RAID on the disks, and use the SSD for caching (SSDcache). This virtual storage appliance would not be able to move to another host using vMotion, but you could mitigate this restriction using Synology High-Availability.

To build the virtual synology you will need to retrieve the latest copy of the XPEnology DS3615xs files. You are looking for XPEnoboot_DS3615xs_5.1-5022.3.vmdk or a more recent version. Each version can have its own deployment process. The process I have described below is using the XPEnoboot_DS3615xs_5.1-5022.3.vmdk version.

There is also a huge forum with lots of contributions and interesting links at the XPEnology forums.

1) Creating the vSynology

Now I’m going to say upfront, that you will need to upload the XPEnoboot_DS3615xs_5.1-5022.3.vmdk twice in the virtual storage appliance. Once for the initial install, which will format all disks of the appliance (including the boot vmdk), then again to boot the appliance.

We start by creating a new Virtual Machine.
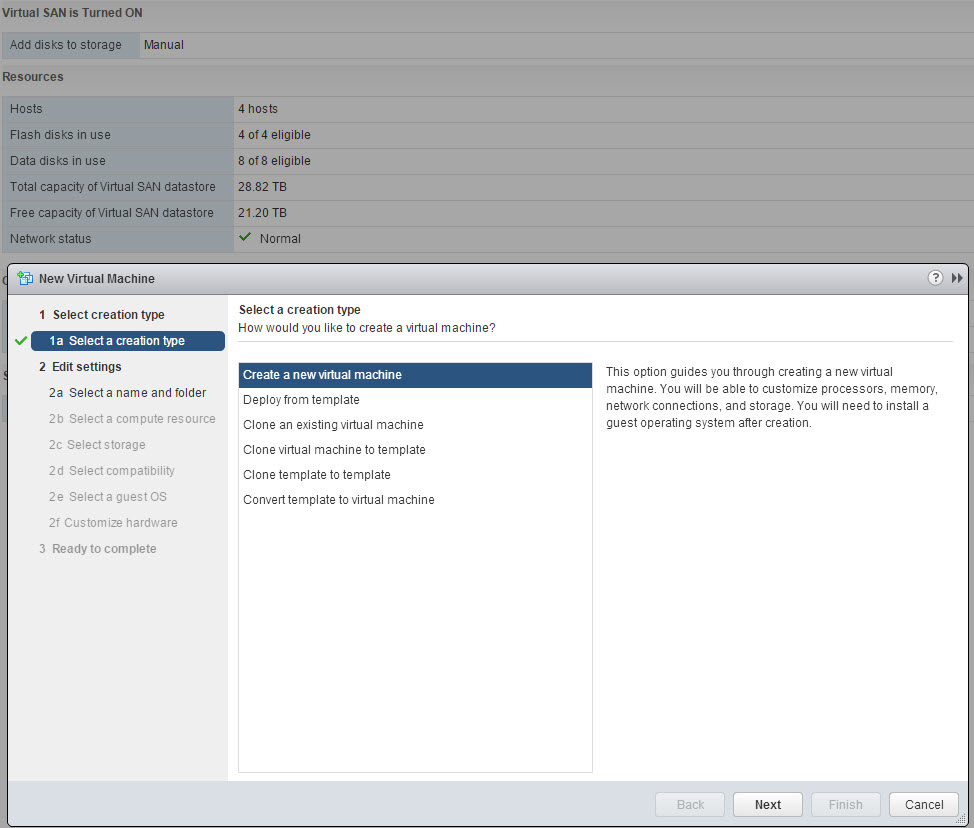
01 - Create new VM

We give it a name and place it in a Cluster.
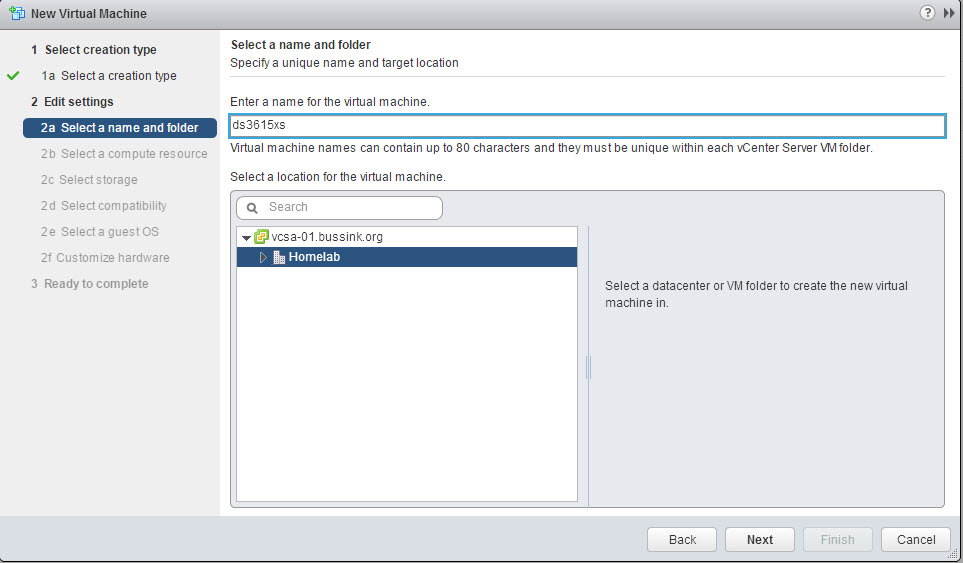
02 - Name VM

And we store the virtual machine and its configuration files on an existing datastore. I have select my vsanDatastore.
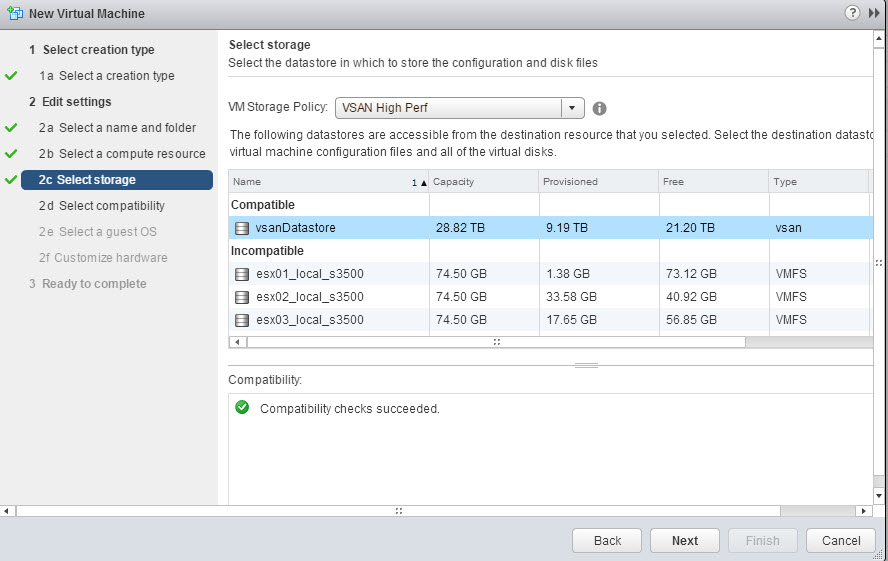
04 - Select VSAN Datastore

We define the hardware compatibility of the virtual machine and select the Guess OS. We are going to use the Linux Other 3.x Linux (64-bit).
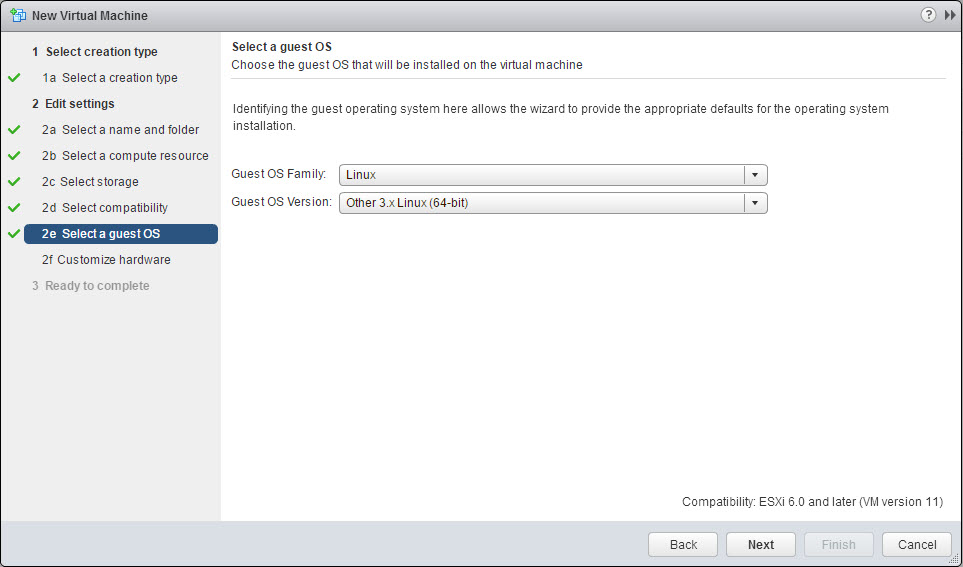
06 - Select Guess OS Linux 3.2I have selected two CPU and 8GB of memory. Because my appliance won’t do any software RAID, 2 vCPU is more than enough.
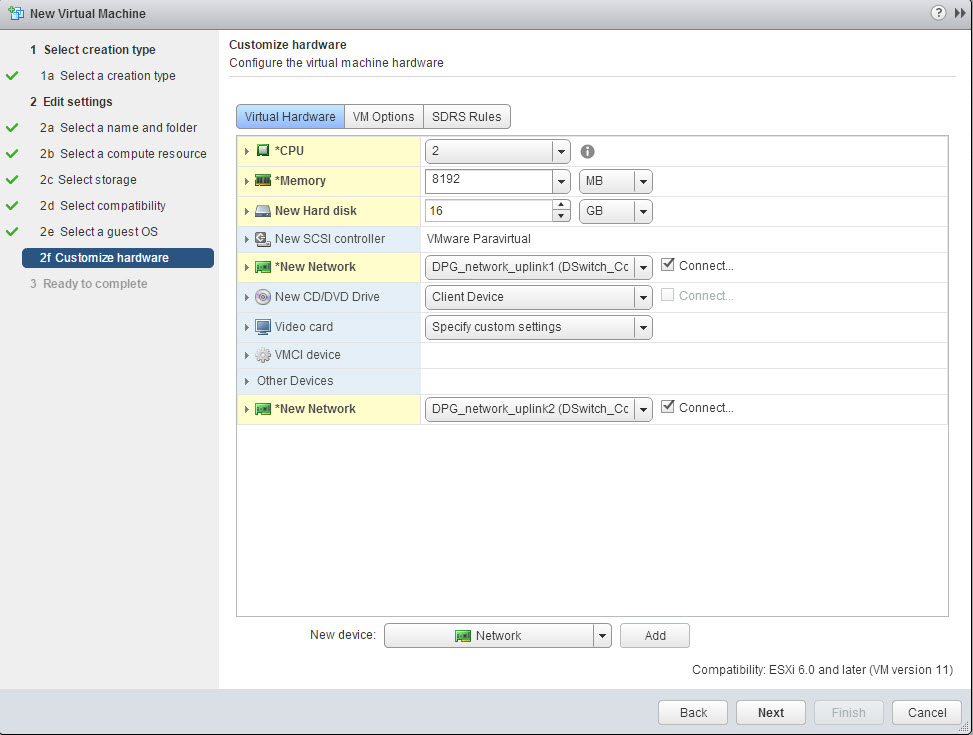
07 - Base Hardware

I have added a second VMXNET3 network interface, which I put on a dedicated 10GbE Distributed Port Group. So eth0 goes out using uplink1 and eth1 goes out using uplink2. You see these changes in the summary of the appliance below.
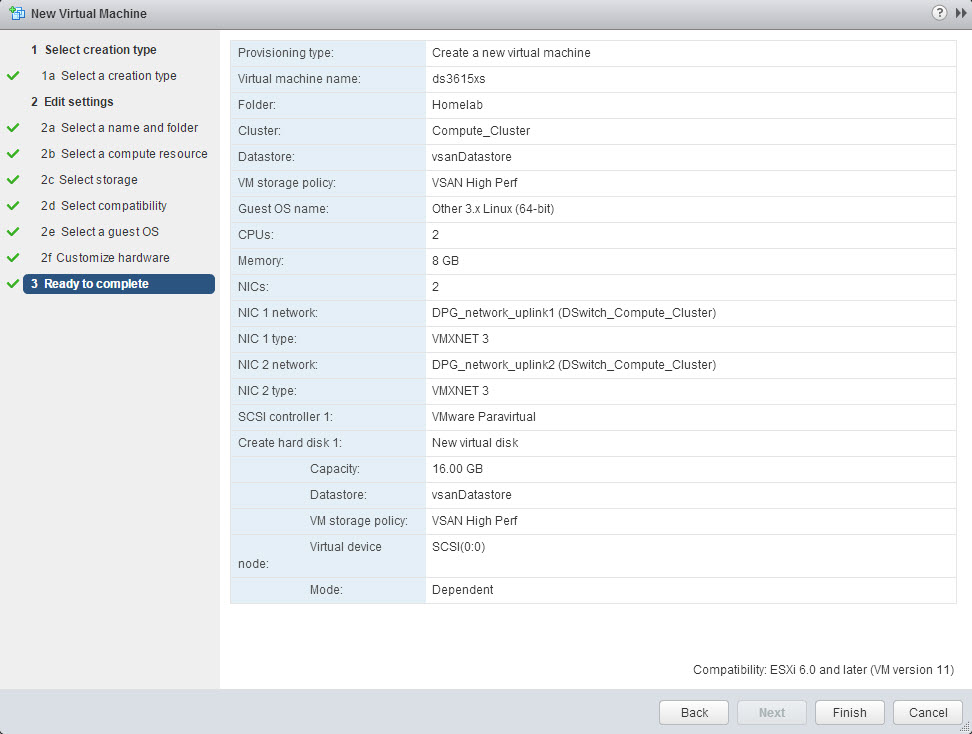
08 - ds3615xs Hardware Summary2) Changing the Boot disk

We can now go back into the appliance and edit it. We remove the boot disk, and erase it from the disk. (Yeah missing screenshot of this step).

We then use the datastore browser to upload for the first time the XPEnoboot_DS3615xs_5-1-5022.3.vmdk in the appliance folder.
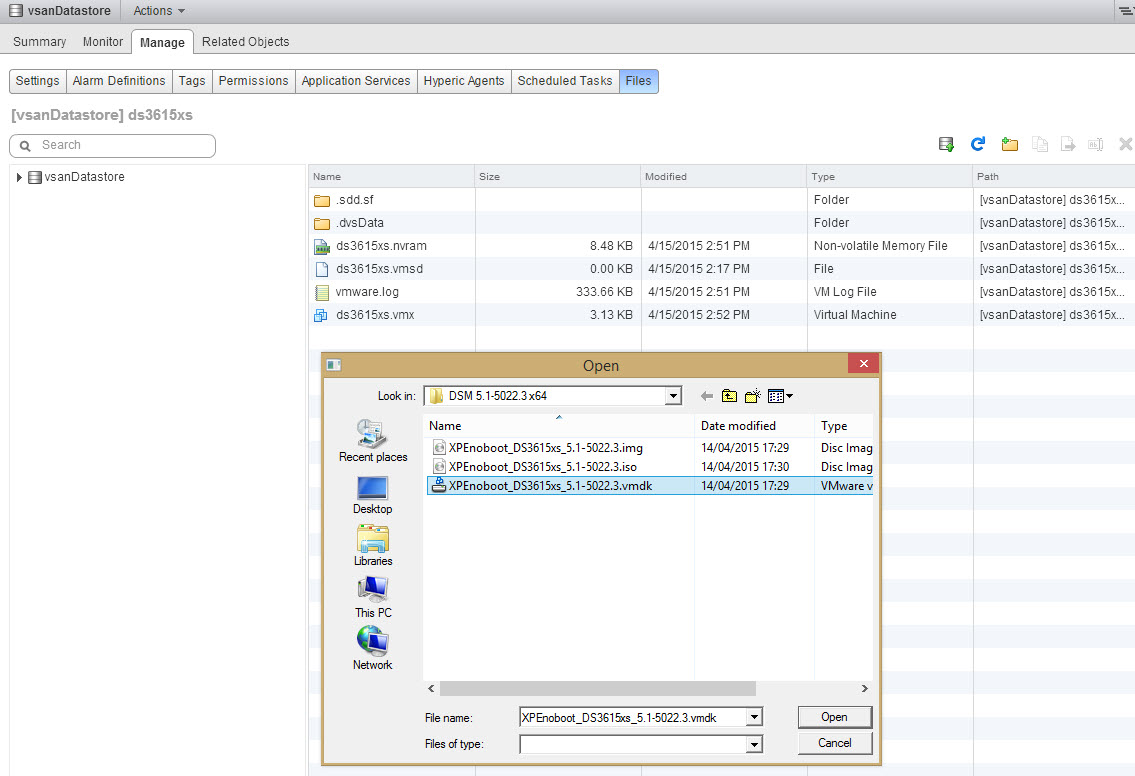
09 - Upload XPE vmdk on vsanDatastore

And we add this existing virtual disk to the appliance
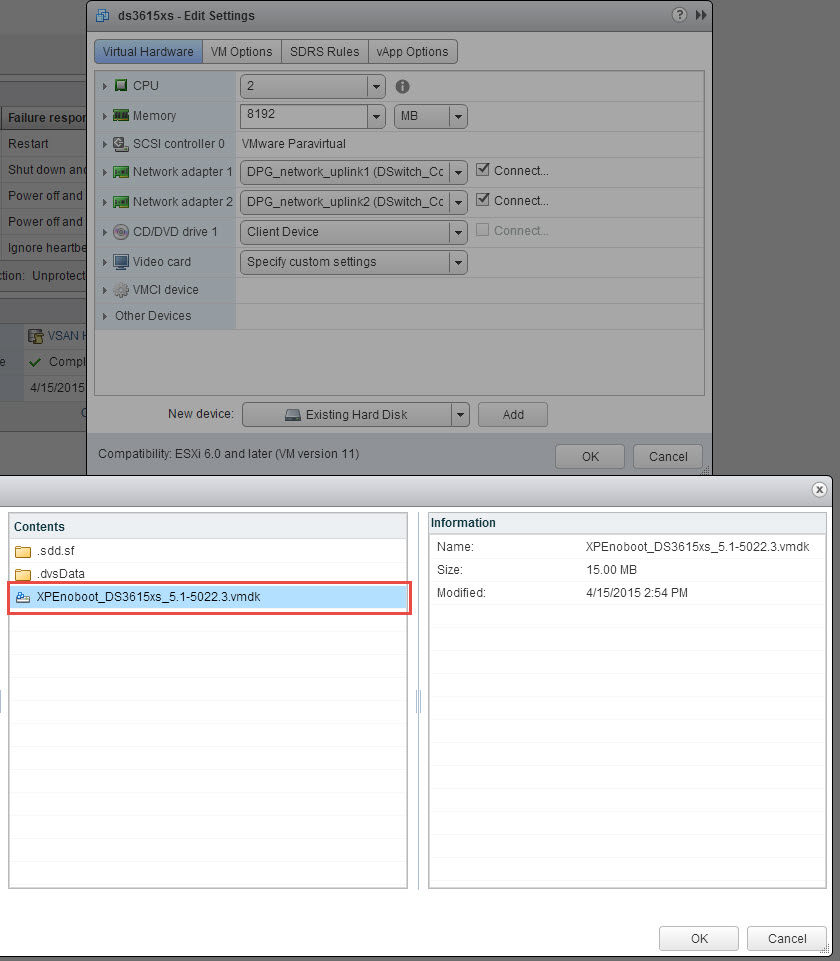
10a - Select the XPE vmdk

The new boot disk is attached as an IDE disk on port IDE(0:0)
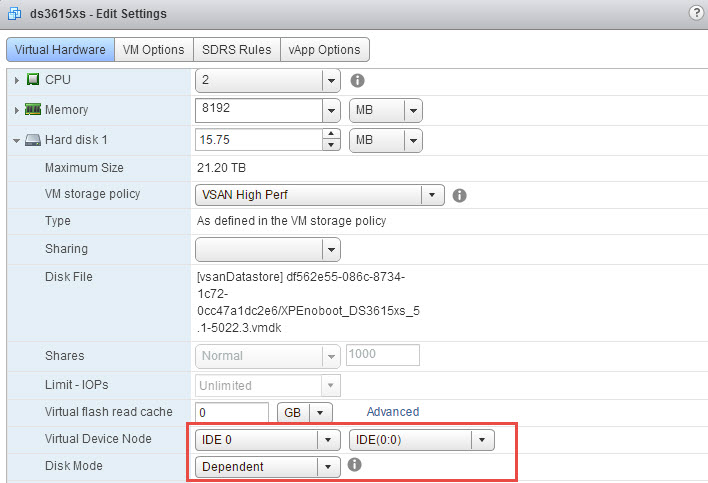
10b - Add XPE vmdk as IDE0-0

In the following screenshot, I’m adding the main disk to the storage appliance. I’m creating a 8TB (or 8192GB) virtual disk, and select my VSAN Storage Base Polci “VSAN High Perf”.  The “VSAN High Perf” is defined as a Number of failures to tolerate of 1, and Number of disk stripes per object at 2.
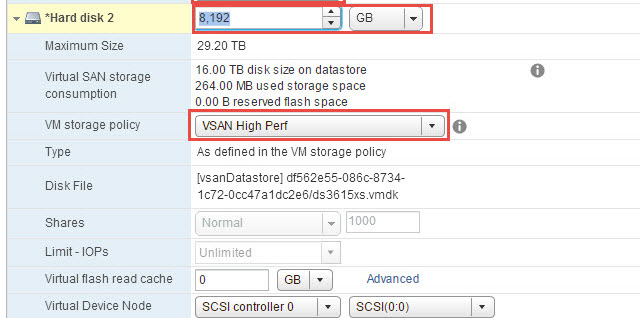
11 - XPE non-persistent and 8TB

Now you can start the appliance. Look closely at the IP addresses of the appliance and the MAC addresses. You want to start configuring the IP Addresses later on the proper NIC.
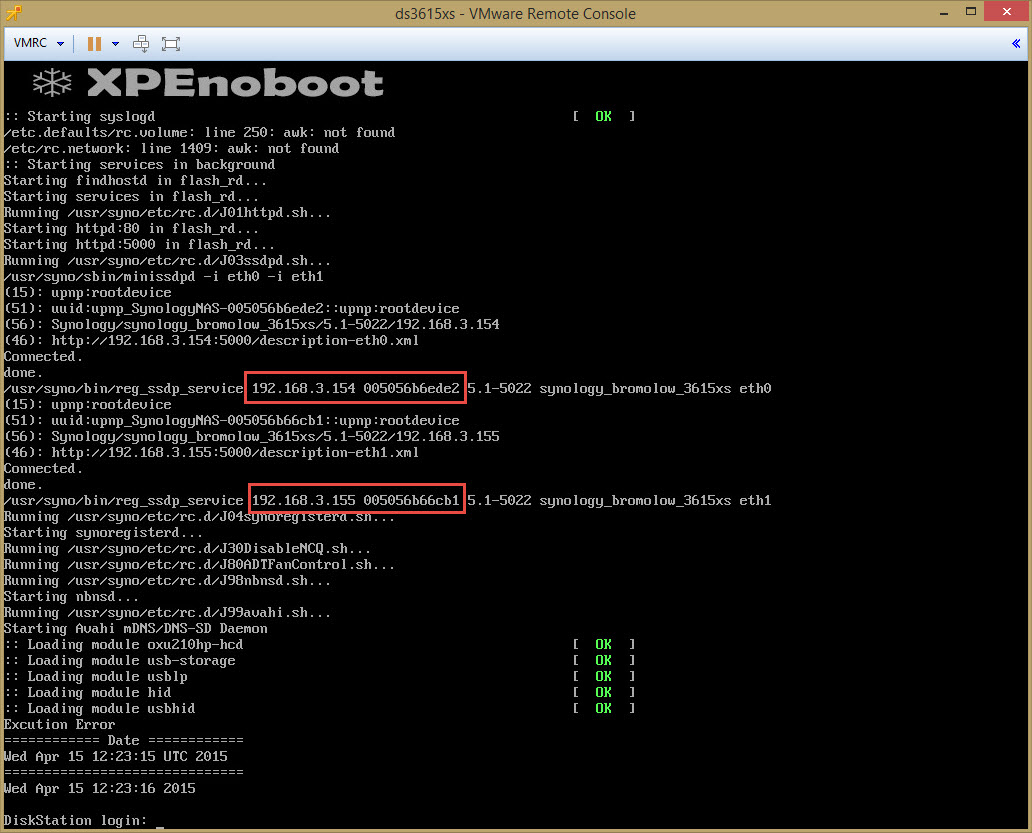
12a Start VM and check eth0 eth1

Using the Synology Assistant you can now see your appliance appear on the network.12b - Use Synology Assistant to find new DS3615xs Use your browser and aim it to the IP address shown in the Synology Assistant to do the initial install.
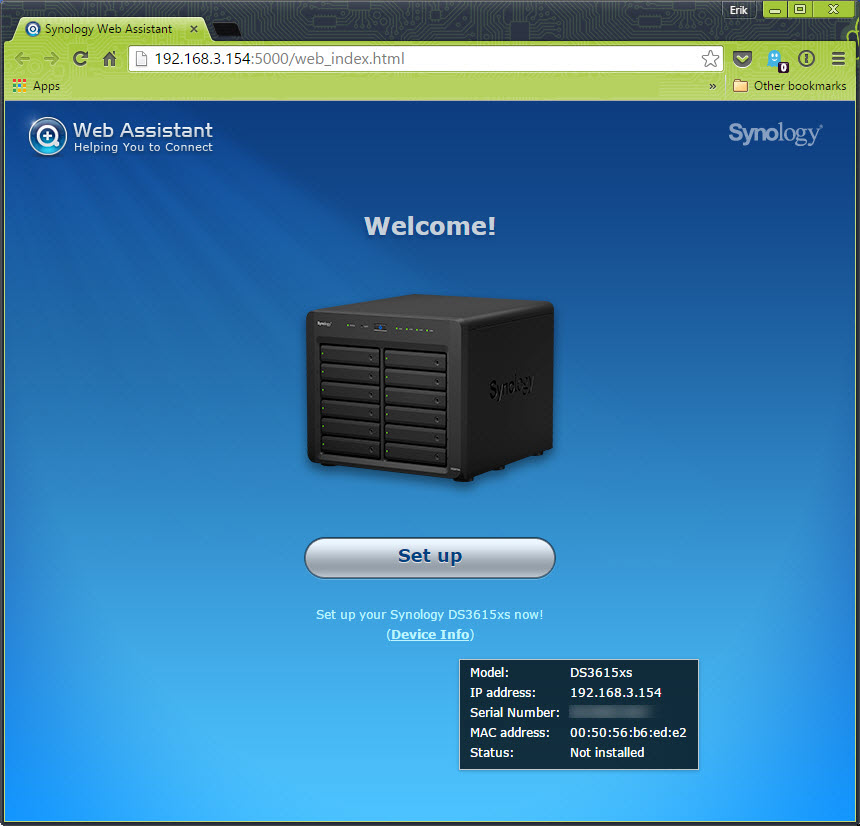
12c - Open the Web Assistant

We are installing the DSM using the Manual install.
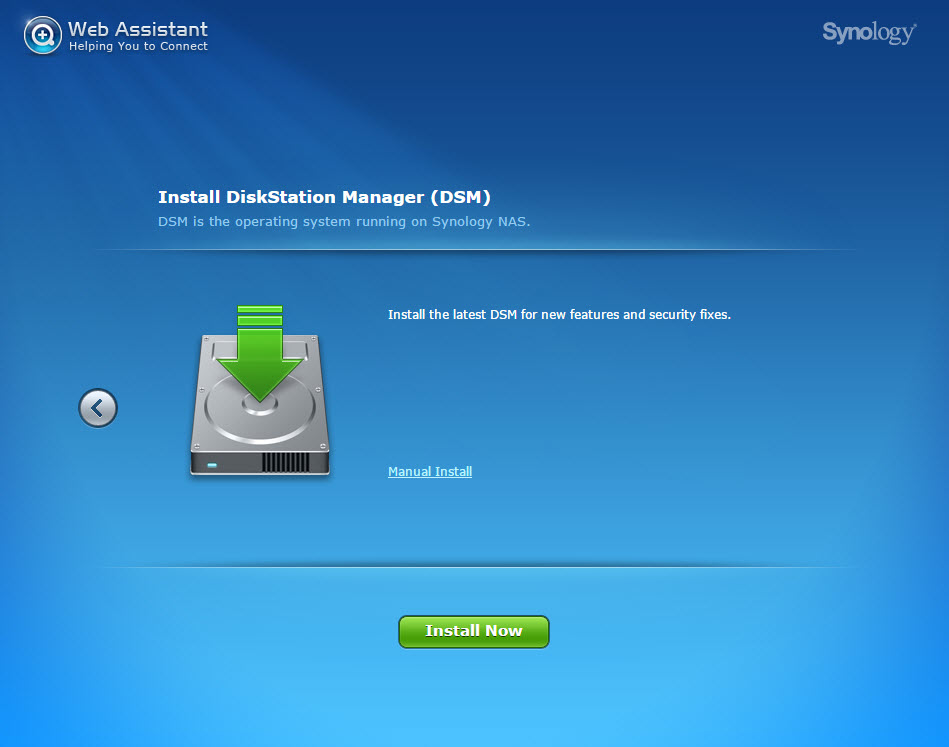
12d - Install DiskStation Manager

Here you upload the DSM 5.1-5022 pattern file that you retrieved from the Synology download center in the DS3615xs selection.
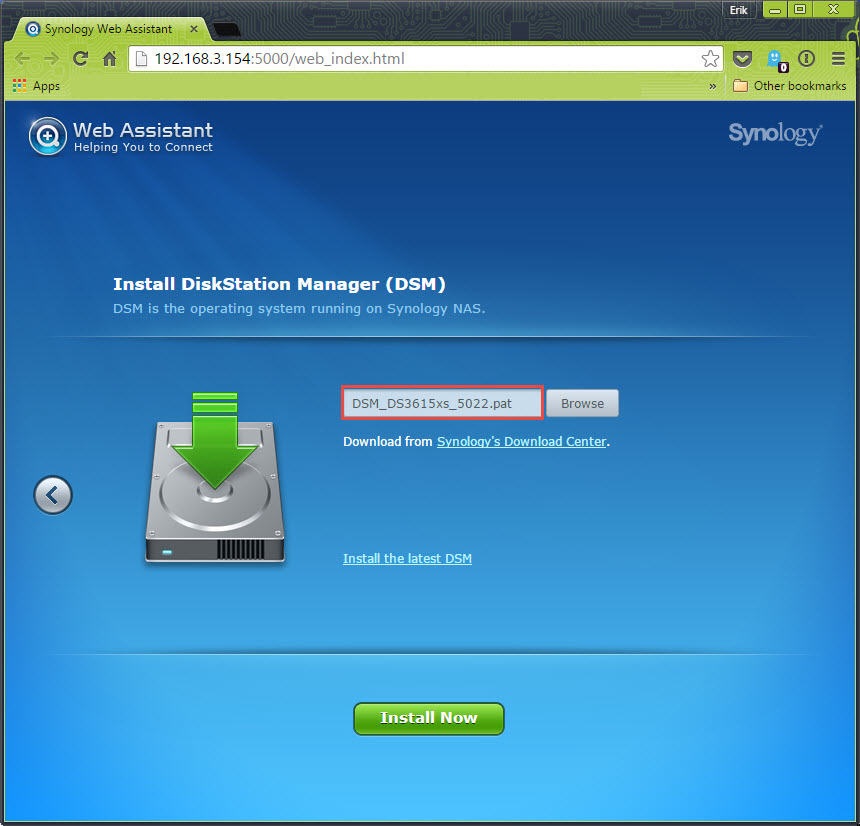
12e - Select Manual install and select DS3615xs 5022 pat

It will now prompt you that it will erase all partitions on the attached disks of the appliance. This includes the XPEnoboot disk of the appliance.
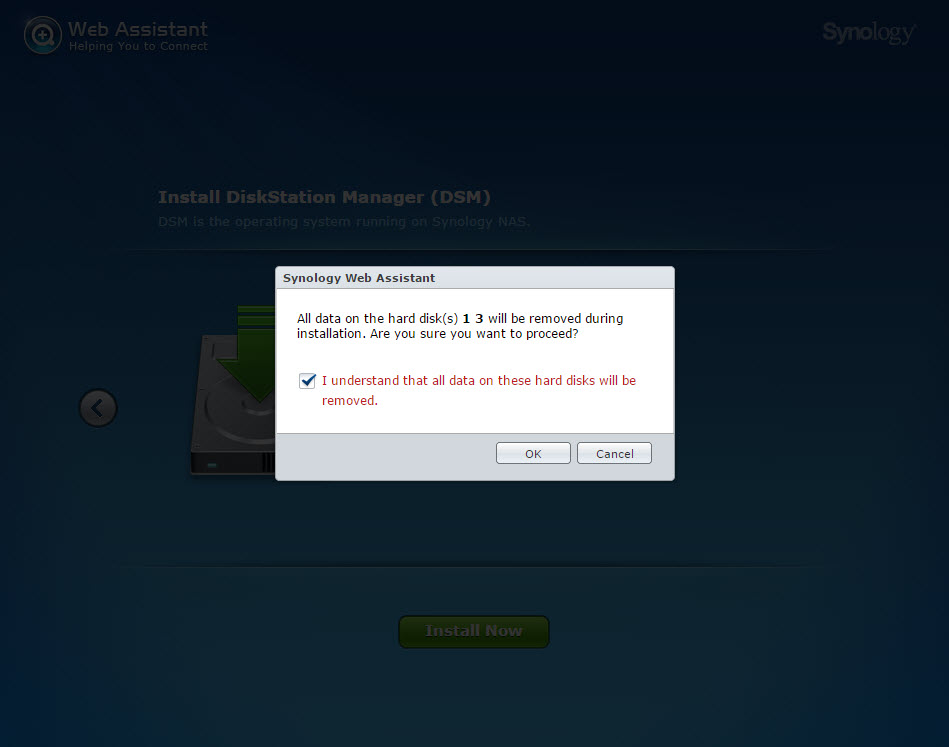
12f - Format disks with 5022.3 PAT

Accordingly the expected behavior now, is that the boot disk is wiped and won’t boot.
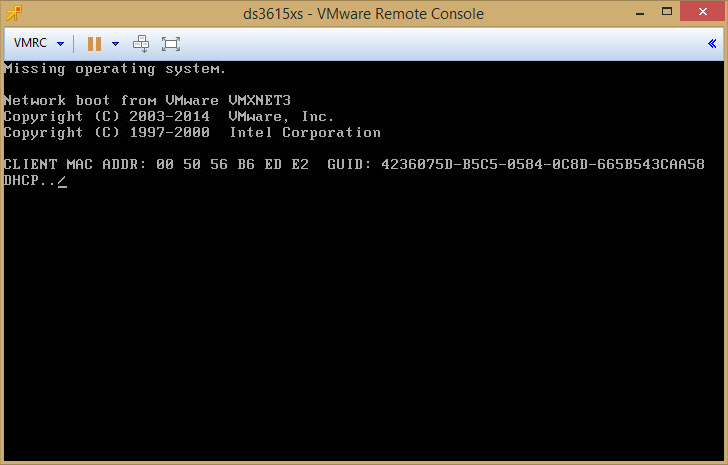
13 - Both disk formatted.

Stop the appliance, and using the Datastore browser, you go erase the XPenoboot disk. Upload again for the 2nd time the XPEnoboot_DS3615xs_5.1-5022-3.vmdk in the folder.

14 - Erase XPEnoboot vmdk and replace with original one

3) Configuration using Synology Assistant

You can now restart the appliance. You will notice that the 2nd time the appliance boots, some of the messages like the IP address are not there anymore. And using the Synology Assistant, you see that the DHCP function isn’t started. The IP addresses are now 169.254.x.y

Select the proper network interface in the Synology Assistant using the MAC address, and select Setup. If you don’t select the proper MAC address you might need to change swap IP addresses later. So save yourself some time, and select the eth0 one.
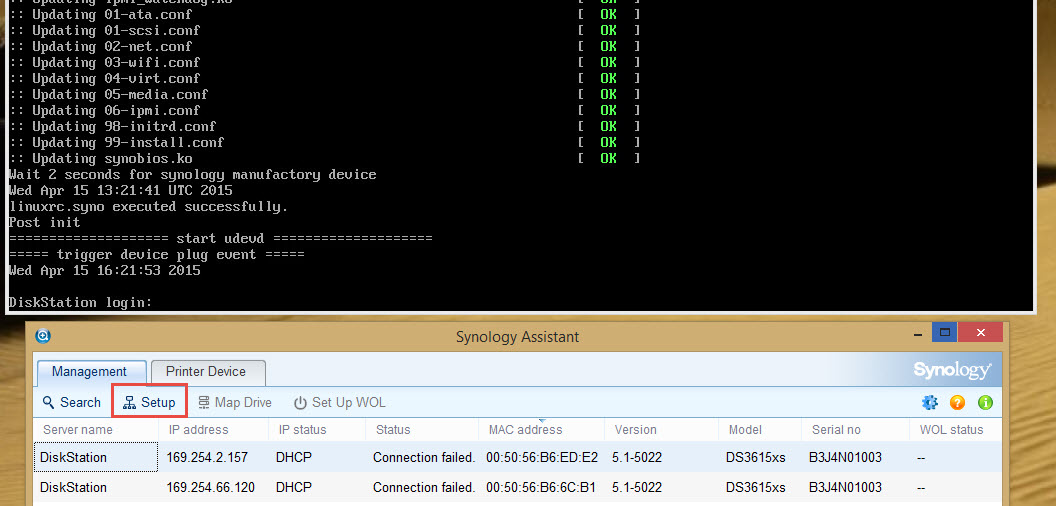
15 - Reboot DS3615xs and use Synology AssistantThe Synology assistant wizard will now start.

16 - Synology Assistant

The Admin password at this time is blank, don’t enter any value. You can change the password later.
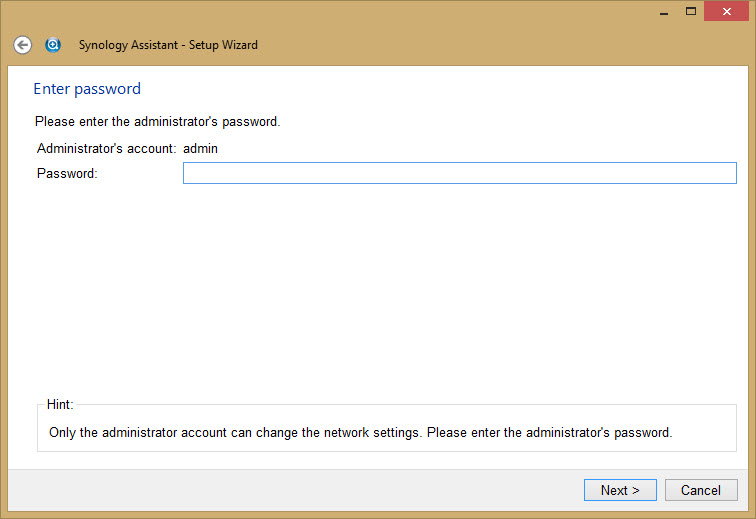
17 - Synology Assitant - Blank passwordEnter the appliance Network settings.

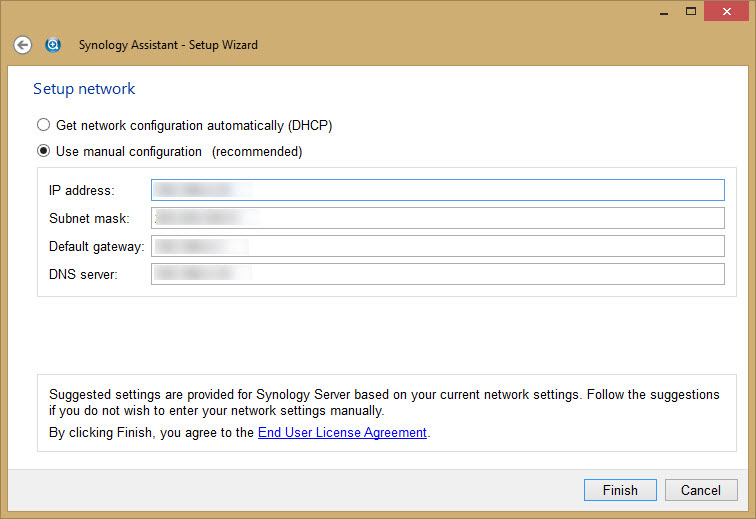
18 - Synology Assitant - Final Network settings for eth0

Refreshing the Synology Assistant shows that you have the proper IP address now.

19 - Now ready for Web configuration

Time to connect to your newly deploy appliance.
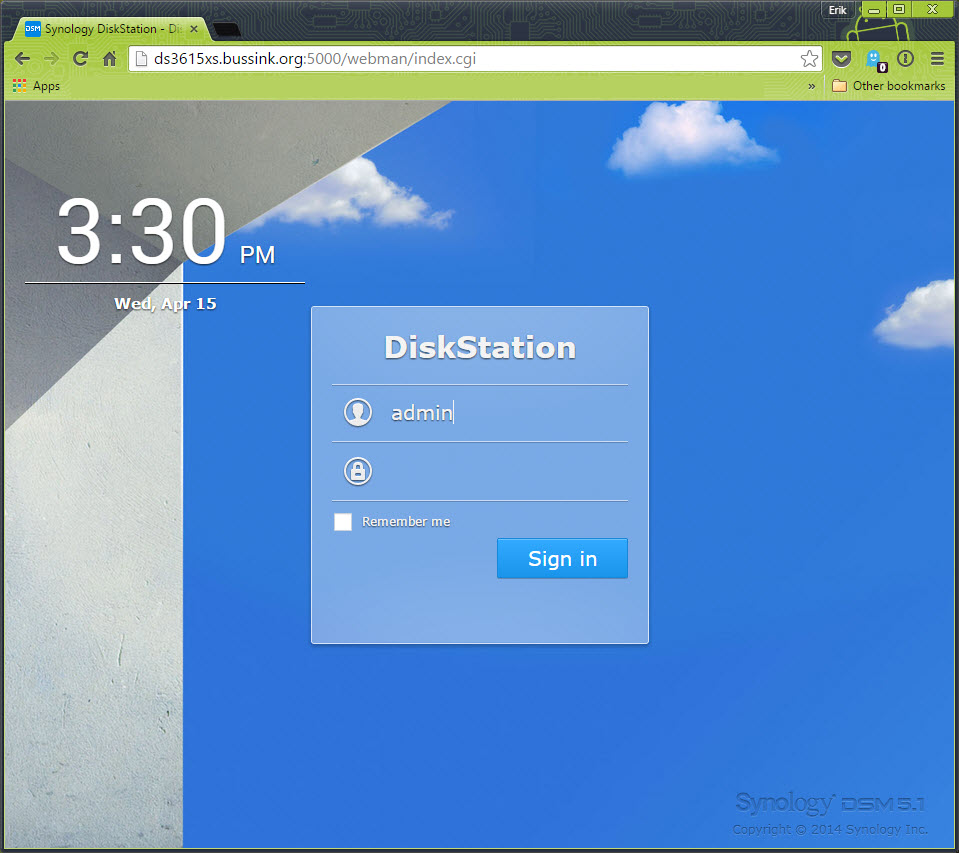
20 - Configuration

You are now only a few steps away from using your storage appliance.
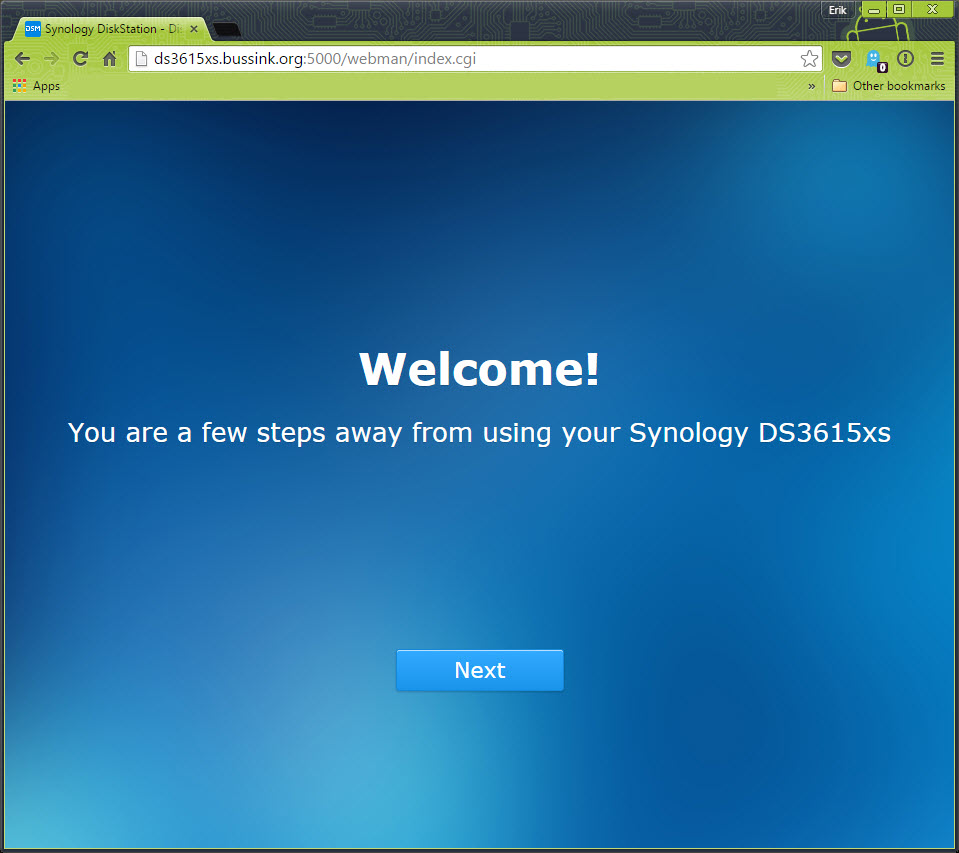
21 - Web Config

It is now time to change your admin account password.
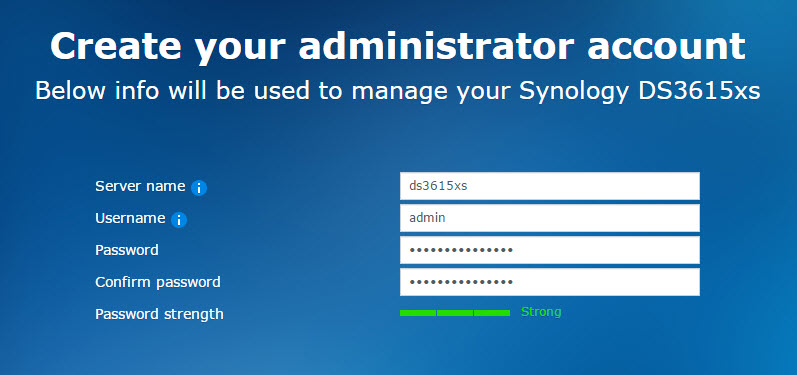
22 - Server name

We can now update the DSM 5.1-5022 version to the latest 5.1-5022-5 version. Depending on the CPU of your host, you will never have seen a Synology reboot so fast.
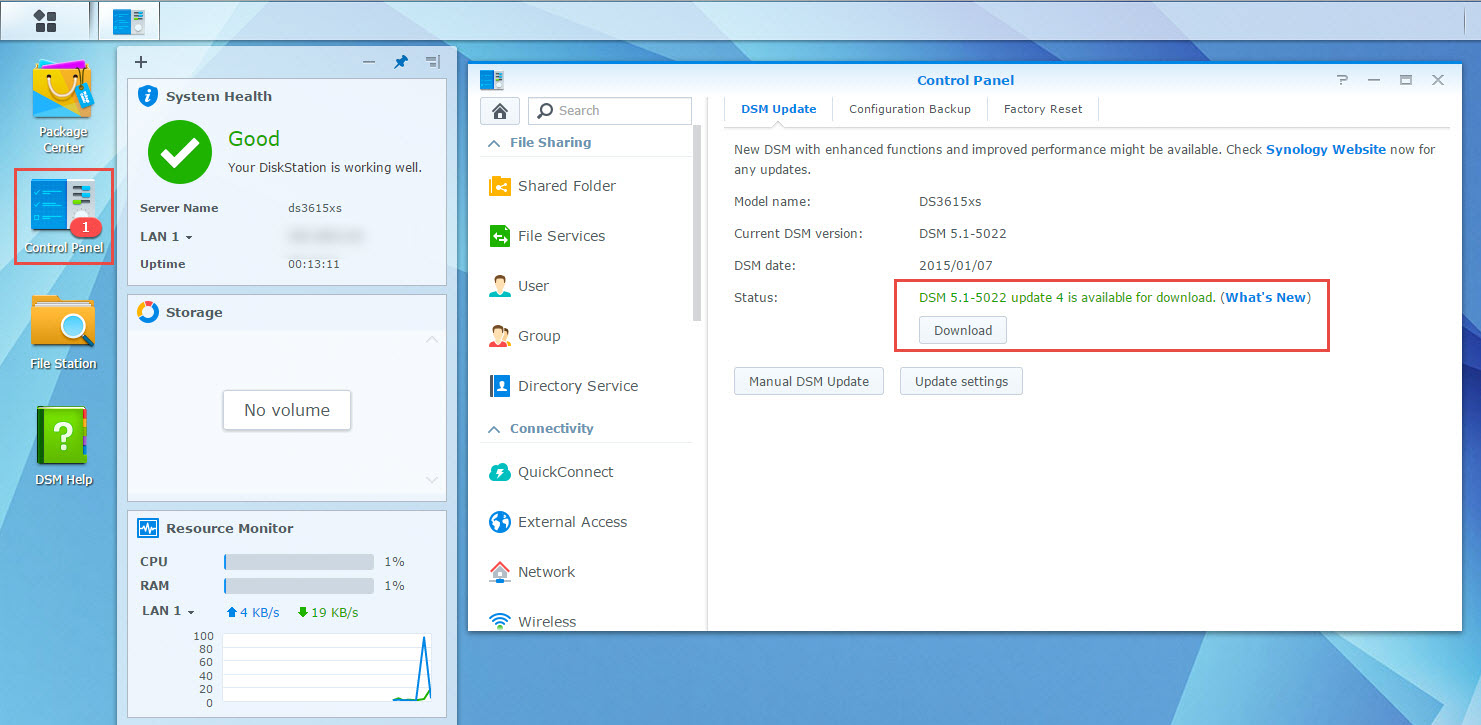
23 Patch DSM

If you intend to use this virtual synology appliance to store data, I recommend you do some conditioning tests first, to see how it reacts in your environment.

I like the flexibility of the virtual synology appliance:

  • Adding a temporary repository for a data migration becomes easy if you have a lot of underlying VSAN datastore space.
  • Want to try out Synology High-Availability, add a 2nd appliance and create the High-Availability cluster.
  • Want to test a Synology with 10GbE interface, easy if your ESXi host has a 10G interface. (*)

In the coming weeks, I’m looking forward to deploy on my VSAN datastore another storage appliances that can scale out in this distributed storage architecture.

(*) I have found out that while having the virtual synology appliance with 10GbE on the backbone is awesome, yet I ran into upload bandwidth limits trying to upload data. My sources where connected to the core switch over 1GbE links, or the virtual machines being used as a source for testing, has its disk store on 1GbE NFS/iSCSI LUNs. To test the virtual synolgoy I copied large files from various sources.I had three sources pushing out 100-120MB/s, 60-70MB/s and 80-90MB/s of large sequential files to get the 2nd screenshot at the top and see the virtual synology write stats at 220MB/s.

Homelab 2014 upgrade

I’ve been looking for a while for a new more powerful homelab (for home), that scales and passes the limits I currently have. I had a great success last year with the Supermicro X9SRL-F motherboard for the Home NAS (Running NexentaStor 3.1.5), so I know I loved the Supermicro X9 Single LGA2011 series. Because of the Intel C600 series of chipset, you can break the barrier of the 32GB you find on most motherboards (Otherwise the X79 chipset allows you upto 64GB).
As time passes, and you see product solutions coming out (vCOPS, Horizon View, vCAC, DeepSecurity, ProtectV, Veeam VBR, Zerto) with memory requirements just exploding. You need more and more memory. I’m done with the homelab, where you really need to upgrade just because you can’t upgrade the top limit of the memory. So bye bye the current cluster of four Shuttle XH61v with 16GB.

With the Supermicro X9SRH-7TF (link) you can go to 128GB easy (8x16GB) for now. It’s really just a $$$ choice. 256GB (8x32GB) is still out of reach for now, but that might change in 2 years.

I have attempted to install PernixData FVP 1.5 on my Homelab 2013 Shuttle XH61v, but the combo of the motherboard/AHCI/Realtek R8168 makes for an unstable ESXi 5.5. Sometimes the PernixData FVP Management Server sees the SSD on my host, then it looses it. I did work with PernixData engineers (and Satyam Vaghani), but my homelab is just not stable. Having been invited to the PernixPro program, doesn’t give me the right to use hours and hours of PernixData engineers time to solve my homelab issues. This has made the choice for my two X9SRH-7TF boxes much easier.

The Motherboard choice of the Supermicro X9SRH-7TF (link) is great because of the integrated management, the F in the X9SRH-7TF. Its a must these day. Having the Dual X540 Intel 10GbE Network Card on the motherboard will allow me to start using the network with a dual gigabit link,  and when I have the budget for a Netgear XS708E or XS712T it will scale to dual 10Gbase-T. In the meantime I can also have a single point-to-point 10GbE link between the two X9SRH-7TF boxes for vMotion and the PernixData data synchronization. The third component that comes on the X9SRH-7TF is the integrated LSI Storage SAS HBA, the LSI 2308 SAS2 HBA. This will allow me to build a great VSAN cluster, once I go from two to three serverss at a later date. Its very important to ensure you have a good storage adapter for VSAN. I have been using the LSI adapters for a few years and I trust them. Purchasing a motherboard, then adding the Dual X540 10GbE NIC and a LSI HBA would have cost a lot more than the X9SRH-7TF.

For the CPU, Frank Denneman (@FrankDenneman) and me came to the same conclusion, the Intel Xeon E5-1650 v2 is the perfect choice between number of cores, cache and speed. Here is an another description of the Intel Xeon E5-1650 v2 launch (CPUworld).

For the Case, I have gone just like Frank Denneman’s vSphere 5.5 home lab choice with the Fractal Design Define R4 (Black). I used a Fractal Design Arc Midi R2 for my Home NAS last summer, and I really liked the case’s flexibility, the interior design, the two SSD slots below the motherboard. I removed the default two Fractal Design Silent R2 12cm cooling fans in the case and replaced with two Noctua NH-A14 FLX fans that are even quieter, and are connected using rubber holders so they vibrate even less. It’s all about having a quiet system. The Home NAS is in the guest room, and people sleep next to it without noticing it. Also the Define R4 case is just short of 47cm in height, meaning you can lie it down in a 19″ rack if there is such a need/opportunity.

For the CPU Cooler, I ordered two Noctua NH-U12DX i4 coolers which support the Narrow ILM socket. Its a bit bigger than the NH-U9DX i4 that Frank ordered, so we will be able to compare. I burned myself last year with the Narrow ILM socket. I puchased a water cooling solution for the Home NAS and it just couldn’t fit it on the Narrow ILM socket. That was before I found out the difference between a normal square LGA2011 socket and the Narrow ILM sockets used on some of the Supermicro boards. Here is a great article that explains the differences Narrow ILM vs Square ILM LGA 2011 Heatsink Differences (ServeTheHome.com)

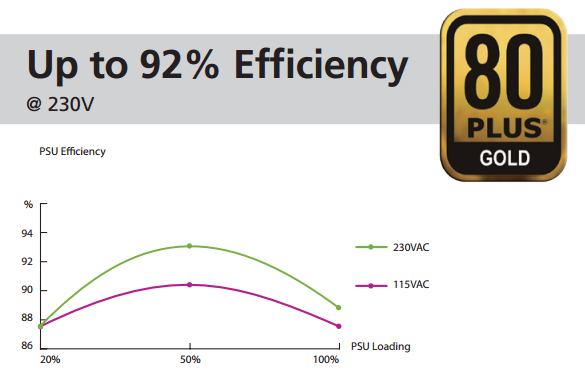
For the Power supply, I invested last year in an Enermax Platimax 750W for the Home NAS. This time the selection is the Enermax Revolution X’t 530W power supply. This is a very efficient 80 Gold Plus PSU. which supports ATX 12V v2.4 (can drop to 0.5W on standby) and uses the same modular connectors of my other power supplies. These smaller 500W power supplies are very efficient when they run at 20% to 50% charge. This should also be a very quiet PSU.

I made some quick calculations yesterday for the Power Consumption, I expect the max power that can be consumed by this new X9SRH-7TF build should be around 180-200W, but it should be running around the 100-120W on a normal basis. At normal usage, I should hit the 20% of the power supply load, so my Efficiency of the PSU should be at around 87%, a bit lower than Frank’s choice of the Corsair RM550. This is the reason why I attempt to take a smaller PSU rather than some of the large 800W or even 1000W PSU. 

xt_530w_efficiency

For the Memory, I’m going to reuse what I purchased last year for my Home NAS. So each box will receive 4x16GB Kingston 1600Mhz ECC for now.

My current SSDs that I will use in this rig are the Intel SSD S3700 100GB enterprise SSD and some Samsung 840 Pro 512GB. What is crucial for me in the the Intel S3700 is that its Endurance design is 10 drive writes per day for 5 years. For the 100GB, it means that its designed to write 1TB each day. This is very important for solutions like PernixData or VSAN.  Just to compare, the latest Intel Enthusiast SSD, the SSD 730 240GB that I purchased for my wife’s computer, its endurance design is set to 50GB per day for 5 years (70GB for the 480GB model). The Intel SSD 730 just like it’s Enterprise cousins (S3500 and S3700) come with a Enhanced power-loss data protection using power capacitors. The second crucial design in an Enterprise SSD, is its Sustained IOPs rating.

I’m also adding a Intel Ethernet Server Adapter I350-T2 Network Card for the vSphere Console management. I’m used to have a dedicated Console Management vNIC on my ESXi hosts. These will be configured in the old but trusty vSwitch Standard.

Another piece of equipment that I already own and that I will plug on the new X9SRH-7TF are the Mellanox ConnectX-3 Dual FDR 56Gb/s  InfiniBand Adapters I purchased last year. This will allow me to test and play with a point-to-point 56Gb/s link between the two ESXi hosts. Some interesting possibilities here…  I currently don’t have a QDR or FDR InfiniBand switch, and these switches are also very noisy, so that is something I will look at in Q3 this year.

I live in Switzerland, so my pricing will be a bit more expensive than what you find in other European countries. I’m purchasing my equipment with a large distribor in switzerland, Brack.ch . Even if the Supermicro X9SRH-7TF is not on their pricing list, they are able to order them for me. The price I got for the X9SRH-7TF is at 670 Swiss Francs, and the Intel E5-1650v2 at 630 Swiss Francs. As you see the Cost of one of these server is closing in the 1800-1900 Euro price range. I realize it’s Not Cheap. And it’s the reason of my previous article on the increase costs for a dedicated homelab, the Homelab shift…

Last but not least, in my Homelab 2013 I focus a lot on the Wife Acceptance Factor (WAF). I aimed for Small, Quiet, Efficence. This time, the only part that I will not be able to keep, is the Small. This design is still a Quiet and Efficient configuration. Lets hope I won’t get into too much problems with the wife.

I also need to thank Frank Denneman (@FrankDenneman) as we discussed extensively this home lab topic over the past 10 days, fine tuning the design on some of the choice going into this design. My prior design for the homelab 2014 might have gone with the Supermicro A1SAM-2750F without his input. A nifty little motherboard with Quad Gigabit, 64GB memory support, but lacking on the CPU performance. Thanks Frank.

VSAN Lab issues due to Infiniband OpenSM failover

This isn’t really a blog where you will get a recipe on how to implement VMware Virtual SAN (VSAN) or InfiniBand technologies, but more a small account of my troubles I experienced yesterday with my infrastructure. I did publish a picture yesterday on twitter, that didn’t look to go.

VSAN Infrastructure in bad shape

Cause: Network infrastructure transporting the VSAN traffic because unavailable for 5-6 minutes

Issue: All VMs became frozen, as all Read/Write where blocked. I Powered Off all the VMs. Each VMs became an Unidentified object as seen above.

Remediation: Restarted all VSAN hosts at the same time, and let the infrastructure stabilize about 10 minutes before restarting the first VM.

I got myself into this state, because I was messing with the core networking infrastructure in my lab, this was not a VSAN product error, but a side effect of the network loss. After publishing this tweet and picture, I had a dinner that lasted a few hours, and when I got home, I simply decided to restart the four VSAN nodes at the same time, let the infrastructure simmer for 10 minutes while looking at the host logs, then I restarted my VMs.


Preamble.

Since beginning of December 2013, I’m running all my VMs direct from my VSAN datastore, no other iSCSI/NFS repository is used. If VSAN goes down, everything goes down (including Domain Controllers, SQL Server and vCenter).


Network Issue.

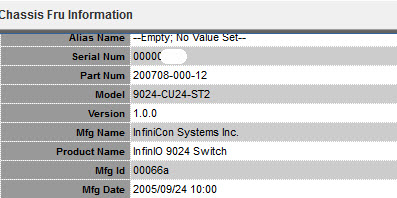
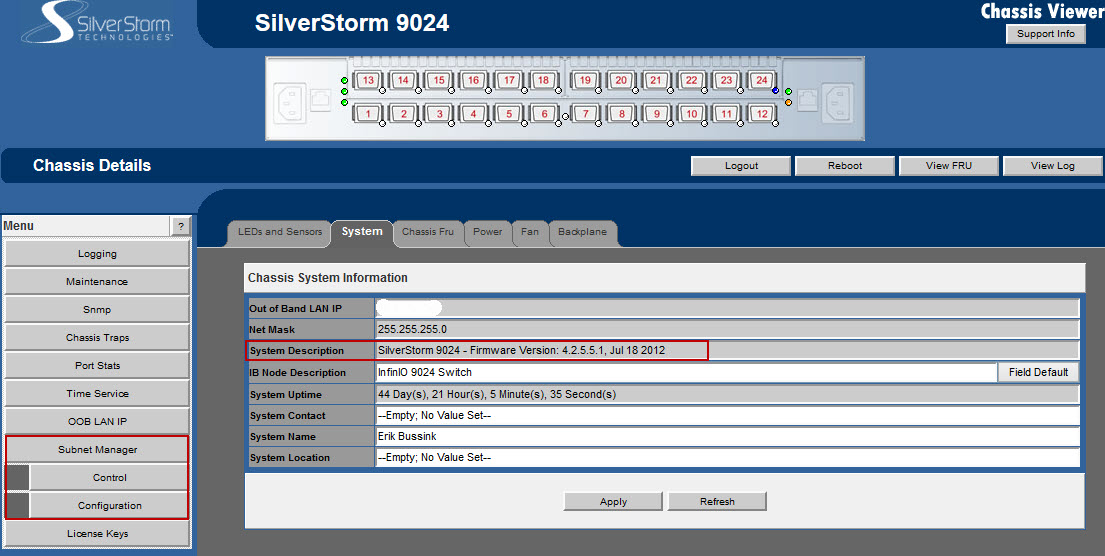
As some of you know, the VSAN traffic in my lab, is being transported by InfiniBand. Each host has two 20Gbps connections to the InfiniBand switches. My InfiniBand switches are described in my LonVMUG presentation about using Infiniband in the Lab. An InfiniBand fabric needs a Subnet Manager to control the various entries, I got lucky in my first InfiniBand switch purchase, I got myself a Silverstorm 9024-CU24-ST2 model from 2005.

silverstorm9024chassis

Yet the latest firmware that can be found on Intel’s 9000 Edge Managed Series website. And the latest firmware 4.2.5.5.1 from Jul 2012 now adds a hardware Subnet Manager. This is simply awesome for a switch created in 2005.

Silverstorm 9024

Silverstorm 9024

Okay, I disgress here…. bear with me. Now, not all the InfiniBand switches come with a Subnet Manager, actually only a select few and more expensive switches have this feature. What can you do, when you have an InfiniBand switch without a management stack, well you run the Software version of the Open Subnet Manager (OpenSM) directly on the ESXi host, or a dedicated Linux node.

Yesterday, I was validating a new build of the OpenSM daemon compiled by Raphael Schitz  (@Hypervisor_fr) that has some improvements. I had placed the new code on each of my VSAN nodes, and shutdown the Hardware Subnet Manager to use only the Software Hardware Manager. It worked well enough, only seeing a simple 2 second RDP interuption to the vCenter.

It was only when I attempted to fake the death of the Master OpenSM on my esx13.ebk.lab host, that I created enough fluctuation in the InfiniBand fabric, causing an outage, that I estimate to have lasted between 3 and 5 minutes. But as the InfiniBand fabric is used to transport all my VSAN traffic at high-speed, all my VMs because frozen, all IOPs suspended, leaving me only the option to connect with the vSphere C# Client to the hosts directly, wait to see if things would stabilize. Unfortunately, that did not seem to be the case after 10 minutes, so I powered off the running VMs.

Yet each of my hosts, was now disconnected from the other VSAN nodes, and the vsanDatastore was not showing at it’s usual 24TB, but at 8TB. It bit of a panic set in, and I tweeted about a Shattered VSAN Cluster.

When I came home a few hours later, I simply restarted all my four VSAN nodes (3 Storage+Compute and 1 Compute-Only), lets some synchronization take place, and I was able to restart my VMs.


Recommendations

These recommendations are only if you use VSAN with an InfiniBand backbone used to replicate the storage objects across nodes. If you have a InfiniBand switch which support a hardware Subnet Manager, use it. If you have an unmanaged InfiniBand switch, you need to ensure that the Subnet Manager is kept stable and always available.

If you use InfiniBand as the network backbone for vMotion or other IP over IB, the impact of having a software Subnet Manager election is not the same (HA reactivity)

I don’t have yet a better answer yet, but I know Raphael Schitz (@Hypervisor_fr) has some ideas, and we will test new OpenSM builds for this kind of issues.


Your comments are welcome…


VSAN and the LSI SAS 9300-4i Host Bus Adapter

As part of my VSAN Cluster that I’m building, I wanted to dig deeper and test hte LSI Host Bus Adapters. These cards have been used extensively in past few years with storage appliances that migrate the mangement, compute and error handling to the operating system, rather than to use RAID adapters. I have build various storage appliances using Nexenta Community Edition. Even as I speak, my office lab, is using such a Nexenta Community Edition 3.1.5 server, to provide shared storage to my vSphere 5.5 Cluster. I’ve used various LSI Host Bus Adapters in my Nexenta boxes, like the LSI SAS 9207-8i in my recent home storage, or the LSI SAS 9201-16i in my office storage. These are very reliable cards that I highly recommend.

For the implementation of the VSAN in the office lab, I have decided to turn to the latest LSI SAS 9300-4i card, so that each of my Cisco UCS C200 M2 LFF host (4x 3.5″ Disk slot), can have a powerful & stable card. The LSI SAS 9300-4i is a PCIe Generation 3 card, but it works great in my PCIe Gen2 slot. The LSI SAS3004 Chipset, supports 12Gb/s SAS connection using an (x4) internal mini-SAS (SFF8643) HD connector. The card is affordable, and should be around $245 (as advertised on the LSI store). For servers with only four disk slots (1 SSD and 3 HDD), the LSI SAS 9300-4i is a nice fit, and provide futur usage.

I added an Adapter HD-SAS Cable 2279900-R (Right Angled) to ensure, the cabling fits nicely in the 1U server.

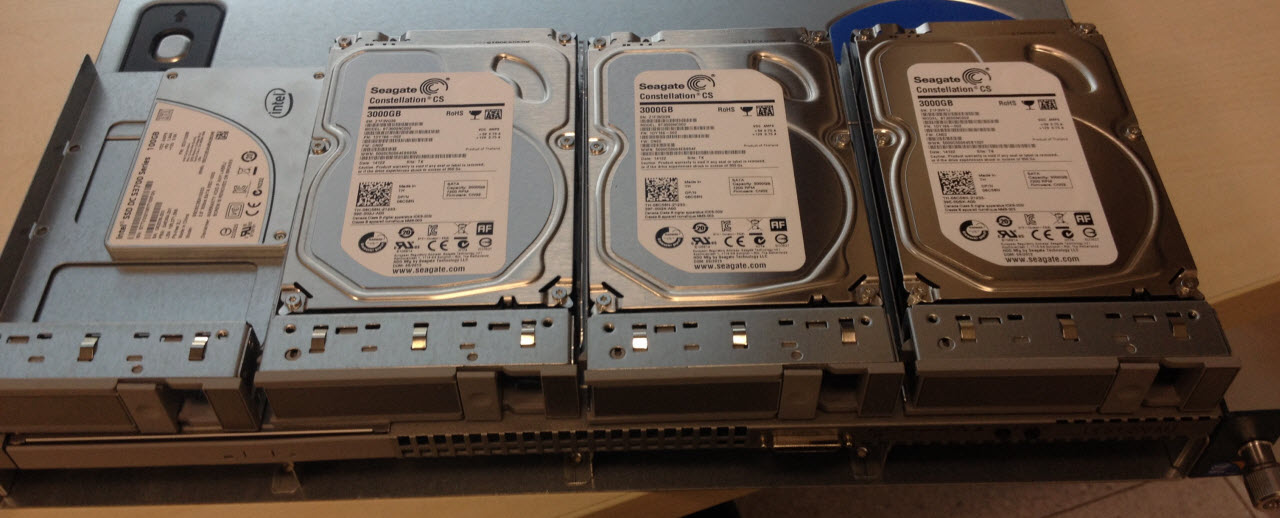
Here is a view of a Cisco UCS 1U server with 1 SSD (Intel S3700) and 3 Seagate Constellation CS 3TB hard drives. I think this kind of server is the right configuration for the VSAN building blocks.

Cisco UCS C200 M2 LFF

Here is the view of the Storage Adapter in vSphere 5.5

Storage Adapters

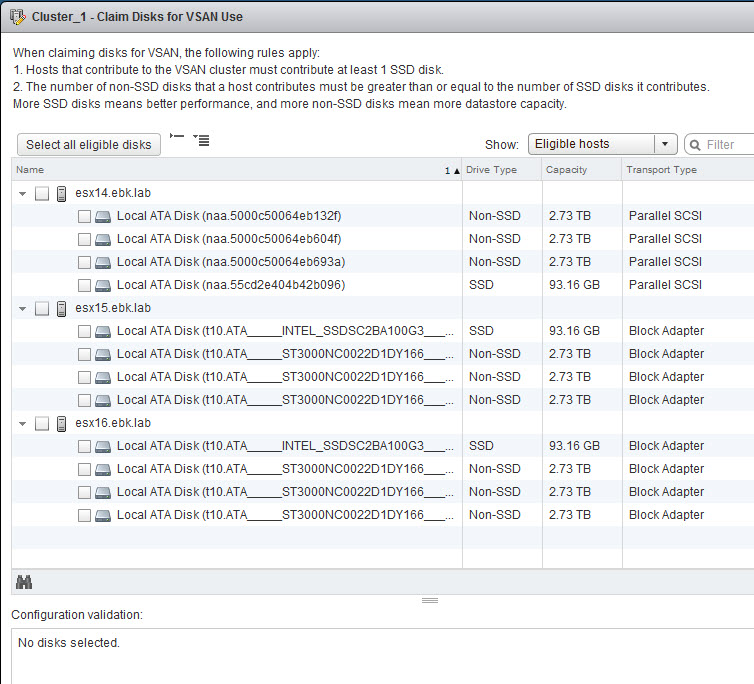
The interesting thing is that the LSI SAS 9300-4i presents the four devices  in the ESXi (esx14.ebk.lab) host with a Transport Protocol “Parallel SCSI“, instead of the expect Block Adapter.

Claim Disks for VSAN Use

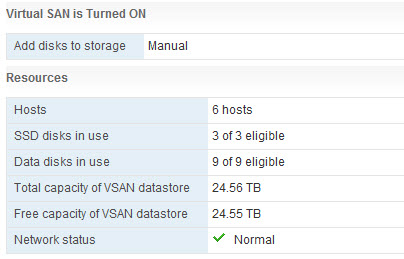
This has not stopped the claiming of the Disks to create a 24.55 TiB VSAN Cluster.

Virtual SAN is Turned ON

I expect another two LSI SAS 9300-4i by the end of the week, and then I will be able to start some serious VSAN scalability and performance testing (which I can’t publish due to the VSAN Beta agreement)

I’m aware that the Intel S3700 are only 100GB, and are way undersizes by the amount of total storage provided in each hosts, but I just don’t have the budget for 400GB or 800GB Intel S3700. I might test this config at some point with Samsung 840 Pro (512GB) if I see that the VSAN Observer is reporting excessive Congestion or WriteBuffer Fills. It’s going to be interesting.

At the time of the writing of this article, the AHCI bug identified in the VSAN Beta has not yet been fixed. This has contributed to the reason of my selection for the LSI SAS 9300-4i Host Bus Adapter. I have added the LSI SAS 9300-4i to the VSAN Community HCL.


VSAN Community HCL

A few days before VMworld 2013 Barcelona, I started the VSAN.info website to documents VSAN configurations, list whitepapers, redirect people to VSAN resources, and VSAN implementations. And it’s been a bit quiet since then on the surface. Well I’ve been working in the background to push a new feature, the VSAN Community HCL.

One of the features I wanted to add to the VSAN.info site from the get go, was a VSAN Community Hardware Compatibility List. Equipment and configurations on this list would not appear on the official VMware VSAN HCL. Now starting such a list is a very large endevour, that needs dedicated resources, probably lots of management, user management, password management, moderators. In short a lot of things to make sure that I don’t find the time to keep it up and going. Good will in new projets only take it so far, before it would have died slowly… So why try to re-invent the wheel ?

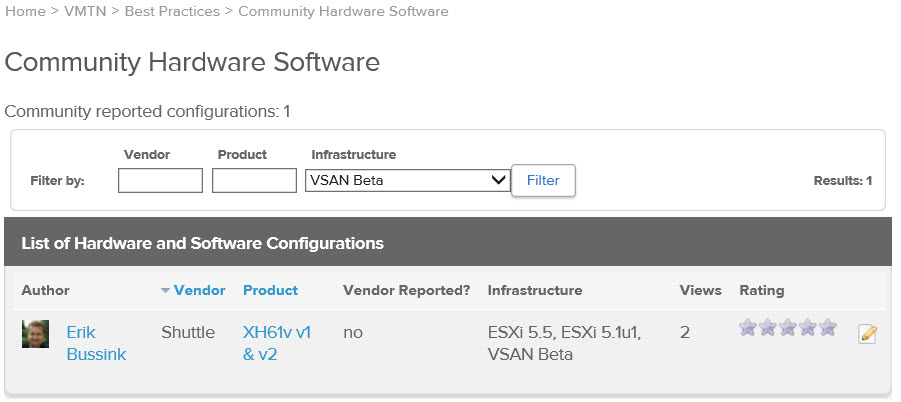
What other better place to host such a VSAN Community HCL than the offical VMware Community website in the Community Hardware Software forum. Yes, now you can head to the Community Hardware Software (CSHWSH) forum and check out which hardware & software can be used to run a VSAN environment.

Here is the direct link to View All the entries for VSAN Beta on the CSHWSW Forum. You can then select the Infrastructure to list all the vSphere 5.5 or VSAN Beta entries.

CSHWSW View All Entries VSAN Beta

When you click on the entry you will be able to see the Configuration Tested field that explains how I have designed and configured this small VSAN node.

CSHWSH Configuration Tested


It is now time to populate the Community Hardware Forum with your VSAN Configs.

This modification of the Community Hardware Software forum, would not have been possible without the help of Corey Romero (@vCommunityGuy) and the team managing the Communities Forums, and I also want to Thank John Troyer (@jtroyer) and Mike Laverick (@Mike_Laverick) that help facilitate my contact with Corey Romero. To all of you… THANK YOU...


vBrownbag TechTalk “InfiniBand in the Lab” presentation.

For the past few weeks I have slowly begun to build a working InfiniBand infrastructure on my vSphere cluster hosted in the office. I’m still missing some cables. With VMworld 2013 EMEA in Barcelona behind us, I’ve now got the time to publish the presentation I did in the Community zone for the vBrownbag Tech Talks. On Tuesday noon, I was the first one to start the series of Tech Talk and the infrastructure to record and process the video/audio feed had not been tuned properly. Unfortunately you will see this in the video link of the presentation. So in my video, the first 2 minutes 08 seconds, the audio is just horible… So I URGE you to jump into the video at the 3 minute mark if you value your ears.

Here is the direct link to the Tech Talk about “InfiniBand in the Lab” and the link to the other Tech Talks done at VMworld 2013 EMEA.

I’m not used to doing a presentation sitting in front of multiple cameras. Some of the later slides are too fuzzy on the video, so I’m now publishing the presentation in this article.

InfiniBand_in_the_Lab


The InfiniBands Host Card Adapters (HCA) for Dual 20Gbps ports (DDR Speed) can be found on ebay for $50 or $35 pounds.

I hope this video link and the presentation will be useful to some of you that want to increase an intra vSphere cluster backbone for the vMotion, Fault Tolerance or VSAN traffic.

I enjoyed doing the presentation, as I have to thank the following people making this presentation possible : Raphael Schitz,William Lam, Vladan Seget, Gregory Roche


VSAN Observer showing Degraded status…

This is just a quick follow-up on my previous “Using VSAN Observer in vCenter 5.5” post. As mentioned recently by Duncan Epping (@DuncanYB) in his blog entry Virtual SAN news flash pt 1. The VSAN engineers have done a full root cause of the AHCI controller issues that have been reported recently. The fix is not out yet. As a precaution, and because I use the AHCI chipset in my homelab servers, I have not scaled up the usage of the VSAN. I have been monitoring closely the VMs I have deployed on the VSAN datastore.

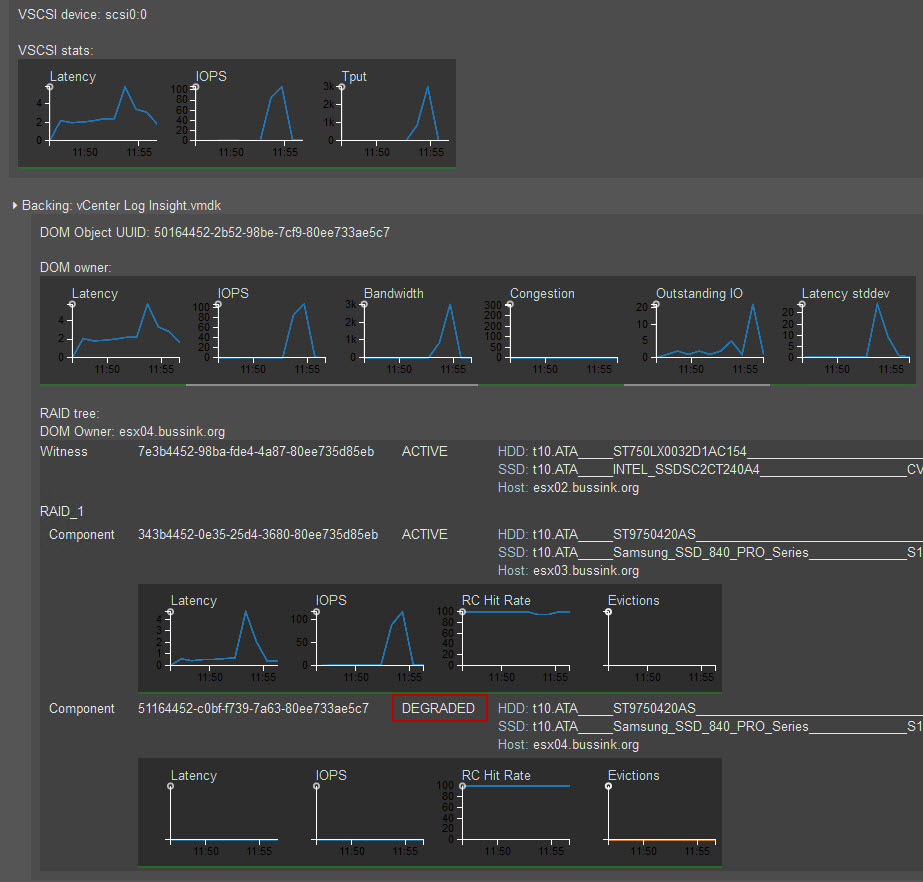
VSAN Observer DEGRADED status on a host

VSAN Observer degraded

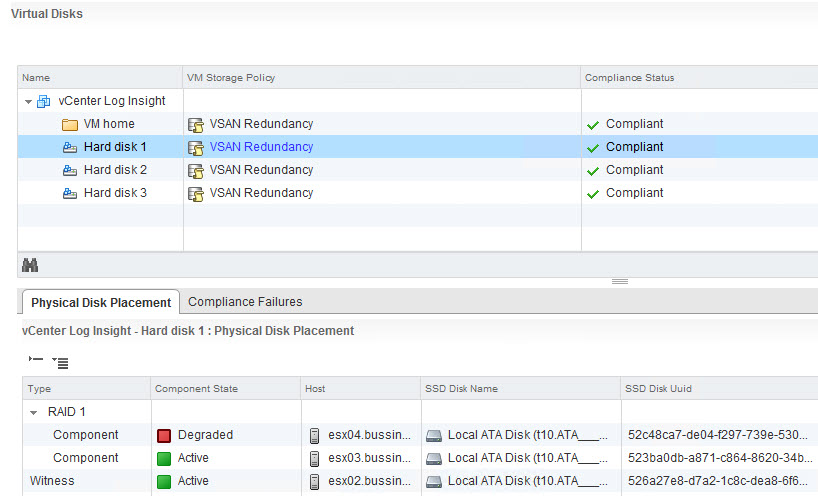
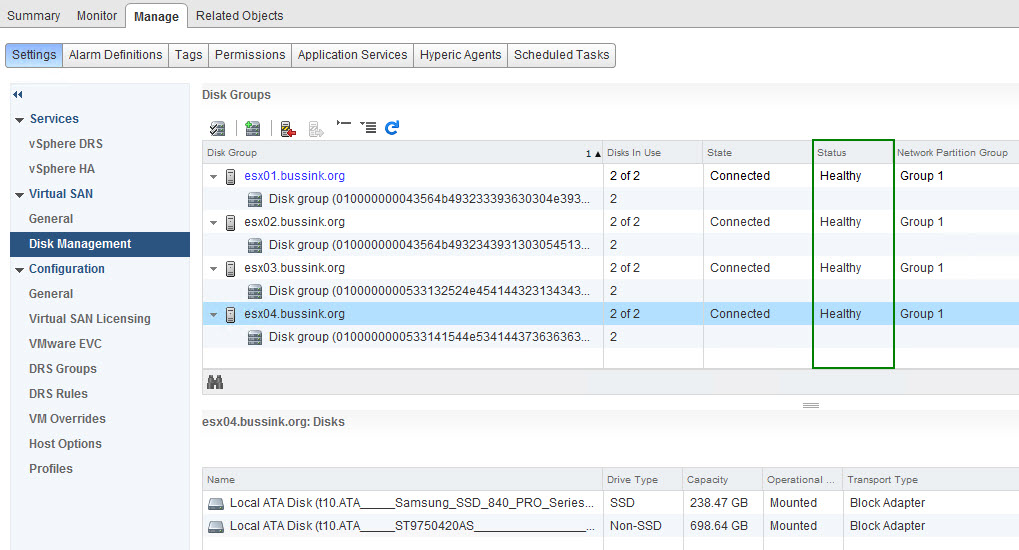
This is curious as neither the vSphere Web Client or the vSphere Client on Windows have reported anything at a high level. No Alarms. As can be seen from the following two screenshots.

VSAN Virtual Disks

VSAN Virtual Disks

To see any glimpse to an error, you need to drill deeper into the Hard disk to see the following.

VSAN Virtual Disks Expanded

VSAN Disk Groups

VSAN Disk Groups


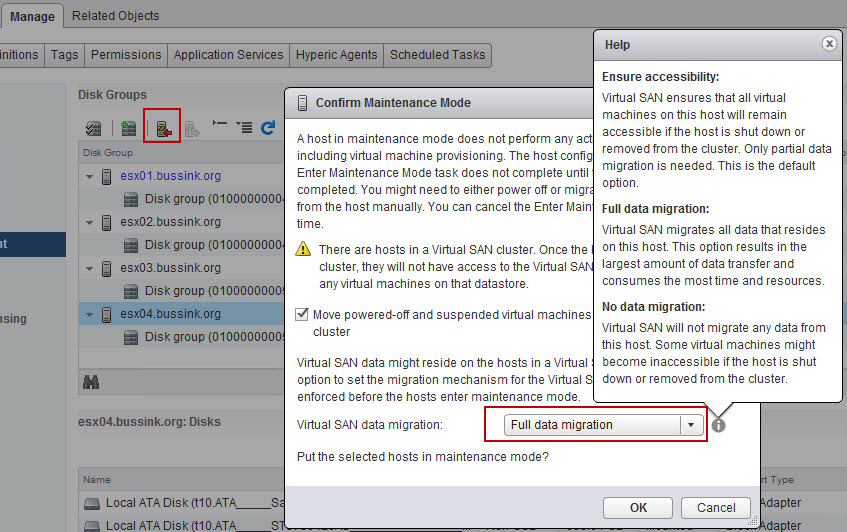
So what to do in this case. Well I tried to activate the Maintenance Mode and migrate the data from the degraded ESXi host to another.

Virtual SAN data migration

There are three modes how you can enter a host in the Virtual SAN Cluster into Maintenance Mode.  They are the following:

  1. Full data migration: Virtual SAN migrates all data that resides on this host. This option results in the largest amount of data transfer and consumes the most time and resources.
  2. Ensure accessibility: Virtual SAN ensures that all virtual machines on this host will remain accessible if the host is shut down or removed from the cluster. Only partial data migration is needed. This is the default option.
  3. No data migration: Virtual SAN will not migrate any data from this host. Some virtual machines might become inaccessible if the host is shut down or removed from the cluster.


Maintenance Mode - Full Data Migration

So I selected the Full data migration option. But this didn’t work out well for me.

General VSAN fault

I had to fail back to the Ensure accessibility to get the host into maintenance mode.

Unfortunately, even after a reboot of the ESXi host and it’s return from maintenance mode. The VSAN Observer keeps telling me that my component residing on the ESXi host is still in a DEGRADED state. Guess, I will have to patiently wait for the release of the AHCI controller VSAN fix. And see how it performs then.


Open Questions:

  • Is VSAN Observer picking up some extra info that is not raised by the vCenter Server 5.5 ?
  • Is the info from the vCenter Server 5.5 not presented properly in the vSphere Web Client ?


Supporting Information.

My hosts have two gigabit network interface. I have created two VMkernel-VSAN interface in two differents IP ranges, as per the recommendations. Each VMkernel-VSAN interface goes out using one interface, and will not switch to the 2nd one.

Using the VSAN Observer in vCenter 5.5

VSAN observer is an experimental feature. It can be used to understand VSAN performance characteristics and as such is a tool intended for customers who desire deeper insight into VSAN as well as by VMware Support to analyze performance issues encountered in the field.”  This is the tool any tester of VSAN can use to monitor his hosts, disks, VMs and see the distribution across hosts.

Rawlinson (@PunchingClouds) has created two very interesting articles on the VSAN Observer, which I’ve been hearing about for a few weeks. In his posts, Rawlinson shows how to use the VSAN observer that comes with the vCenter Appliance Using RVC VSAN Observer Pt1 and Using RVC VSAN Observer Pt2. I will show you here how to use the one that comes with the Windows implementation of vCenter 5.5

The VSAN Observer runs on the Ruby vSphere Console (RVC). Ruby vSphere Console (RVC) is a Linux console UI for vSphere, built on the RbVmomi bindings to the vSphere API. The vSphere object graph is presented as a virtual filesystem, allowing you to navigate and run commands against managed entities using familiar shell syntax.Your vCenter 5.5 ships with RVC installed.

Starting your own VSAN Observer

In the vCenter 5.5 server under the path C:\Program Files\VMware\Infrastructure\VirtualCenter Server\support\rvc you will find the rvc.bat file. Edit the rvc.bat file with notepad or notepad++ and jump at the end of the line to change the name of the user that will connect to the vCenter and the name of the vCenter. That can be seen from the output below in the first orange box.

  • Remember that the Ruby vSphere Console and the VSAN Observer tool are an experimental feature. There is no user authentication to the VSAN Observer website, and I’ve found out that the VSAN Observer process dies after a few hours.

Once you launch the RVC tool and enter the password for your vCenter account, you can use RVC commands. You can use ls to list objects, or cd <number> to drill down in an object. William Lam (@lamw) has some interesting articles about RVC (RVC 1.6 released)

But the command you want is to launch the vsan.observer program that will launch a webserver to which you can connect on port 8010 (Second orange box).

vsan.observer <vcenter-hostname>/<Datacenter-name>/computers/<Cluster-Name>/ –run-webserver –force

or for me

vsan.observer vcenter01.bussink.org/Home/computers/Management\ Cluster/ –run-webserver –force

VSAN Observer on Windows 01

To stop the vsan.observer process you can stop it with a double Ctrl+C.

VSAN Observer Web interface

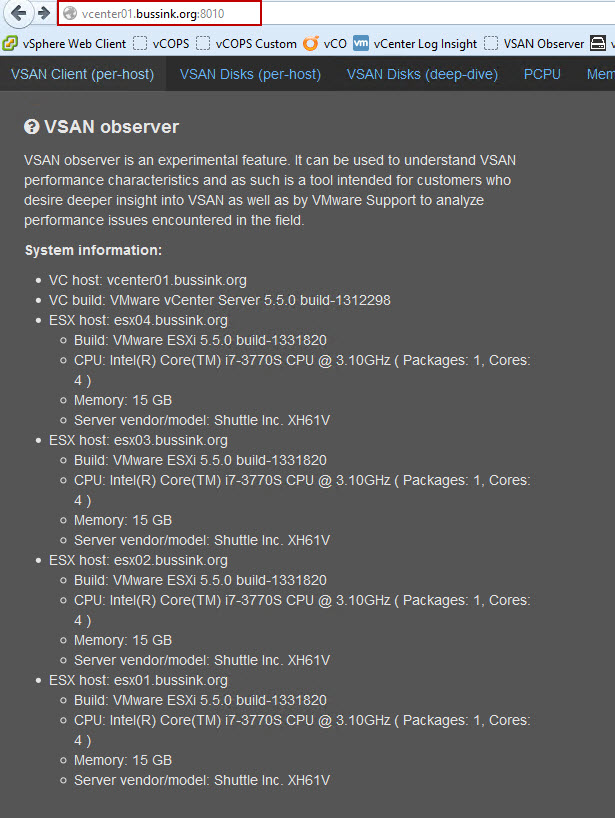
So now that you have your vsan.observer running, let’s connect to it with a browser on port 8010. This is the About section  that will list your VSAN hosts.

VSAN Observer About

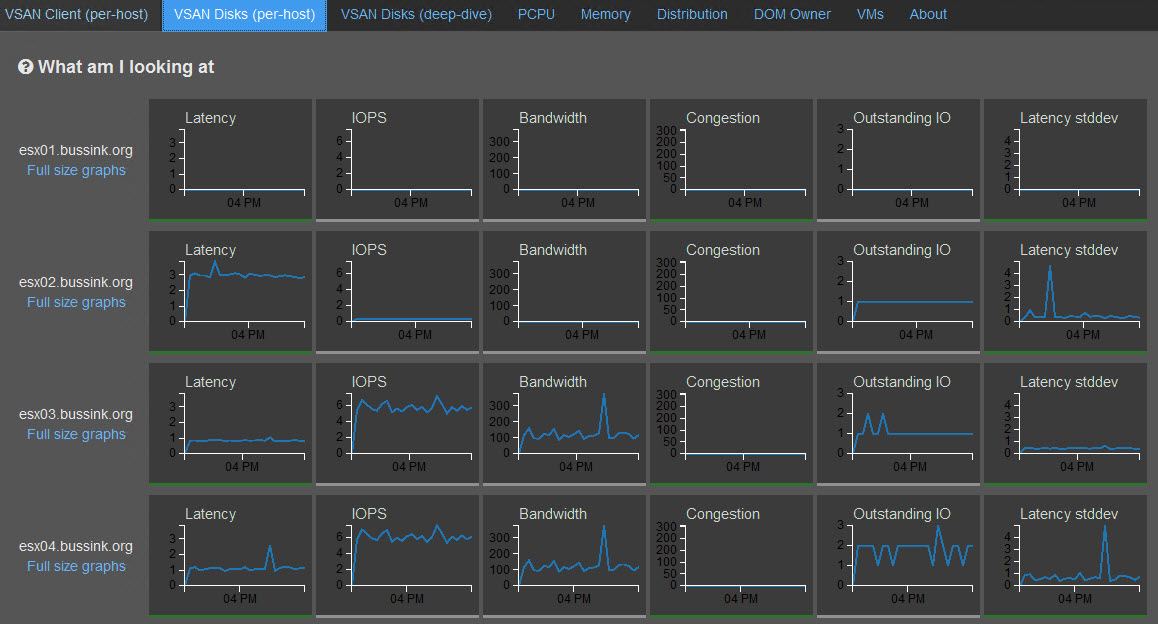
But you can get some very interesting information about your Hosts such as VSAN Disks (per-host).

VSAN Observer VSAN Disks per-host

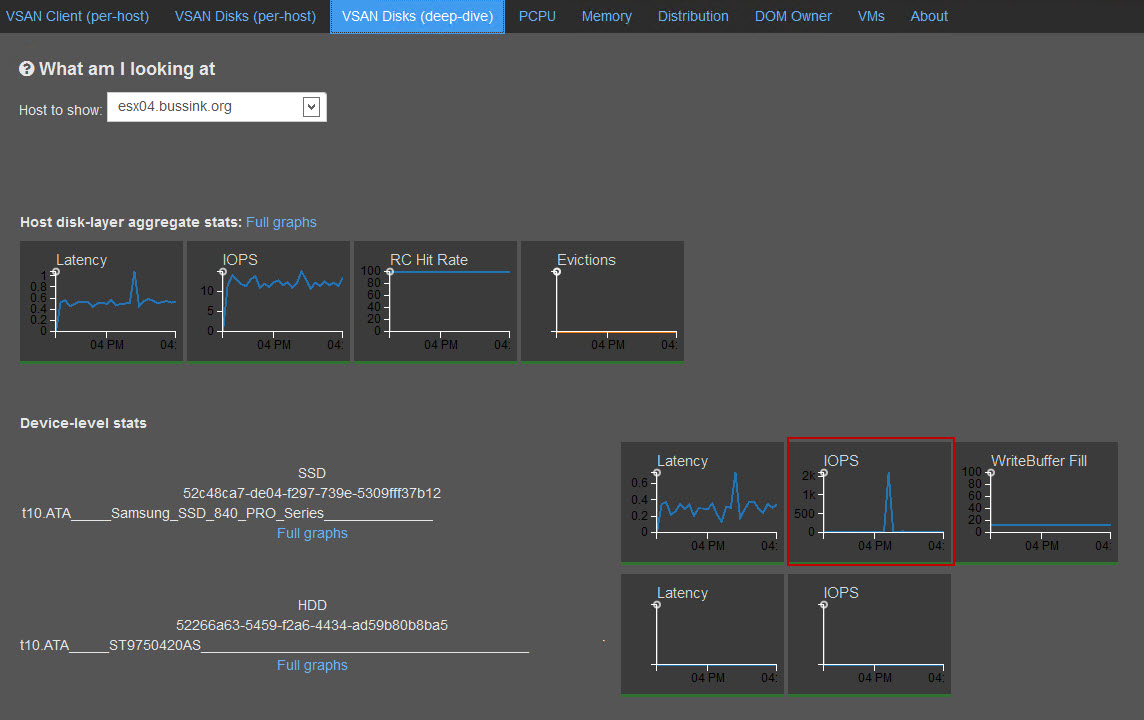
Here is the VSAN Disk (deep-dive) to see the performance of the SSD caching in front of the magnetic disk. Here the vCenter Log Insight appliance kept on the VSAN, had a peak during a reboot.

VSAN Observer VSAN Disks deep-dive

You can also drill deep with the Full graphs to get more details of the write operations on the SSD.

VSAN Observer VSAN Disks deep-dive SSD 01

VSAN Observer VSAN Disks deep-dive SSD 02

These charts are not always the easiest to read. But you will find great stuff here.

VM VSAN Stats with Backing Storage.

The is the most interesting charts I’ve found. This is where you can see the different component of the storage backing your VM. My Storage Policu for the vCenter Log Insight is placed in the vCenter with a VSAN Redundancy policy (Number of failures to tolerate = 1).

I recommend you see this picture in full size, to better see the various details.

VSAN Observer VMs vCenter Log Backing

This below is the original view you get with the vSphere Web Client view from the Monitor, Virtual SAN and on the VM.

vSphere Web Client vCenter Log Insight VSAN Redundancy


After having played a bit with the RVC VSAN Observer in the last 24 hours. I think this will be an interesting tool for Storage IO analysis. I really hope this makes it into a Fling or a full plugin for the vCenter server.


VSAN Observer Firewall rule

If your vCenter Server 5.5 is running on a Windows hosts with the integrated firewall activated. Here is the rule to open the port on your system to check the VSAN Observer, from another machine.

netsh advfirewall firewall add rule name = “VMware RVC VSAN Observer” dir = in protocol = tcp action = allow localport = 8010 remoteip = localsubnet profile = DOMAIN