vBrownbag TechTalk “InfiniBand in the Lab” presentation.

For the past few weeks I have slowly begun to build a working InfiniBand infrastructure on my vSphere cluster hosted in the office. I’m still missing some cables. With VMworld 2013 EMEA in Barcelona behind us, I’ve now got the time to publish the presentation I did in the Community zone for the vBrownbag Tech Talks. On Tuesday noon, I was the first one to start the series of Tech Talk and the infrastructure to record and process the video/audio feed had not been tuned properly. Unfortunately you will see this in the video link of the presentation. So in my video, the first 2 minutes 08 seconds, the audio is just horible… So I URGE you to jump into the video at the 3 minute mark if you value your ears.

Here is the direct link to the Tech Talk about “InfiniBand in the Lab” and the link to the other Tech Talks done at VMworld 2013 EMEA.

I’m not used to doing a presentation sitting in front of multiple cameras. Some of the later slides are too fuzzy on the video, so I’m now publishing the presentation in this article.

InfiniBand_in_the_Lab


The InfiniBands Host Card Adapters (HCA) for Dual 20Gbps ports (DDR Speed) can be found on ebay for $50 or $35 pounds.

I hope this video link and the presentation will be useful to some of you that want to increase an intra vSphere cluster backbone for the vMotion, Fault Tolerance or VSAN traffic.

I enjoyed doing the presentation, as I have to thank the following people making this presentation possible : Raphael Schitz,William Lam, Vladan Seget, Gregory Roche


VSAN.info website

Introducing the new VSAN.info website, This website is not aimed at Corporate vSphere VSAN infrastructure, butthe people implementing VSAN in the homelabs. We have noticed an new interest in build labs to test out VSAN, but many questions on configurations and components. By building a list of the various articles and blogs that talk about the VSAN, people will be able to quickly check the various configs.

Head over to http://www.vsan.info


VSAN Observer showing Degraded status…

This is just a quick follow-up on my previous “Using VSAN Observer in vCenter 5.5” post. As mentioned recently by Duncan Epping (@DuncanYB) in his blog entry Virtual SAN news flash pt 1. The VSAN engineers have done a full root cause of the AHCI controller issues that have been reported recently. The fix is not out yet. As a precaution, and because I use the AHCI chipset in my homelab servers, I have not scaled up the usage of the VSAN. I have been monitoring closely the VMs I have deployed on the VSAN datastore.

VSAN Observer DEGRADED status on a host

VSAN Observer degraded

This is curious as neither the vSphere Web Client or the vSphere Client on Windows have reported anything at a high level. No Alarms. As can be seen from the following two screenshots.

VSAN Virtual Disks

VSAN Virtual Disks

To see any glimpse to an error, you need to drill deeper into the Hard disk to see the following.

VSAN Virtual Disks Expanded

VSAN Disk Groups

VSAN Disk Groups


So what to do in this case. Well I tried to activate the Maintenance Mode and migrate the data from the degraded ESXi host to another.

Virtual SAN data migration

There are three modes how you can enter a host in the Virtual SAN Cluster into Maintenance Mode.  They are the following:

  1. Full data migration: Virtual SAN migrates all data that resides on this host. This option results in the largest amount of data transfer and consumes the most time and resources.
  2. Ensure accessibility: Virtual SAN ensures that all virtual machines on this host will remain accessible if the host is shut down or removed from the cluster. Only partial data migration is needed. This is the default option.
  3. No data migration: Virtual SAN will not migrate any data from this host. Some virtual machines might become inaccessible if the host is shut down or removed from the cluster.


Maintenance Mode - Full Data Migration

So I selected the Full data migration option. But this didn’t work out well for me.

General VSAN fault

I had to fail back to the Ensure accessibility to get the host into maintenance mode.

Unfortunately, even after a reboot of the ESXi host and it’s return from maintenance mode. The VSAN Observer keeps telling me that my component residing on the ESXi host is still in a DEGRADED state. Guess, I will have to patiently wait for the release of the AHCI controller VSAN fix. And see how it performs then.


Open Questions:

  • Is VSAN Observer picking up some extra info that is not raised by the vCenter Server 5.5 ?
  • Is the info from the vCenter Server 5.5 not presented properly in the vSphere Web Client ?


Supporting Information.

My hosts have two gigabit network interface. I have created two VMkernel-VSAN interface in two differents IP ranges, as per the recommendations. Each VMkernel-VSAN interface goes out using one interface, and will not switch to the 2nd one.

Using the VSAN Observer in vCenter 5.5

VSAN observer is an experimental feature. It can be used to understand VSAN performance characteristics and as such is a tool intended for customers who desire deeper insight into VSAN as well as by VMware Support to analyze performance issues encountered in the field.”  This is the tool any tester of VSAN can use to monitor his hosts, disks, VMs and see the distribution across hosts.

Rawlinson (@PunchingClouds) has created two very interesting articles on the VSAN Observer, which I’ve been hearing about for a few weeks. In his posts, Rawlinson shows how to use the VSAN observer that comes with the vCenter Appliance Using RVC VSAN Observer Pt1 and Using RVC VSAN Observer Pt2. I will show you here how to use the one that comes with the Windows implementation of vCenter 5.5

The VSAN Observer runs on the Ruby vSphere Console (RVC). Ruby vSphere Console (RVC) is a Linux console UI for vSphere, built on the RbVmomi bindings to the vSphere API. The vSphere object graph is presented as a virtual filesystem, allowing you to navigate and run commands against managed entities using familiar shell syntax.Your vCenter 5.5 ships with RVC installed.

Starting your own VSAN Observer

In the vCenter 5.5 server under the path C:\Program Files\VMware\Infrastructure\VirtualCenter Server\support\rvc you will find the rvc.bat file. Edit the rvc.bat file with notepad or notepad++ and jump at the end of the line to change the name of the user that will connect to the vCenter and the name of the vCenter. That can be seen from the output below in the first orange box.

  • Remember that the Ruby vSphere Console and the VSAN Observer tool are an experimental feature. There is no user authentication to the VSAN Observer website, and I’ve found out that the VSAN Observer process dies after a few hours.

Once you launch the RVC tool and enter the password for your vCenter account, you can use RVC commands. You can use ls to list objects, or cd <number> to drill down in an object. William Lam (@lamw) has some interesting articles about RVC (RVC 1.6 released)

But the command you want is to launch the vsan.observer program that will launch a webserver to which you can connect on port 8010 (Second orange box).

vsan.observer <vcenter-hostname>/<Datacenter-name>/computers/<Cluster-Name>/ –run-webserver –force

or for me

vsan.observer vcenter01.bussink.org/Home/computers/Management\ Cluster/ –run-webserver –force

VSAN Observer on Windows 01

To stop the vsan.observer process you can stop it with a double Ctrl+C.

VSAN Observer Web interface

So now that you have your vsan.observer running, let’s connect to it with a browser on port 8010. This is the About section  that will list your VSAN hosts.

VSAN Observer About

But you can get some very interesting information about your Hosts such as VSAN Disks (per-host).

VSAN Observer VSAN Disks per-host

Here is the VSAN Disk (deep-dive) to see the performance of the SSD caching in front of the magnetic disk. Here the vCenter Log Insight appliance kept on the VSAN, had a peak during a reboot.

VSAN Observer VSAN Disks deep-dive

You can also drill deep with the Full graphs to get more details of the write operations on the SSD.

VSAN Observer VSAN Disks deep-dive SSD 01

VSAN Observer VSAN Disks deep-dive SSD 02

These charts are not always the easiest to read. But you will find great stuff here.

VM VSAN Stats with Backing Storage.

The is the most interesting charts I’ve found. This is where you can see the different component of the storage backing your VM. My Storage Policu for the vCenter Log Insight is placed in the vCenter with a VSAN Redundancy policy (Number of failures to tolerate = 1).

I recommend you see this picture in full size, to better see the various details.

VSAN Observer VMs vCenter Log Backing

This below is the original view you get with the vSphere Web Client view from the Monitor, Virtual SAN and on the VM.

vSphere Web Client vCenter Log Insight VSAN Redundancy


After having played a bit with the RVC VSAN Observer in the last 24 hours. I think this will be an interesting tool for Storage IO analysis. I really hope this makes it into a Fling or a full plugin for the vCenter server.


VSAN Observer Firewall rule

If your vCenter Server 5.5 is running on a Windows hosts with the integrated firewall activated. Here is the rule to open the port on your system to check the VSAN Observer, from another machine.

netsh advfirewall firewall add rule name = “VMware RVC VSAN Observer” dir = in protocol = tcp action = allow localport = 8010 remoteip = localsubnet profile = DOMAIN


Adding Realtek R8168 Driver to ESXi 5.5.0 ISO

Update 20 March 2014. With the release of VMware ESXi 5.5.0 Update 1, this blog post is once again very popular. A lot of other articles, blogs and forum discussions have been using the Realtek R8168 driver link to my website, and this is starting to take an impact on my hosting provider. I therefore have had to removed the direct links to the R8168 & R8169 drivers on this page. These drivers are very easy to extract from the latest ESXi 5.1.0 Update 2 offline depot file which you can get from my.vmware.com . You just need to open the .zip file in a 7zip/winzip and extract the net-r8168 driver and use it with the ESXi Customizer.

vib_path

Sorry for the inconvenience.


The ESXi 5.5.0 Build 1331820  that came out yesterday, did not include any Realtek R8168 or R8169 driver in it. So if your homelab ESXi host only has these Realtek 8168 network cards, you need to build a custom ISO.

The most simple tool to use is Andreas Peetz’s (@VFrontDEESXi Customizer 2.7.2 tool. The ESXi Customizer tool allows you to select the ESXi 5.5.0 ISO file and include into it a new Driver in .vib format.

You can then download and extract the VMware Bookbank NET-R8168 driver from vSphere 5.1 ISO or download it from the following link for your conveniance.

VMware_bootbank_net-r8168_8.013.00-3vmw.510.0.0.799733

VMware_bootbank_net-r8169_6.011.00-2vmw.510.0.0.799733

Launch the ESXi Customizer and build your new .ISO file

ESXi-Customizer_ESXi-5.5.0_r8168

This will create a ESXi-Custom.ISO file that you can burn to a CD and use to install vSphere 5.5 on your host.

InfiniBand in the lab…

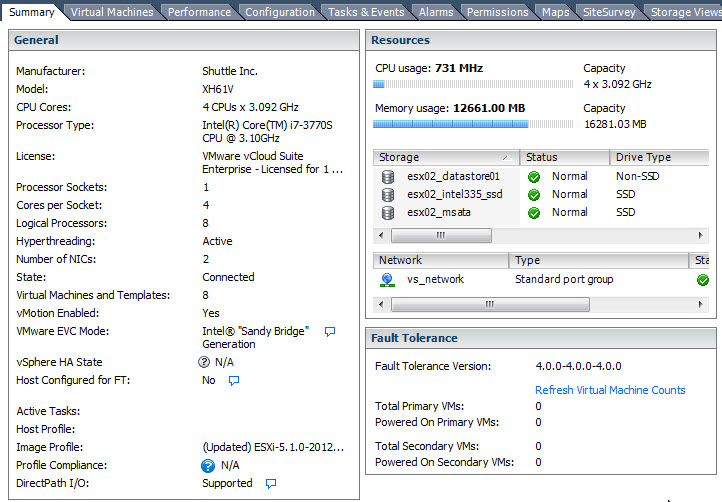
Okay, the original title was going to be ‘InfiniBand in the lab… who can afford 10/40 GbE’. I’ve looked in the past at 10GbE switches, and nearly pulled the trigger a few times. Even now the prices of the switches like the Netgear Prosafe or Cisco SG500X are going down, the cost of the 10GbE Adapter is still high. Having tested VSAN in the lab, I knew I wanted more speed for the replication and access to the data, than what I experienced.  The kick in the butt in network acceleration that I have used is InfiniBand.

If you search on ebay, you will find lots of very cheap InfiniBand host channel adapters (HCA) and cables. A Dual 20Gbps adapter will cost you between $40 and $80 dollars. The cables will vary between $15 and upto $150 depending of the type of cables. One of the interesting fact is that you can use InfiniBand in a point-to-point configuration. Each InfiniBand network needs a Subnet Manager, This is a configuration for the network, akin a Fabric Channel Zoning.

InfiniBand Data Rates

An InfiniBand link is a serial link operating at one of five data rates: single data rate (SDR), double data rate (DDR), quad data rate (QDR), fourteen data rate (FDR), and enhanced data rate (EDR).

  1. 10 Gbps or Single Data Rate (SDR)
  2. 20 Gbps or Dual Data Rate (DDR)
  3. 40 Gbps or Quad Data Rate (QDR)
  4. 56 Gbps or Fourteen data rate (FDR)
  5. 100Gbps or Enhanced data rate (EDR)
  6. In 2014 will see the announcement of High data rate (HDR)
  7. And the roadmap continues with next data rate (NDR)

There is a great entry InfiniBand on wikipedia that discuss in larger terms the different signaling of InfiniBand.

InfiniBand Host Channel Adapters

Two weeks ago, I found a great lead, information and that pushed me to purchased 6 InfiniBand adapters.

Item picture  3x Mellanox InfiniBand MHGH28-XTC Dual Port DDR/CX4 (PCIe Gen2) at $50.
Item picture 3x Mellanox InfiniBand MCX354A-FCBT CX354A Dual Port FDR/QDR  (PCIe Gen3) at $300.

InfiniBand Physical Interconnection

Early InfiniBand used copper CX4 cable for SDR and DDR rates with 4x ports — also commonly used to connect SAS (Serial Attached SCSI) HBAs to external (SAS) disk arrays. With SAS, this is known as an SFF-8470 connector, and is referred to as an “InfiniBand-style” Connector.

Item picture Cisco 10GB CX4 to CX4 Infiniband Cable 1.5 m

The latest connectors used with up to QDR and FDR speeds 4x ports are QSFP (Quad SFP) and can be copper or fiber, depending on the length required.

InfiniBand Switch

While you can create a triangle configuration with 3 hosts using Dual Port cards like Vladan Seget (@Vladan) writes in his very interesting article Homelab Storage Network Speed with InfiniBand I wanted to see how a InfiniBand switch would work. I only invested in the following older Silverstorm 9024-CU24-ST2 that supports only 10Gbps SDR port. But it has 24x of them. Not bad for a $400 switch that supports 24x 10Gbps ports.

Item picture
SilverStorm 10Gbps 24 port InfiniBand switch 9024-CU24-ST2

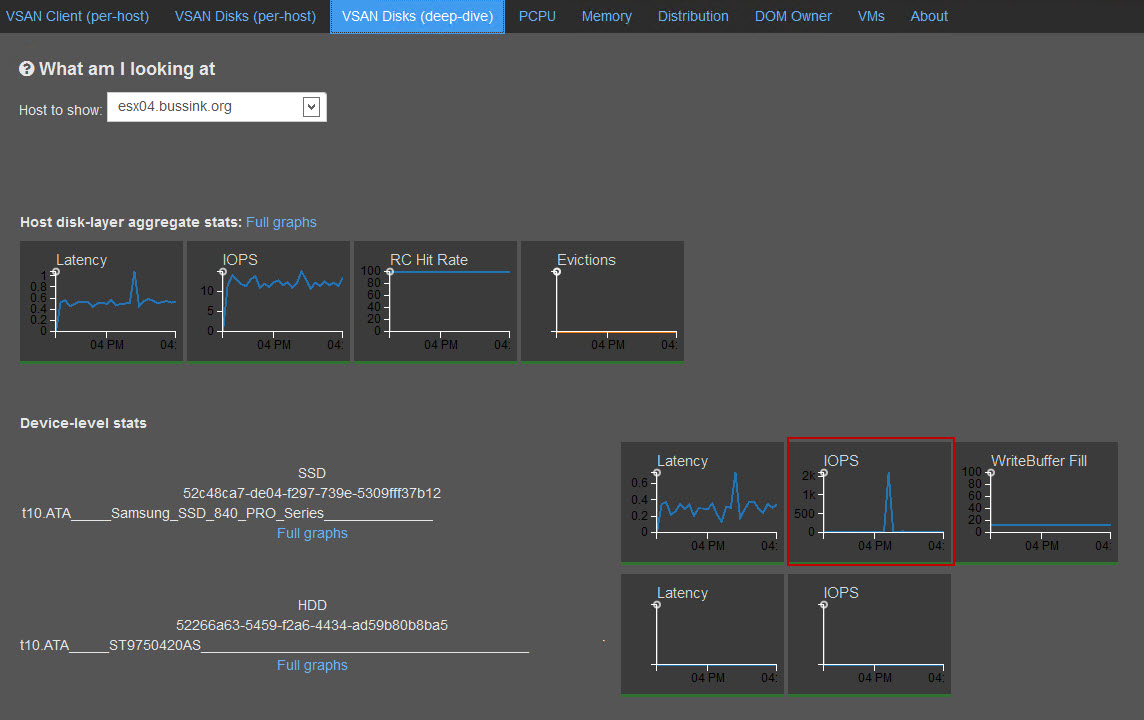
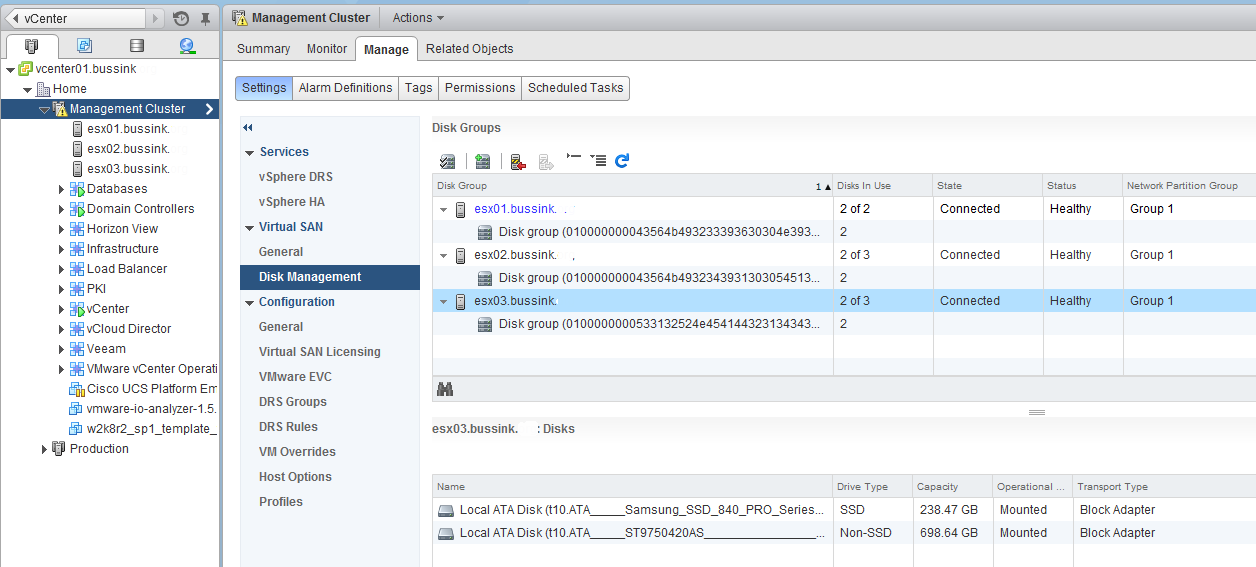
In my configuration each Dual Port Mellanox MHGH28-XTC (DDR Capable) will connect to my SilverStorm switch at only SDR 10Gbps speed, but I have two ports from each hosts. I can also increase the amount of hosts connected to the switch, and use a single Subnet Manager and single IPoIB (IP over InfiniBand) network addressing scheme. At the present time, I think this single IPoIB network addressing might be what is important for the implementation of VSAN in the lab.

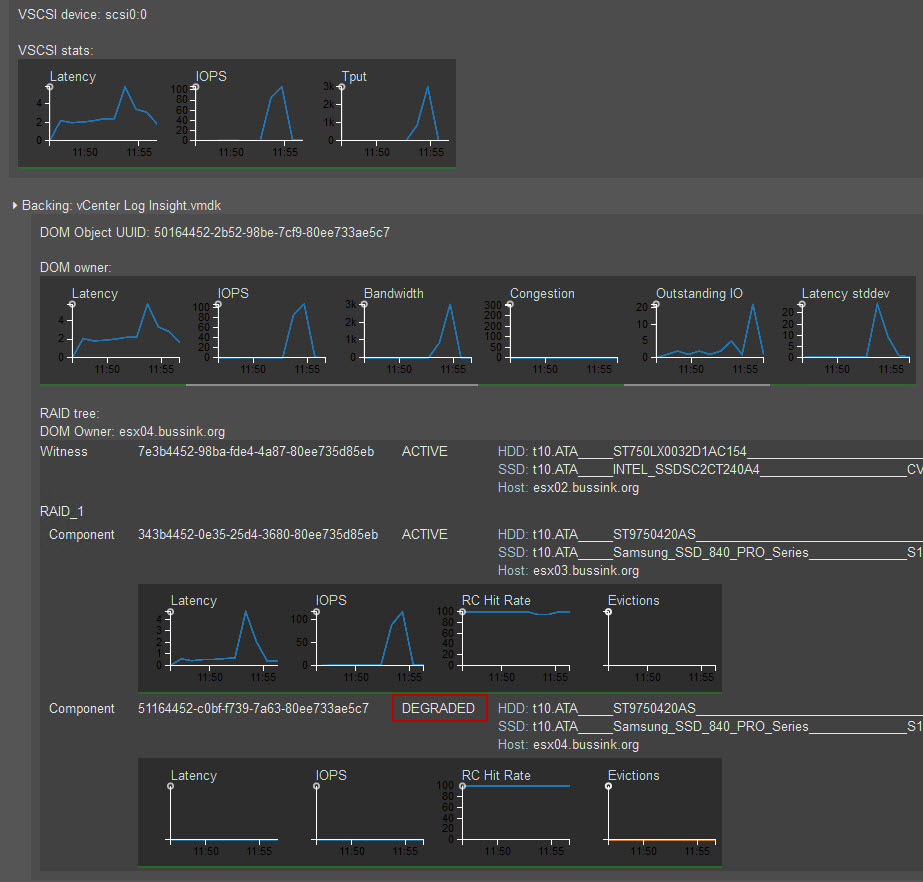
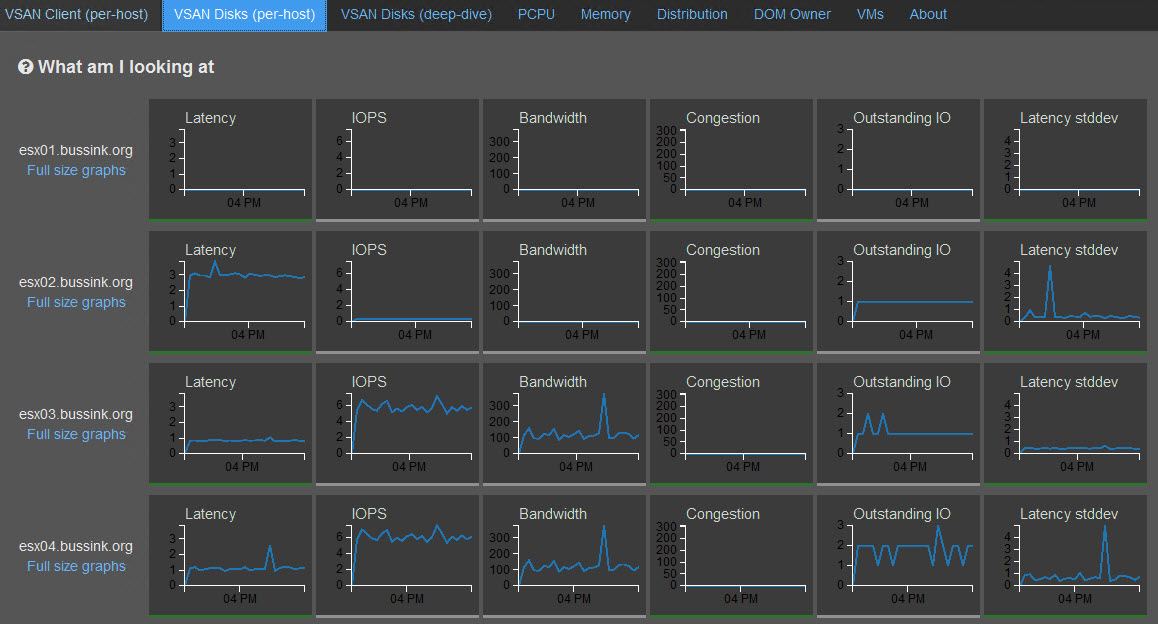
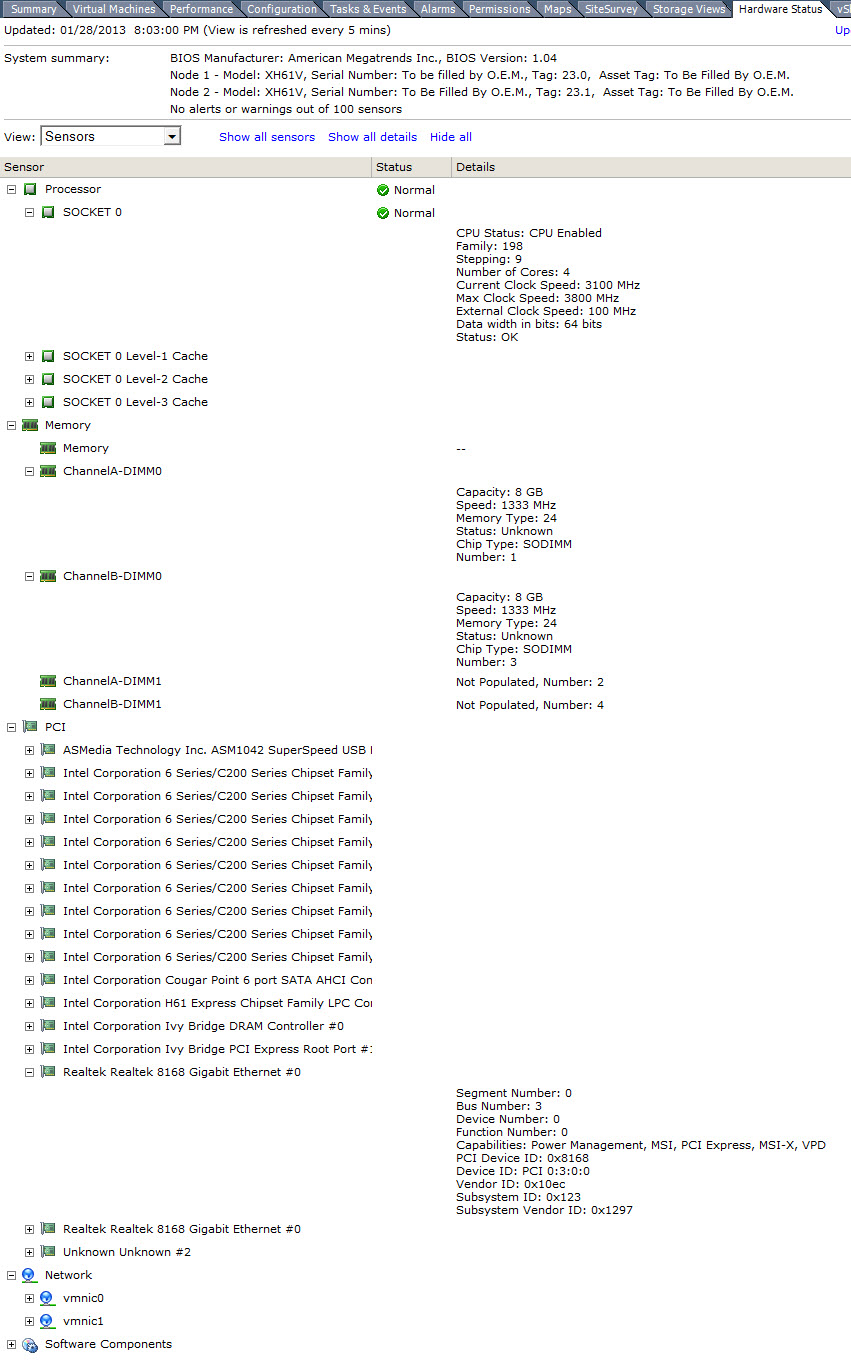
Below you see the IB Port Statistics with three vSphere 5.1 hosts connected (1x cable per ESXi as I’m waiting on a 2nd batch of CX4 cables).

Silverstorm 3x SDR Links

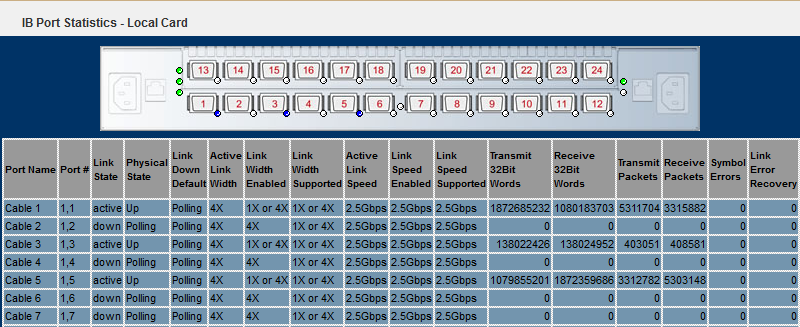
The surprise I had when connecting to the SilverStorm 9024 switch is that it did not have the Subnet Manager. But thanks to Raphael Schitz (@hypervisor_fr) who has successfully with the work & help of others (William Lam & Stjepan Groš) and great tools (ESX Community Packaging Tool by Andreas Peetz @vFrontDE), repackaged the OpenFabrics Enterprise Distribution OpenSM (Subnet Manager) so that it can be loaded on vSphere 5.0 and vSphere 5.1. This vSphere installable VIB can be found in his blog article  InfiniBand@home votre homelab a 20Gbps (In French).

The Link states in the screenshot above went to active, once the ib-Opensm was installed on the vSphere 5.1 hosts, the MTU was set and the partitions.conf configuration file written. Without Raphael’s ib-opensm, my InfiniBand switch would have been alone and not passed the IPoIB traffic in my lab.


Installing the InfiniBand Adapters in vSphere 5.1

Here is the process I used to install the InfiniBand drivers after adding the Host Channel Adapters. You will need three files. The first is the InfiniBand OFED Driver for VMware vSphere 5.x from Mellanox. The 2nd is the

  1. VMware’s Mellanox 10Gb Ethernet driver supports products based on the Mellanox ConnectX Ethernet adapters
  2. Mellanox InfiniBand OFED Driver for VMware vSphere 5.x
  3. OpenFabrics.org Enterprise Distribution’s OpenSM for VMware vSphere 5.1 packaged by Raphael Schitz

You will need to transfer these three packages to each vSphere 5.x host, and install them using the esxcli command line. Before installing the VMware Mellanox ConnectX dcrive, you need to unzip the file, as it’s the offline zip file you want to supply in the ‘esxcli software vib’ install command. I push all the files via SSH in the /tmp folder. I recommend that the host be put in maintenance mode, as you will need to reboot after the drivers are installed.

esxcli software vib install

The commands are

  • unzip mlx4_en-mlnx-1.6.1.2-471530.zip
  • esxcli software vib install -d /tmp/mlx4_en-mlnx-1.6.1.2-offline_bundle-471530.zip –no-sig-check
  • esxcli software vib install -d /tmp/MLNX-OFED-ESX-1.8.1.0.zip –no-sig-check
  • esxcli software vib install -v /tmp/ib-opensm-3.3.15.x86_64.vib –no-sig-check

Careful with the ib-opensm, the esxcli -d becomes a -v for the vib.

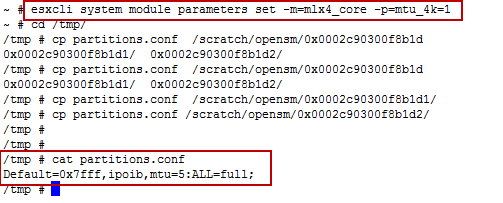
At this point, you will reboot the host. Once the host comes backup, there are two more commands you need to do. One is the set the MTU to 4092, and configure the OpenSM per adapter with the partitions.conf file.

The partitions.conf file is a simple one line file that contains the following config.

[button] Default=0x7fff,ipoib,mtu=5:ALL=full;[/button]

esxcli set IB mtu and copy partitions.conf

The commands are

  • esxcli system module paramters set -m=mlx4_core -p=mtu_4k=1
  • copy partitions.conf  /scratch/opensm/adapter_1_hca/
  • copy partitions.conf /scratch/opensm/adapter_2_hca/

At this point you will be able to configure the Mellanox Adapters in the vSphere Web Client (ConnectX for the MHGH28-XTC)

ESXi Network Adapter ConnectX

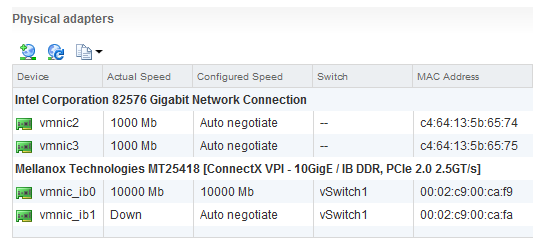
The vSwitch view is as follow

vSwitch1 Dual vmnic_ib


Configure the Mellanox Adapter in the vSphere Clientand (ConnectX3 for the MCX354A-FCBT)

ESXi Network Adapter ConnectX3

I’m still waiting on the delivery of some QSFP Cable for the ConnectX Adapters. This config will be done in a triangular design until I find a QDR Switch of reasonable cost.

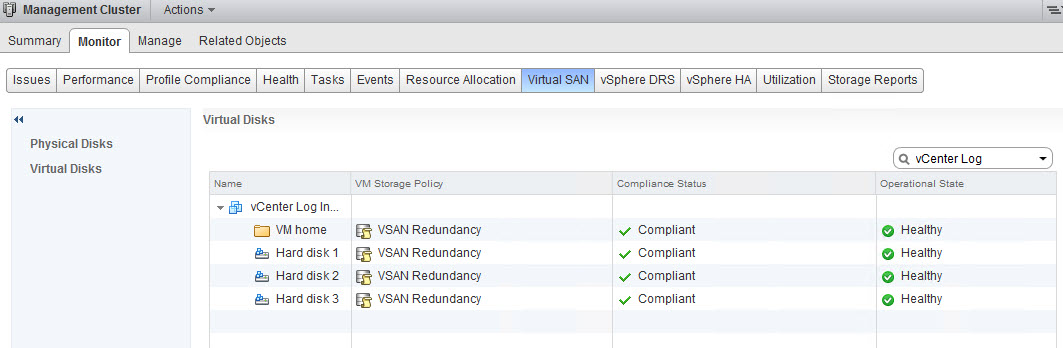
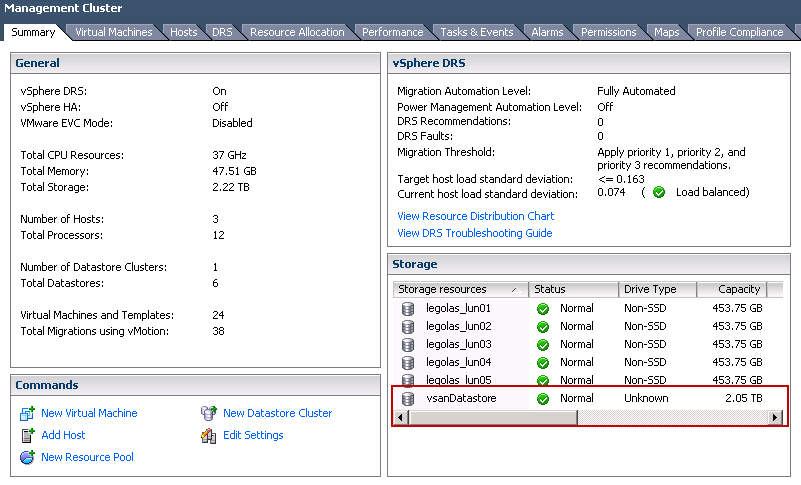
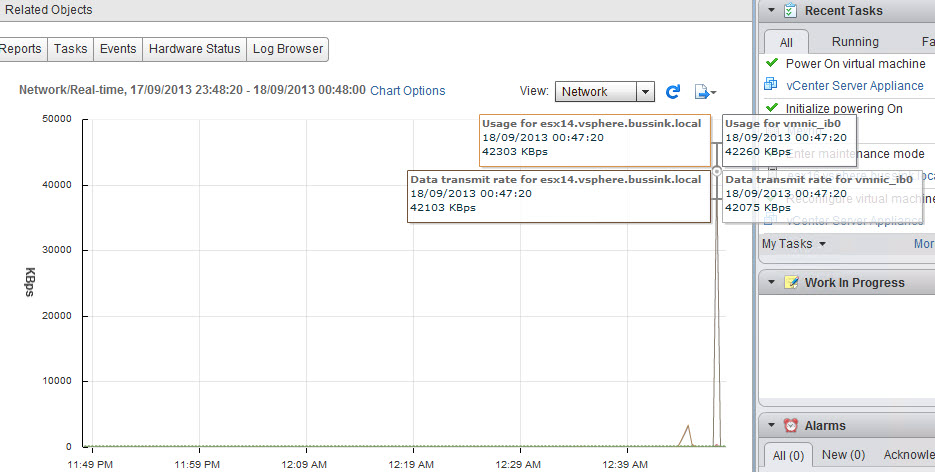
This article wouldn’t be complete without a bench mark. Here is the screenshot I quickly took from the vCenter Server Appliance, that I bumped to 4 vCPU and 22GB that I vMotioned between two hosts with SDR (10Gbps) connectivity.

vCSA 22GB vMotion at SDR speed


This is where I’m going to stop for now.  Hope you enjoyed it.


Expanding the lab and network reflexions

Before I start on a blog on how I implemented InfiniBand in the lab, I wanted to make a quick backstory on my lab which is located in the office. I do have a small homelab running VSAN, but this my larger lab.

This is a quick summary of my recent lab adventures. The different between the lab and the homelab, is it’s location. I’m privileged that the company I work for, is allowing me used  12U in the company datacenter. They provide the electricity and the cooling. The rest of what happens inside those 12U is mine. The only promise I had to do, is that I was not going to run external commercial services on this infrastructure.

Early last year, I purchased a set of Cisco UCS C M2 (Westmere processor) Series servers when Cisco announced the newer M3 with Sandy Bridge processors, at a real bargain (to me at least).

I had gotten three Cisco UCS C200 M2 with a Single Xeon 5649 (6-cores @2.5Ghz) and 4GB, and three Cisco UCS C210 M2 with a Single Xeon 5649. At that point I purchased some Kingston memory 8GB dimms to increase each host from to 48GB (6x 8GB), and the last one got all 6x4GB dimms.

It tooks me quite a few months to pay for all this infrastructure.

Office Lab with Cisco UCS C Series

This summer with the release of the next set of Intel Xeon Ivy Bridge processors (E5-2600v2), the Westmere series of processors are starting to fade from the pricelists. Yet at the same time, some large social networking companies are shedding some equipment. In this I was able to find on ebay a set of 6x Xeon L5639 (6-cores @2.1Ghz), and I have just finished adding them to the lab. I don’t really need the additional cpu resources, but I do want the capability to expand the memory of each server past the original 6 DIMMs I purchased.

The Lab is composed of two Clusters, one with the C200 M2 with Dual Xeon 5649.

Cluster 1

and one cluster with the C210 M2 with Dual Xeon L5639.

Cluster 2

The clusters are real empty now, as I have broken down the vCloud Director infrastructure that was available to my colleagues, as I wait for the very imminent release of the vSphere 5.5 edition.

The network is done with two Cisco SG300-28 switches with a LAG Trunk between them.

Office Lab back

For a longtime, I have been searching for a faster backbone to these two Cisco SG300-28 switches. Prices on 10GbE switches have come down, and some very interesting contenders are the Cisco SG500X series with 4 SFP+ ports, or the Netgear Prosafe XS708E or XS712T switches. While these switches are just affordable for a privatly sustain lab, the cost of the Adapters would make it expensive. I’ve tried to find an older 10GbE switch or tried to coax some suppliers to give their old Nexus 5010 switches over but not much success. The revelation to an affordable and fast network backbone comes from InfiniBand. Like others, I’ve know about InfiniBand for years, and I’ve seen my share in datacenters left and right (HPC Clusters, Oracle Exadata racks). But only this summer did I see a french blogger Raphael Schitz (@hypervisor_fr) write what we all wanted to have… InfiniBand@home votre homelab a 20Gbps (In French). Vladan Seget (@Vladan) has followed up on the topic and has also a great article Homelab Storage Network Speed with InfiniBand on the topic. Three weeks ago, I took the plunge and ordered my own InfiniBand interfaces, InfiniBand cables and even to try my hand at it, an InfiniBand Switch. Follow me in the next article to see me build a Cheap yet fast network backbone to my lab.

Having had the opportunity to test VSAN in the homelab, I’ve notice that once you are running a dozen virtual machines, you really want to migrate from the gigabit network to the recommended VSAN network speed of 10G. If you plan to just validate VSAN in the homelab, gigabit is great, but if you plan to run the homelab on VSAN, you will be quickly finding things sluggish.


Homelab with vSphere 5.5 and VSAN

This is to give you a quick insight in my 2013 Homelab that is running vSphere 5.5 and has a running version of Virtual SAN (VSAN) in Beta code. I have been quiet on the blog for a while, as I’ve been doing some tests with vSphere 5.5 and VSAN, but the NDA has limited my communications.

This is probably the smallest VSAN implementation you can do without going with a Nested VSAN (Awesome design by William Lam) or with three Mac Mini’s.

This VSAN is only 24cm x 22cm x 20cm (High x Depth x Width), and runs with 130 Watts total consumption. On the following screenshot you see the Homelab next to an old Synology DS1010+

Homelab running vSphere 5.5 with VSAN

Homelab running vSphere 5.5 with VSAN


It is composed of three Shuttle XH61v with a quad-core i7-3770s processor (65W) and 16GB of memory (Two 8GB Kingston SO-DIMM). The Shuttle XH61v also comes with two Gigabit network cards. Each Shuttle XH61v has the following storage

  1. Kingston USB 3.0 DataTraveller 16GB Key to boot vSphere 5.5
  2. Intel mSATA 525 SSD 120GB which is used by vFlash
  3. Intel 530 SSD 240GB 2.5″ or Samsung 840 Pro 256GB
  4. Seagate Momentus HD 2.5″ 750GB 7200rpm

That is a lot of storage in such a small case, but it works, and you don’t even hear the ventilator (for Wife Acceptance Factor approval).

I’m not going to cover in this article how you need to create a VMkernel interface for VSAN, and that you need to disable HA before turning VSAN on. This article “VSAN How to Configure” by David Hill does an excellent job, and his follow-up post “Configure disk redundancy in VSAN” adds more information.

From the vSphere Web Client, this is the configuration of my VSAN after I enabled it.

VSAN Disk Management

VSAN Disk Management

So once you enable the VSAN with three hosts that each have an empty SSD and HD (in my case 240GB SSD and 750GB HD) you get the following.

VSAN Datastore created

VSAN Datastore created

Another great functionality of the VSAN, is that if you take another ESXi host and configure it’s VSAN VMkernel interface and add it to the VSAN Resource, it automaticaly mounts the VSAN Datastore. This will greatly simplify the provisioning of storage in a vSphere Cluster. The VSAN Datastore is also the first implementation of Virtual Volumes (VVOL) that I have seen. Cormac Hogan has a great Virtual Volume (VVOL) Tech Preview article.

The Virtual SAN from VMware should be available in Beta for a wider audience very soon, so go over to VMware VSAN Beta Register.


  • Concerning the Shuttle XH61v, it’s only down side is the two SO-DIMM slots of memory. There is no current capacity to increase beyond the 16GB the memory of a Mini-ITX motherboard.
  • The Shuttle XH61v cannot boot in USB3 mode from the USB key, you need to modify the BIOS and downgrade the USB3 to USB2 mode.


vCenter SRM 5.1 database creation using Transact-SQL

I’ve created a simple Microsft SQL Server Transact-SQL script to configure the database for vCenter Site Recovery Manager (SRM) 5.1 . This allows you to quickly create the database on the primary site and the recovery site.

I’m not too impressed by the description in the Site Recovery Manager 5.1 Installation and Configuration documentation on page 20 as seen below…

[box] This information provides the general steps that you must perform to configure an SQL Server database for SRM to use. For specific instructions, see the SQL Server documentation.

Procedure

1 Select an authentication mode when you create the database instance.

Option & Description

Windows authentication. The database user account must be the same user account that you use to run the SRM service.

SQL Authentication. Leave the default local system user.

2 If SQL Server is installed on the same host as SRM Server, you might need to deselect the Shared Memory network setting on the database server.

3 Create the SRM database user account.

4 Grant the SRM database user account the bulk insert, connect, and create table permissions.

5 Create the database schema. The SRM database schema must have the same name as the database user account.

6 Set the SRM database user as the owner of the SRM database schema. 7 Set the SRM database schema as the default schema for the SRM database user.[/box]


My general rule when I create a SQL Server database is to have my user database on a separate disk from the operating system. This disk is formatted with 64K block size. SQL Server works with two specific IO request size 8K and 64K in general, so having 64K block size is optimum for SQL Server databases (See Disk partition alignment Best Practice for SQL Server ). I usually create a directory path for my SQL database D:\Microsoft SQL Server in which I will create the directories for the vCenter databases, vcenter-sso, vcenter-server, vcenter-update-manager and vcenter-srm.

Microsoft SQL Server directory structure for User Databases

Microsoft SQL Server directory structure for User Databases


Now let’s insert the Transact-SQL script to create the vcenter-srm database. My database settings limits the database to grow past 2GB, and increases the database as it grows by blocks of 64MB. The initial size starts at 64MB.
I recommend that you cut & paste the following Transact-SQL script into the SQL Server Management Studio and then select the sections to execute them one after another.


[code]
—  Transact-SQL script to simplify the creation of the vCenter SRM 5.1 database
— this script as been created to run with a SQL Server 2008 R2 SP2 (10.50.4000)
—  it should run without much changes on SQL Server 2012
— 
—  Erik Bussink, Date created 08/03/2013
—  Twitter @ErikBussink
 
— Let’s create the vcenter-srm database in the D:\Microsoft SQL Server\vcenter-srm\
 
USE [master]
GO
CREATE DATABASE [vcenter-srm] on PRIMARY
(NAME = N’vcenter-srm’, FILENAME = N’D:\Microsoft SQL Server\vcenter-srm\vcenter-srm.mdf’, SIZE = 64MB , MAXSIZE = 2048MB, FILEGROWTH = 64MB)
LOG ON
(NAME = N’vcenter-srm_log’, FILENAME = N’D:\Microsoft SQL Server\vcenter-srm\vcenter-srm.ldf’, SIZE = 32MB , MAXSIZE = 1024MB, FILEGROWTH = 32MB)
COLLATE SQL_Latin1_General_CP1_CI_AS
GO
 
— Let’s change some default settings for the [vcenter-srm] database
 
USE [vcenter-srm]
GO
ALTER DATABASE [vcenter-srm] SET RECOVERY SIMPLE ;
GO
 
— Let’s create the vCenter SRM database account
 
USE [vcenter-srm]
GO
CREATE LOGIN [srmdb] WITH PASSWORD = ‘password’, DEFAULT_DATABASE = [vcenter-srm], DEFAULT_LANGUAGE =[us_english], CHECK_POLICY= OFF
GO
CREATE USER [srmdb] for LOGIN [srmdb] WITH DEFAULT_SCHEMA= [dbo]
GO
CREATE SCHEMA [srmdb] AUTHORIZATION [srmdb]
GO
ALTER USER [srmdb] WITH DEFAULT_SCHEMA=[srmdb]
GO
 
—  Lets modify the [srmdb] account to have the required server right and user rights
 
USE [vcenter-srm]
EXEC master ..sp_addsrvrolemember @loginame = N’srmdb’, @rolename = N’bulkadmin’
GO
sp_addrolemember [db_accessadmin], [srmdb]
GO
sp_addrolemember [db_backupoperator], [srmdb]
GO
sp_addrolemember [db_datareader], [srmdb]
GO
sp_addrolemember [db_datawriter], [srmdb]
GO
sp_addrolemember [db_ddladmin], [srmdb]
GO
sp_addrolemember [db_owner], [srmdb]
GO
sp_addrolemember [db_securityadmin], [srmdb]
GO

[/code]

Once you have uploaded the script you can execute the script step by step, by selecting the paragraph you want to run, then executing just the selected code.

Create the vcenter-srm database

Create the vcenter-srm database

Create the vcenter-srm database

Modify the vcenter-srm database to put it in Single Recover mode

Configure vcenter-srm database

Configure vcenter-srm database

Create the srmdb user account & schema & change schema owner

Create srmdb user

Create srmdb user

Modify the srmdb user account with rights and

Modify srmdb user

Modify srmdb user

And now we can check the user account with the proper rights.

Validate srmdb user rights

Validate srmdb user rights

I hope that you can now see how a simple well written Transact-SQL script can save you time & errors when creating the Primary and Recovery site’s databases.

I’ve created similar scripts to Create vCenter Server databases with Transact-SQL, and Create vCloud Director database with Transact-SQL .


2013 Homelab refresh

Preamble

It’s now 2013, and it’s time to have a peak at my homelab refresh for this year.


Background

In the past three years, I’ve ran a very light homelab with VMware ESXi. I mainly used my workstation (Supermicro X8DTH-6F) with Dual Xeon 5520 @2.26Ghz (8-Cores) and 72GB of RAM to run most of the virtual machines and for testing within VMware Workstation, and only ran domain controllers and 1 proxy VM on a small ESXi machine, a Shuttle XG41. This gives a lot of flexibilty to run nearly all the virtual machines on a large beefed up workstation. There are quiet a few posts on this topic on various vExpert websites (I highly recommend Eric Sloof’s Super-Workstation).

I sometimes do play games (I’m married with a gamer), and when I do I have to ensure my virtual machines are powered down within VMware Workstation, as my system could and has crashed during games. Having corrupted VM is no fun.


Requirements

What I want for 2013 in the homelab, is a flexible environment composed of a few quiet ESXi hosts with my larger workstation being able to add new loads or test specific VM configuration. For this I need a infrastructure that is small, quiet and stable. Here are the requirements for my 2013 homelab infrastructure

  1. Wife Acceptance Factor (WAF)
  2. Small
  3. Quiet
  4. Power Efficient

Having purchased a flat, I don’t have a technical room (nothing like my 2006 computer room) or a basement. So having a few ESXi hosts on 24 hours a day, requires a high Wife Acceptance Factor. The system have to be small & quiet. In addition, if they are power efficient, it will make the utility bill easier.


Shuttle XH61V

The Shuttle XH61V is small black desktop based on the Intel H61 chipset. It comes in a 3.5L metal case with very quiet ventilators. You just need to purchase the Shuttle XH61V, a Intel 1155 Socket 65W processor, two memory SODIMMs (laptop memory) and local storage. Assembly can be done in less than 30 minutes.

Shuttle XH61V

Shuttle XH61V

The Shuttle XH61V comes with two NICs and support for a mSATA (Bootable) connector, a PCIe x1 slot, and two 2.5″ Devices. The Shuttle XH61V comes with two gigabit network cards. They are Realtek 8168 cards. These work flawlessly, but they do not support Jumbo frames.

Shuttle XH61V Back

Shuttle XH61V Back

For storage, I decided to boot from a mSATA device, and to keep a Intel SSD for a fast upper-tier local storage, and one large Hybrid 2.5″ Harddisk for main storage. I do have a Synology DS1010+ on the network that is the centralized NFS storage, but I want some fast local storage for specific virtual machines. It’s still early 2013, so I have not yet upgraded my older Synology or created a new powerful & quiet Nexenta Community Edition home server. On the next image you can see that three Shuttle XH61V take less space than a Synology DS1010+

Three Shuttle HX61V with Synology DS1010+

VMware ESXi installation

Installing VMware ESXi is done quickly as all the devices drivers are on the ESXi 5.1 VMware-VMvisor-Installer-5.1.0-799733.x86_64.iso install cdrom.

ESXi 5.1 on XH61V

ESXi 5.1 on XH61V

Here is the Hardware Status for the Shuttle XH61V

ESXi XH61V Hardware Status

Here is an updated screenshot of my vSphere 5.1 homelab cluster.

Management Cluster


Bill of Materials (BOM)

Here is my updated bill of materials (BOM) for my ESXi nodes.

  • Shuttle XH61V
  • Intel Core  i7-3770S CPU @3.1Ghz
  • Two Kingston 8GB DDR3 SO-DIMM KVR1333D3S9/8G
  • Kingston 16GB USB 3.0 Key to boot ESXi (Change BIOS as you cannot boot a USB key in USB3 mode)
  • Local Storage Intel SSD 525 120GB
  • Local Storage Intel SSD 520 240GB
  • Local Storage Seagate Momentus XT 750GB

Planned upgrade: I hope to get new Intel SSD 525 mSATA boot devices to replace the older Kingston SSDnow when they become available.


Performance & Efficiency

In my bill of materials, I selected the most powerful Intel Core i7 processor that I could fit in the Shuttle XH61V. Because I’m running virtual appliances and virtual machines like vCenter Operations Manager, SQL Databases, Splunk. There are some less expensive Core i3 (3M Cache), Core i5 (6M Cache) or Core i7 (8M Cache) processor that would work great.

What is impressive, is that the Shuttle XH61V comes with a 90W power adapter. We are far from the 300W mini-boxes/XPC or even the HP MicroServer with their 150W power adapters. Only the Intel NUC comes lower with a 65W power adapter and a single gigabit network (@AlexGalbraith has a great series of post on running ESXi on his Intel NUC ).

Just for info, the Intel Core i7-3770S has a cpubenchmark.net score of 9312. Which is really good for a small box that uses 90W.

The Shuttle XH61V is also very quiet... it’s barely a few decibels above the noise of a very quiet room. To tell you the thru… the WAF is really working, as my wife is now sleeping with two running XH61V at less than 2 meters away. And she does not notice them… 🙂


Pricing

The pricing for a Shuttle XH61V with 16GB memory and a USB boot device (16GB Kingston USB 3.0) can be kept to a about $350 on newegg. What will increase the price is the performance of the LGA 1155 Socket 65W processor ( Core i3-2130 from $130 to Core  i7-3770S at $300) and what additional local storage you want to put in.

vSphere 5.1 Cluster XH61V

The sizing of the homelab in early 2013 is so far from the end of 2006 when I moved out of my first flat, when I had a dedicated Computer room.

Update 18/03/2012. DirectPath I/O Configuration for Shuttle XH61v BIOS 1.04

XH61v DirectPath I/O Configuration

XH61v DirectPath I/O Configuration


Update 22/03/2013.  mSATA SSD Upgrade

I’ve decided to replace the Intel 525 30GB mSATA SSD that is used for booting ESXi and to store the Host Cache with a larger Intel 525 120GB mSATA SSD. This device will give me more space to store the Host Cache and will be used as a small Tier for the Temp scratch disk of my SQL virtual machine.

The ‘published’ performance for the Intel 525 120GB mSATA are

Capacity
Sequential
Read/Write (up to)
Random 4KB
Read/Write (up to)
Form Factor
30 GB SATA 6 Gb/s       500 MB/s / 275 MB/s  5,000 IOPS / 80,000 IOPS mSATA
60 GB SATA 6 Gb/s       550 MB/s / 475 MB/s 15,000 IOPS / 80,000 IOPS mSATA
120 GB SATA 6 Gb/s       550 MB/s / 500 MB/s 25,000 IOPS / 80,000 IOPS mSATA
180 GB SATA 6 Gb/s       550 MB/s / 520 MB/s 50,000 IOPS / 80,000 IOPS mSATA
240 GB SATA 6 Gb/s       550 MB/s / 520 MB/s 50,000 IOPS / 80,000 IOPS mSATA
 Show More Detailed Product Specifications >