Nexenta storage for the vLab

In this post, I will describe the storage design I use for my virtual infrastructure lab. I have been using the Community Edition of NexentaStor for the past two and a half year already. And I can tell already in the first paragraph of this post, that it’s a very impressive storage solution, which can scale to your needs and based on the budget you are ready to allocate to it.

I have played with various virtual storage appliances (VSA) from NetApp and EMC, and I used Openfiler 2.3 (x86-64) prior to moving to NexentaStor in my lab over 2.5 years ago. I was not getting the storage performance from the VSA, and it was difficult to add disks and storage to these VSA. The Community Edition of NexentaStor supports 18 TB of usable storage without requiring a paying license (you do need to register your Community Edition with Nexenta to get a license).  I don’t believe a lot of people are hitting this limit in their labs. In addition, since NexentaStor 3.1, the VAAI primitives are supported with iSCSI traffic. There simply is no other way to test VAAI in a virtualization lab without spending some serious money.

Here are the current release notes for NexentaStor 3.1.2 and you can download the NexentaStor Community Edition 3.1.2 to give it a go. Version 4 of NexentaStor is planned for the summer of 2012. It will use the Illumos. I’m looking forward to the next release of NexentaStor.

Hardware.


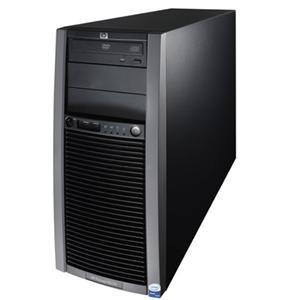
  • My current implementation of NexentaStor is currently using an HP ProLiant ML150 G5 with a single quad-core Xeon 5410 (@2.33 GHz and 12MB of L2 Cache) and 16GB of ECC Memory.
  • My current hard disks are three year old 1TB SATA disks. They are definitely the weak point of my infrastructure at the present time, and I should really replace these aging disks by bigger and faster disks.
  • I recently added three performant Intel 520 Series SSD. I took three 60GB disks. I’ve got Intel SSD in the past, and they are still very reliable, so the choice was not difficult. The 60GB versions of these disks are speced at 6700 IOPS RandomWrite, and 12000 IOPS RandomRead (I took the lowest numbers from the various Intel documentation). Getting larger disks would result in better IOPS performances and the drive would have more lifetime writes, but that would increase the cost of my storage.
  • On the Network side, I have added an Intel based Dual gigabit server network card. My management traffic and NFS traffic arrive on the mainboard network card, and my iSCSI stack is presented using two IP addresses on the very good Supermicro AOC-SG-i2 network card. The Supermicro AOC-SG-i2 has dual Intel 82575EB chips. The iSCSI traffic is set to use a 9000 MTU, and I have an EtherChannel trunk (2x1Gbps) across the network switches (two Cisco SG300-28) from the HP ProLiant ML150 G5 to the ESXi servers in a second room.


Storage Layout.

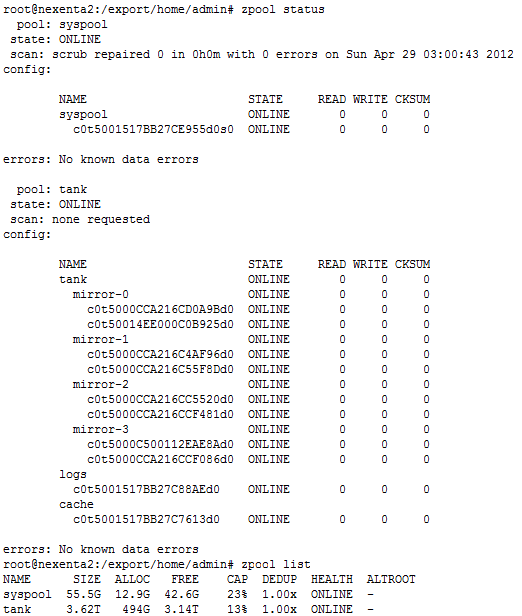
Here is a screenshot of my storage layout I’m now using. I used to have a single large RAIDZ2 configuration last year, which was giving me a lot of space, but I found the system lacking on the write side, so I exported all my virtual machines from the NexentaStor server, and reformatted the storage using mirror of disks to improve the write speed.

zpool status & zpool list

As you can see in the previous screenshot, my tank zvol is composed of four set of mirrored disks, and I’m using two Intel SSD 520 60GB. One as the L2ARC cache, and one as the ZLOG cache disk.

Because I don’t have more than 16GB of RAM in the HP ProLiant ML150 G5, I decided not to use the De-dupe functionality of the NexentaStor. From Constantin’s blog, it seems like a good rule of thumb is 5GB of dedupe in ARC/L2ARC per TB of deduped pool space. I have about 3.6TB of disk, so that’s would require about  18GB (if I want to keep the De-dupe tables in RAM instead of the L2ARC).

I have enough CPU resources with the Quad-Core Xeon 5410 (@ 2.33GHz) to run the compression on the storage.

NexentaStor and VMware’s vStorage API for Array Integration (VAAI)

Nexenta introduced support for VMware’s vStorage API for Array Integration (VAAI). Specifically four SCSI commands have been added to improve the performance of several VMware operations when using iSCSI or FC connections. Following is a brief summary of the four functions, as described in the NexentaStor 3.1 release notes.

  • SCSI Write Same: When creating a new virtual disk VMware must write’s zeros to every block location on the disk. This is done to ensure no residual data exists on the disk which could be read by the new VM. Without Write Same support the server’s CPU must write each individual block which consumes a lot of CPU cycles. With the Write Same command VMware can direct the storage array to perform this function, offloading it from the CPU and thereby saving CPU cycles for other operations. This is supported in ESX/ESXi 4.1 and later.
  • SCSI ATS: Without ATS support, when VMware clones a VM it must lock the entire LUN to prevent changes to the VM while it is being cloned. Howerver, locking the entire LUN affects all other VM’s that are using the same LUN. With ATS support VMware is able to instruct the array to lock only the specific region on the LUN being cloned. This allows other operations affecting other parts of the LUN to continue unaffected. This is supported in ESX/ESXi 4.1 and later.
  • SCSI Block Copy: Without Block Copy support, cloning a VM requires the server CPU to read and write each block of the VM consuming a lot of server CPU cycles. With Block Copy support VMware is able to instruct the array to perform a block copy of a region on the LUN corresponding to a VM. This offloads the task from the server’s CPU thereby saving CPU cycles for other operations. This is supported in ESX/ESXI 4.1 and later.
  • SCSI Unmap: Provides the ability to return freed blocks in a zvol back to a pool. Previously the pool would only grow. This enables ESXi to destroy a VM and return the freed storage back to the zvol. ESXi 5.0 and later support this functionality.

I’m covering the setting up of the iSCSI on the NexentaStor for vSphere in a separate post: Configuring iSCSI on Nexenta for vSphere 5.


vSphere 5 iSCSI Configuration

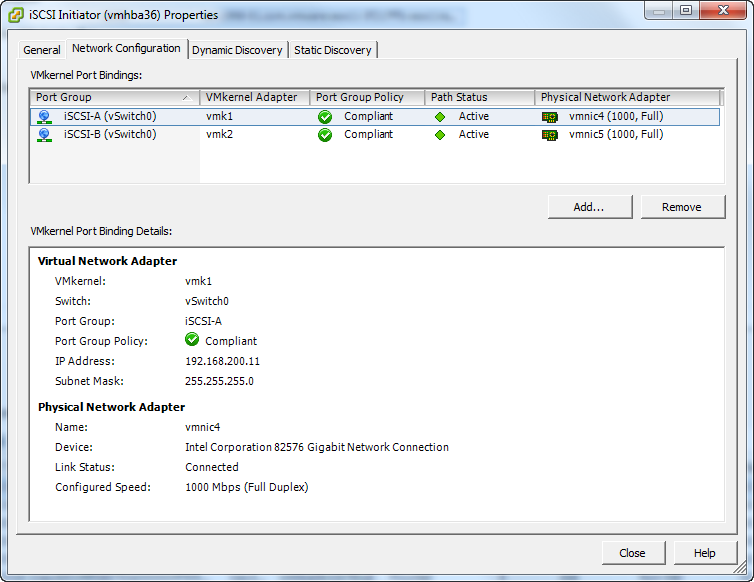
Here are some screenshots of how I setup the iSCSI configuration on my vSphere 5 cluster. The first one is the iSCSI Initiator with two iSCSI network cards.

vSphere 5 iSCSI Initiator VMkernel Port Bindings

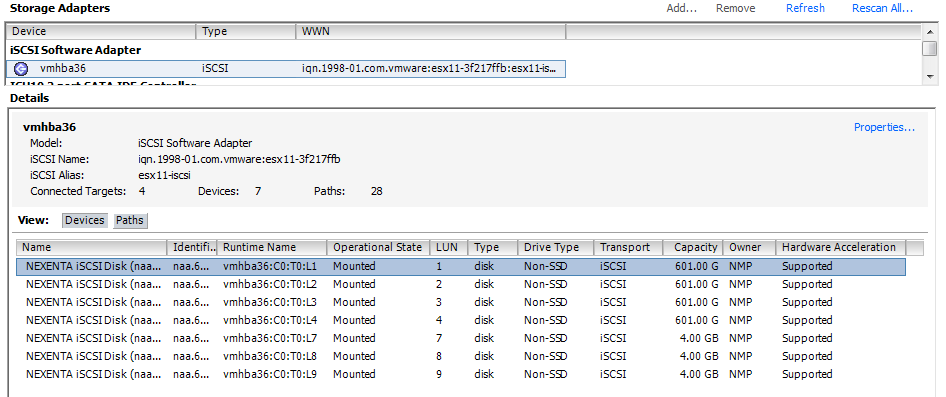
Then I presented four 601GB LUNs to my vSphere 5 Cluster. You can see in the following screenshot those four LUNs with LUN ID 1,2,3,4, while the small 4GB LUNs with ID 7,8,9 are the RDM LUNs I’m presenting for the I/O Analyzer tests. We see that the Hardware Acceleration is Supported.

NexentaStor iSCSI LUNs presented to vSphere

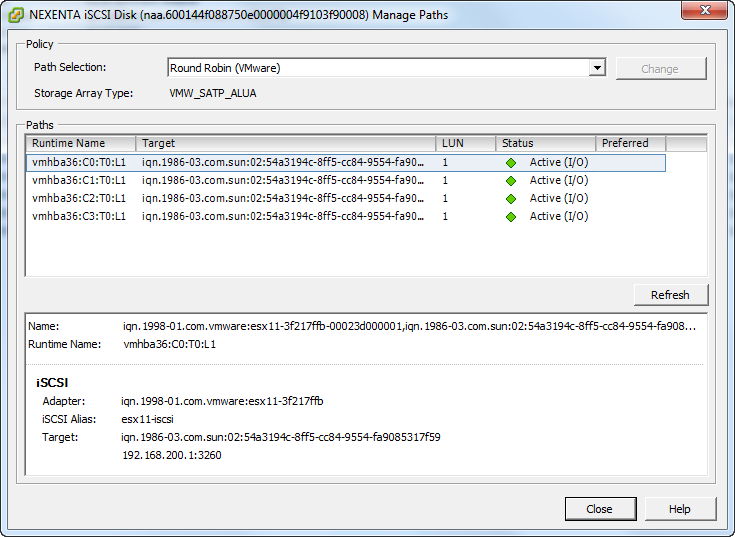
For each of these 601GB presented LUN, I modified the Path Selection from Most Recently Used (VMware) to Round Robin (VMware) and we see that all four paths are now Active (I/O) paths. iSCSI traffic is load balanced on both iSCSI network interfaces.

vSphere 5 iSCSI LUNs Path Selection set to Round Robin (VMware)


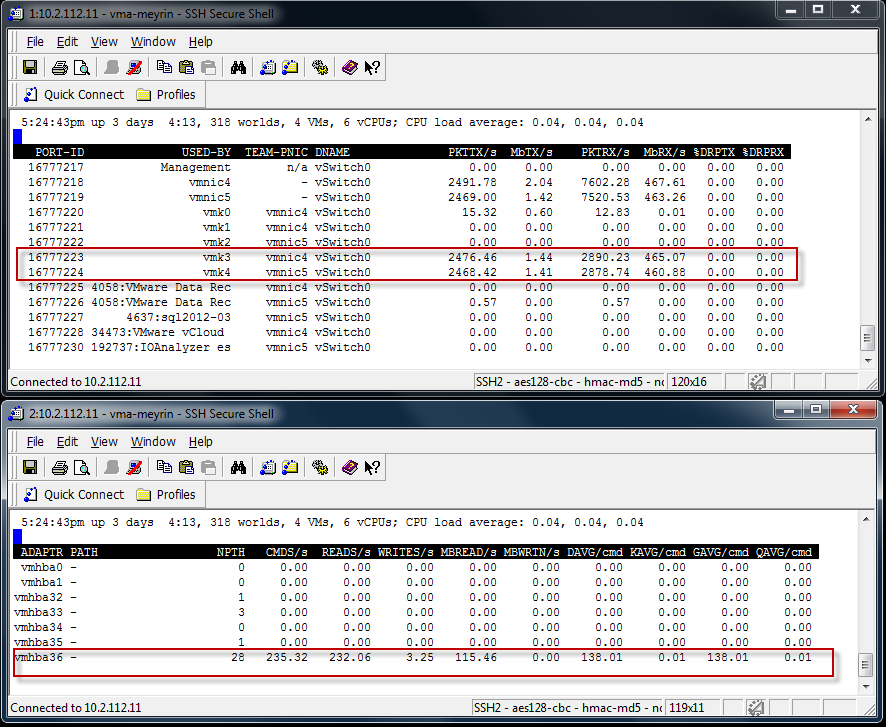
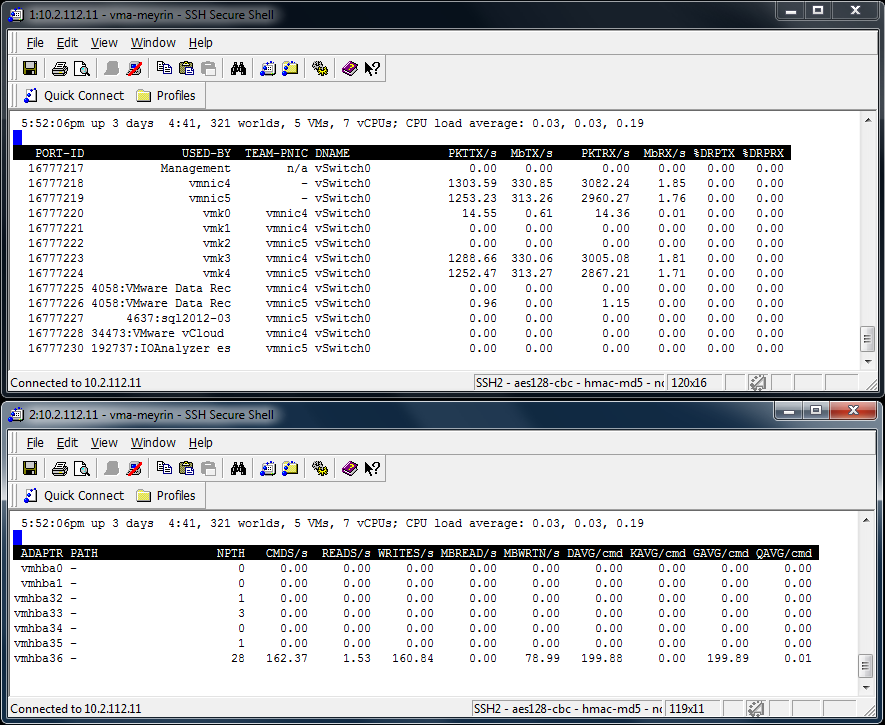
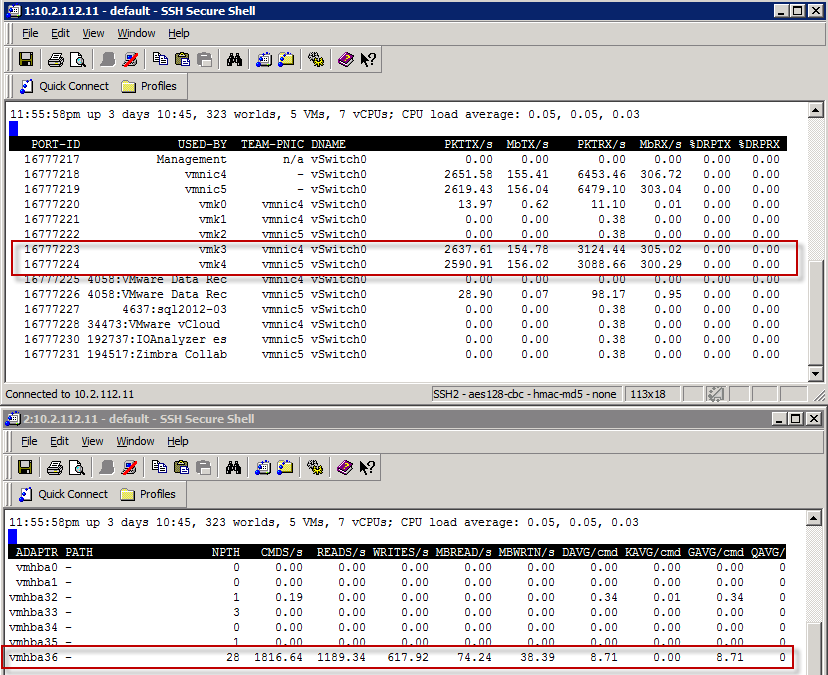
To see the load balancing across both iSCSI Network cards, I can quickly demo it with the IO Analyzer 1.1 doing a Max Throughput test (Max_Throughput.icf). I will show the results later in the post, but let’s first have a peak at the ESXTOP running from a vMA against my ESXi host. On this host, the two iSCSI vmkernel nics are vmk3 and vmk4.

IO Analyzer doing Max Throughput test. Load balanced iSCSI Traffic with Nexenta CLI

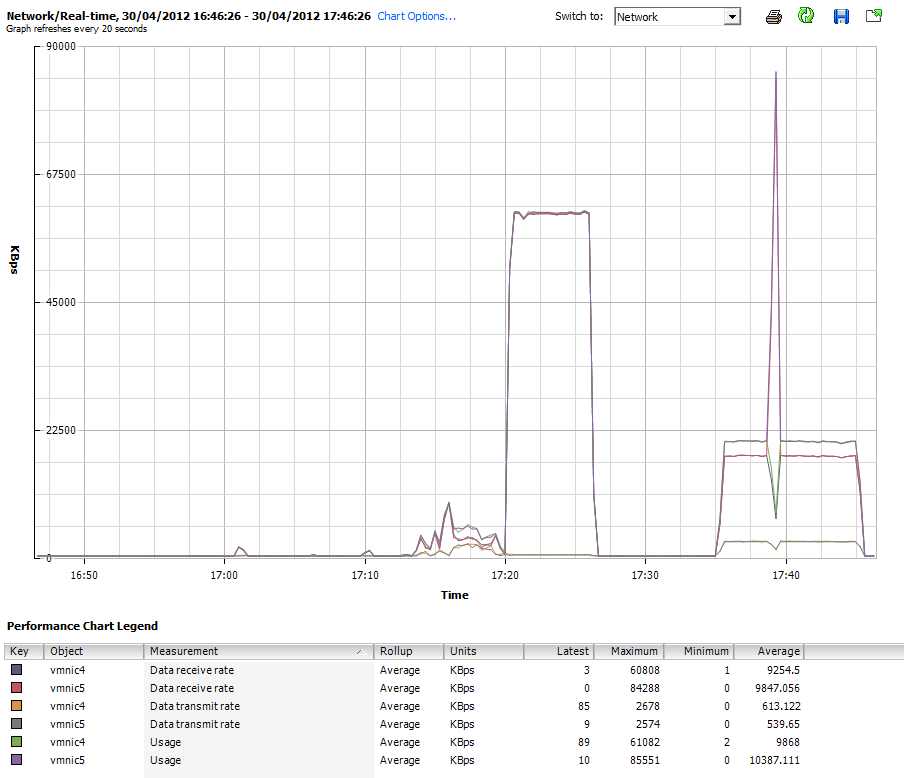
and with the vSphere 5 Client, we can see that the traffic is using both the physical vmnic4 and vmnic5.

IO Analyzer doing Max Throughput test. Load balanced iSCSI Traffic with Nexenta


VMware’s Fling I/O Analyzer 1.1 benchmarking

These are the test I ran on my infrastructure with VMware’s Fling I/O Analyzer 1.1. The Fling I/O Analyzer deploys a virtual appliance running Linux, with a WINE implementation of the iometer on it. I highly recommend that you watch the following I/O Analyzer vBrownBag by Gabriel Chapman (@bacon_is_king) from March 2012 to understand how you can test your infrastructure.

Maximum IOPS

Here are the three screenshots of the IO Analyzer running MAX_IOPS.icf (512b block 0% Random – 100% Read) against my NexentaStor. While it gives nice stats, and I’m the proud owner of a 55015 IOPS storage array, it’s not representative of day to day workload that the NexentaStor gives me.


IO Analyzer Max_IOPS Test from the vMA

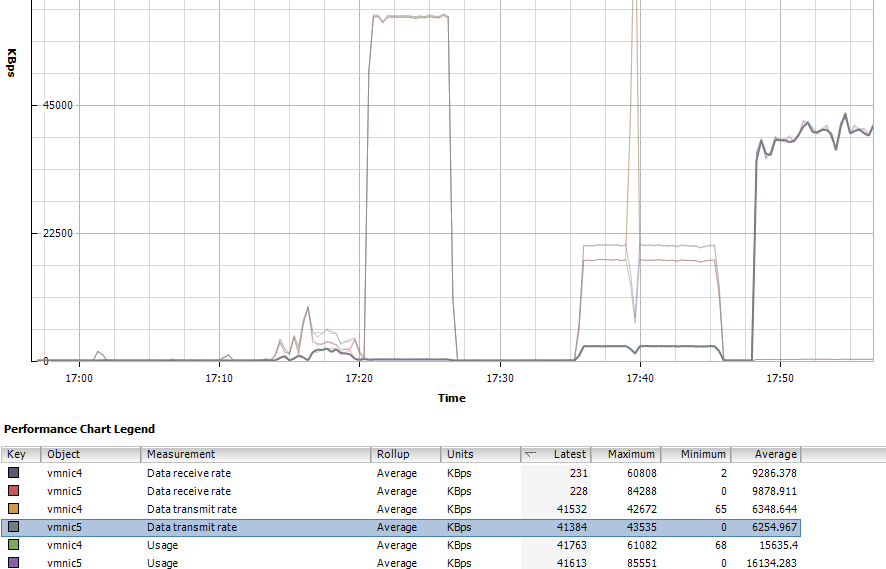
In the next graphic, the 2nd set of tests to the right is the Max IOPS Test. There is a spike. But we clearly see that when pushing the system with 512 Byte Sequential Read, the Throughput is down from the Max Throughput test I used earlier.

IO Analyzer Max_IOPS Test from the vSphere 5 Client

And now lets the results in the IO Analyzer for the Max_IOPS.icf test. Result is 55015 Read IOPS.

IO Analyzer results for Max_IOPS.icf


Maximum Write Throughput

This test will measure the maximum Write Throughput to the NexentaStor server Using the Max Write Throughput test (512K, 100% Sequential, 100% Write)

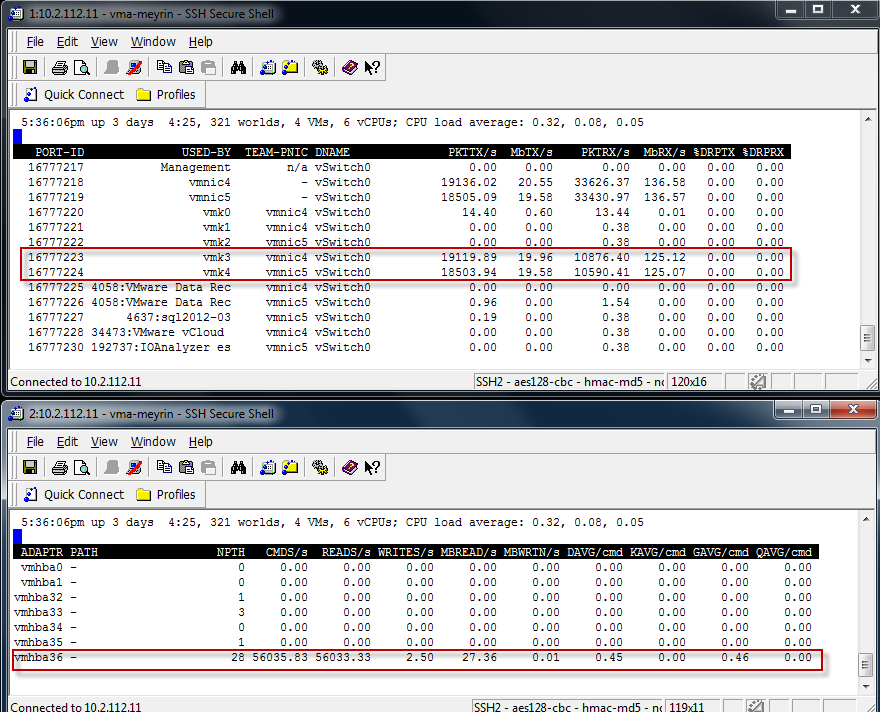
This is the screenshot from the vMA showing the load balancing Write traffic.

IO Analyzer running MaxWriteThroughPut from the vMA

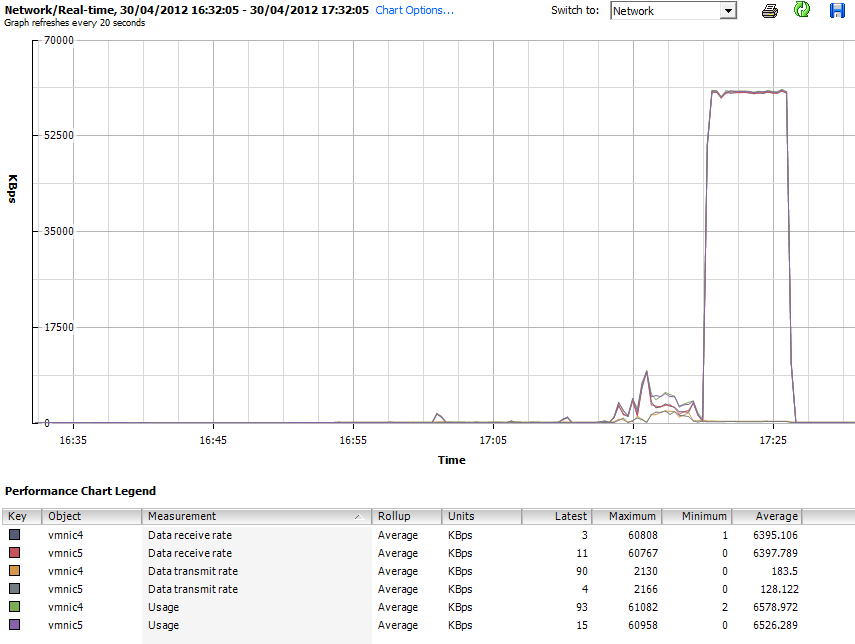
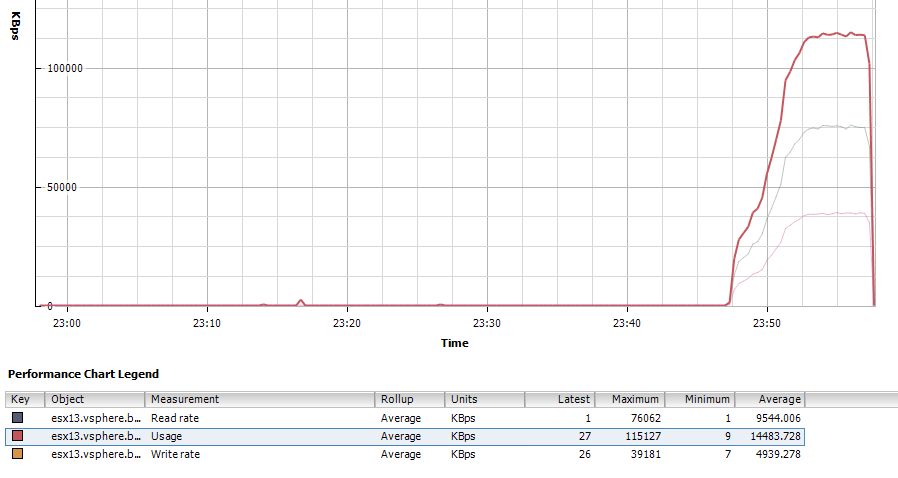
vSphere 5 Client Performance chart of the iSCSI Load Balancing (Network Chart)

IO Analyzer running MaxWriteThroughPut (Network) from the vSphere 5 Client

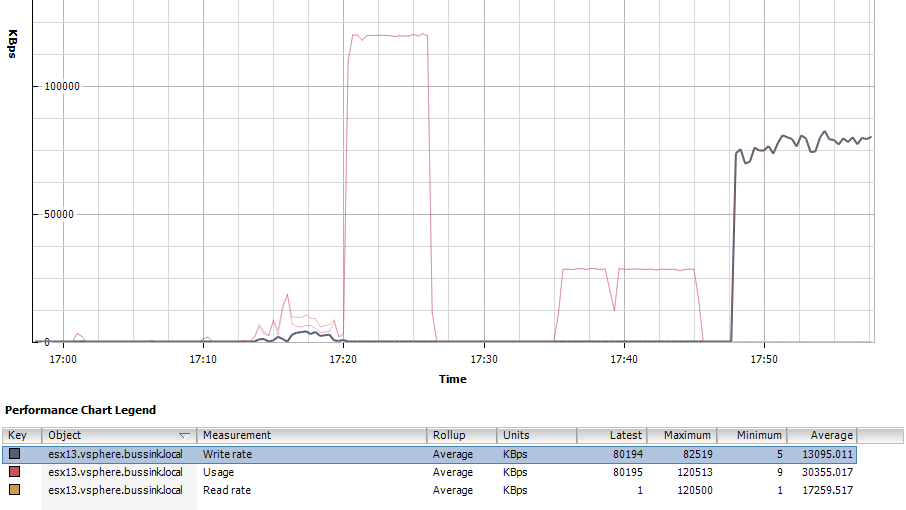
vSphere 5 Client Performance chart of the ESXi Write Rate (Disk Chart)

IO Analyzer running MaxWriteThroughPut (Disk from the vSphere 5 Client

Here is the view from the Nexenta General Status, where you have two speedometers. Notice that the CPU is running at 42% due to Compression being enabled on my ZVOL.

Nexenta GUI Status when running the Max Write Throughput test

And the result from the IO Accelerator for the Max Write Throughput Test. 75 MB/s or 151 WriteIOPS.

IO Analyzer Results for Max Write Throughput with the Nexenta


SQL Server Load

Now le’ts look at the SQL Server 64K test run on the I/O Analyzer. The test uses 64K blocks

IO Analyzer running SQL Server 64K test on Nexenta

Here is the vSphere 5 Client performance chart for the Disk. We see a nice 66% througput on Read and 33% on Write.

IO Analyzer running SQL Server 64K test on Nexenta (Disk Chart)

and the results giving us a nice 1354 total IOPS (893 ReadIOPS and 461 WriteIOPS).

IO Analyzer SQL Server 64K Results


Max IOPS from Three ESXi Hosts

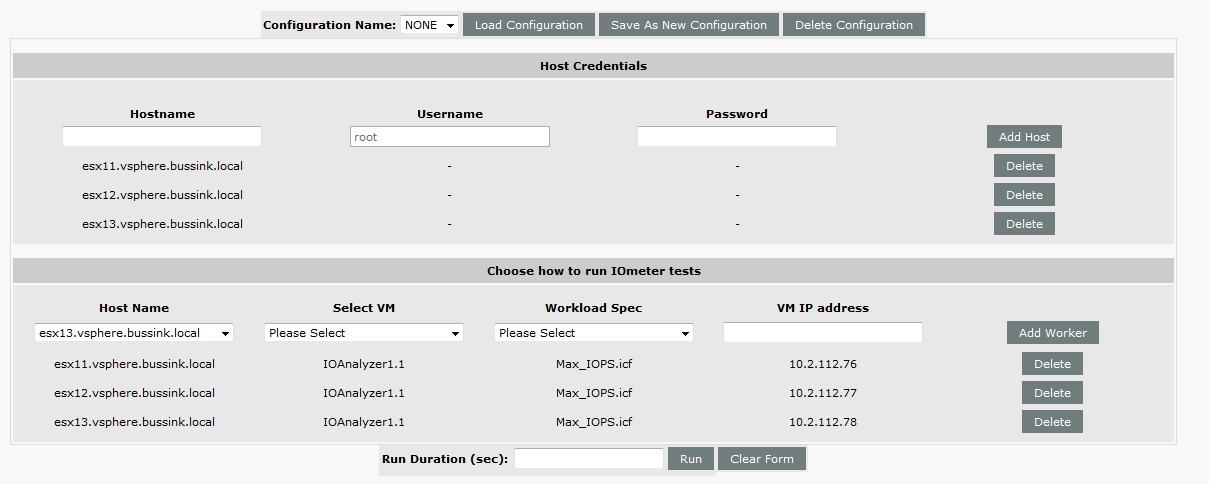
One final test with IO Analyzer is to run three concurrent tests across three ESXi host on the same NexentaStor server. I’m using the Max_IOPS test (512b block 0% Random – 100% Read). We will notice that running the same test from Three sources instead of a single ESXi host, will result in a lower total IOPS result. So instead of a 55015 IOPS, we are getting and average of 12800 IOPS per host or a total of 38400 IOPS. Not bad at all for a lab storage server.

3x IO Analyzer running on dedicated Host in parallel

and the results are

3x IO Analyzer running on dedicated Host in parallel Results


Bonnie++ Benchmarking

I installed the Bonnie++ benchmark took directly on the Nexenta server, and I ran it multiple times, with a 48GB data file (so it’s three times larger than the RAM of my server).

Here are my results, and I apologize already for the very wide formatting this next HTML table will do to this post.

Version 1.96 Sequential Output Sequential Input Random
Seeks
Sequential Create Random Create
Size Per Char Block Rewrite Per Char Block Num Files Create Read Delete Create Read Delete
K/sec % CPU K/sec % CPU K/sec % CPU K/sec % CPU K/sec % CPU /sec % CPU /sec % CPU /sec % CPU /sec % CPU /sec % CPU /sec % CPU /sec % CPU
Nexenta2 HP ML150 G5 Tank&Compression&Cache&Log 48G 98 99 381672 85 262061 82 254 99 597024 69 6300 125 16 7013 42 +++++ +++ 12665 60 12612 62 +++++ +++ 14078 56
Latency 85847us 298ms 400ms 39001us 121ms 114ms Latency 25709us 795us 250us 16031us 30us 323us
Nexenta2 HP ML150 G5 Tank&Compression&Cache&Log 48G 101 99 383428 86 265270 83 250 97 595142 69 7034 142 16 7742 46 +++++ +++ 12861 60 13023 65 +++++ +++ 13884 56
Latency 90145us 270ms 401ms 170ms 145ms 53417us Latency 25757us 118us 330us 16036us 32us 365us
Nexenta2 HP ML150 G5 Tank&Compression&Cache&Log 48G 101 99 380309 85 256859 80 250 98 593337 69 10018 154 16 7290 44 +++++ +++ 12650 61 12324 62 +++++ +++ 14074 57
Latency 92352us 245ms 394ms 173ms 85135us 62798us Latency 26885us 118us 1564us 16120us 63us 279us
Nexenta2 HP ML150 G5 Tank&Compression&Cache&Log 48G 102 99 379416 85 255191 79 248 97 579578 68 5067 106 16 7103 43 +++++ +++ 12781 61 13253 66 +++++ +++ 14503 59
Latency 91351us 225ms 1413ms 270ms 98217us 41929us Latency 25746us 120us 233us 15943us 124us 227us
Nexenta2 HP ML150 G5 Tank&Compression&Cache&Log 48G 101 99 387046 86 257276 80 255 99 557928 65 11517 187 16 7070 42 +++++ +++ 12651 61 13029 64 +++++ +++ 13838 56
Latency 94237us 370ms 332ms 38815us 90411us 46669us Latency 25788us 110us 234us 15918us 21us 252us
Nexenta2 HP ML150 G5 Tank&Compression&Cache&Log 48G 101 99 381530 85 258287 80 255 99 550162 64 10903 179 16 7314 45 +++++ +++ 12640 60 11857 59 +++++ +++ 13789 57
Latency 99227us 243ms 398ms 51192us 73688us 45083us Latency 26538us 140us 234us 15924us 43us 301us
Nexenta2 HP ML150 G5 Tank&Compression&Cache&Log 48G 101 99 381556 86 258073 80 253 99 561755 65 5144 108 16 6805 41 +++++ +++ 12625 60 12844 63 +++++ +++ 14847 59
Latency 91342us 291ms 418ms 82618us 112ms 54898us Latency 25738us 113us 375us 15928us 27us 205us
Nexenta2 HP ML150 G5 Tank&Compression&Cache&Log 48G 101 99 383434 85 259550 80 253 99 553803 65 5869 126 16 6724 40 +++++ +++ 12236 59 11574 57 +++++ +++ 13511 54
Latency 91320us 347ms 383ms 87805us 108ms 117ms Latency 25753us 113us 232us 15908us 55us 181us

The test was run on a ZVOL that had the Compression enabled, It was backed with a Intel SSD 520 60GB disk for the L2ARC Cache and a Intel SSD 520 60GB disk for the zlog.

There are some spikes here and there. but in average, the Bonnie++ is telling me that local storage access is capable of

  • Sequential Block Reads: 381530K/sec (381MB/sec)
  • Sequential Block Writes: 550162K/sec (550MB/sec)
  • Rewrite: 255191K/sec (255MB/sec)
  • Random Seeks: 5067/sec


Additional Resources:

In the past week, Chris Wahl over at http://wahlnetwork.com/ has writen four excellent articles about using NFS, Load Balancing and the Nexenta Community Edition server. I highly recommend you look up these articles to see how you can improve your Nexenta experience

  1. Misconceptions on how NFS behaves on vSphere by Chris Wahl
  2. Load balancing NFS deep dive in both a single subnet by Chris Wahl
  3. Load balancing NFS deep dive with multiple subnet by Chris Wahl
  4. and NFS on vSphere – Technical Deep Dive on Load Based Teaming by Chris Wahl


vCenter VM Hardware Upgrade results in Hung vCenter services

Yesterday, while upgrading a new vCenter virtual machine that was created on an ESX 3.5 host, to a new ESXi 5.0 host, we found ourself with a VM that was refusing to start any services.
The virtual machine is running

  • Windows Server 2008 R2 SP1
  • vCenter 5.0 Update 1
  • SQL Server 2008 R2 SP1 (10.50.2792)
  • and the whole suite of vCenter services (vum, syslog, dump, web service).

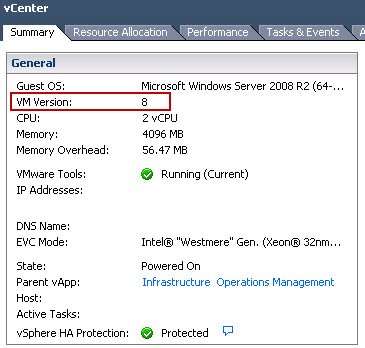
The virtual machine was created  on an ESX 3.5 (Build 604481) and was configured as a VM Version 4.  The target platform was a new ESXi 5.0 Update 1 host (Build 623860). So we cold migrated the vCenter to the new system, via a shared VMFS3 datastore.

At this point, the virtual machine was running fine as a VM Version 4 on the ESXi 5.0 Update 1.

I then started the upgrade process, with the installation of the VMware Tools, to ensure I had all the proper drivers in the VM. I then powered off the virtual machine, and upgraded the hardware to VM Version 8.

vCenter - VM Version 8

The system restarted but there was an issue with the various services. I could not open the network settings, I could not uninstall the VMware Tools as the Windows Installer service was not running. My data and database log disks where not visible, I could not open the disk management control panel.

After much troubleshooting, restarting the virtual machine in safe mode and various other tests, my colleague found this very interesting article Windows Server 2008 computer hang during startup while “applying computer settings” and services configured to start automatically fail to start http://support.microsoft.com/kb/2004121 

The following two paragraphs are taken from the Microsoft Support Article.

Cause

The problems described in the symptoms section occur because of a lock on the Service Control Manager (SCM) database.  As a result of the lock, none of the services can access the SCM database to initialize their service start requests. To verify that a Windows computer is affected by the problem discussed in this article, run the following command from the command Prompt:

[box]sc querylock

The output below would indicate that the SCM database is locked:

QueryServiceLockstatus – Success

IsLocked : True

LockOwner : .\NT Service Control Manager

LockDuration : 1090 (seconds since acquired)

[/box]

Let me fix it myself

you can modify the behavior of HTTP.SYS to depend on another service being started first.  To do this, perform the following steps:
[box]

  • Open Registry Editor
  • Navigate to HKLM\SYSTEM\CurrentControlSet\Services\HTTP and create the following Multi-string value: DependOnService
  • Double click the new DependOnService entry
  • Type CRYPTSVC in the Value Data field and click OK.
  • Reboot the server

[/box]

NOTE: Please ensure that you make a backup of the registry / affected keys before making any changes to your system.

After having made the registry modification and a final restart, the virtual machine was working again as expect. This was a very strange and bizarre error I have never heard someone run into. So here it is resumed, and may it be usefull someday to someone else…


iPad and “Could not activate cellular data network” error message

I finished the migration from an iPad 3G to the iPad3 4G using iTunes. Everything worked great. I only had to re-enter my passwords for the email accounts, WiFi, and other online services credentials.

But this morning, once I was out of range of my house, the WiFi dropped and the iPad3 tried to reach my telecom 3G network. My Carrier network (Swisscom) was showing up as 3G but I kept receiving the “Could not activate cellular data network“.

1) On my initial migration from the iPad1 I used the Reset Network settings described below.

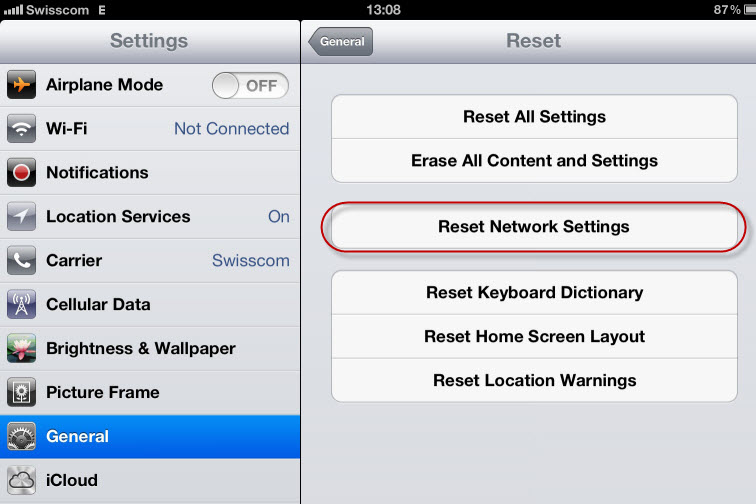
The trick is to go to the Settings \ General \ Reset tab, and to select the Reset Network Settings. This will cause the iPad3 to reboot, but then the Carrier 3G network will work.

iPad Reset Network Settings


2) But I’m not going wipe my Network settings again and again. Only a Power-Off Power-On of the iPad currently fixes this issue. We all hope Apple will fix this with an iOS 5.1.1 release.


Upgrading vCloud Director Cell from RHEL 5.6 to RHEL 5.7

With the release of vCloud Director 1.5.1 last night, the operating system for the vCloud Director Cell now supports Red Hat Enterprise Linux 5.7 (x86_64). If you are running your current cell with Red Hat Enterprise Linux 5.6, and you want to upgrade to the most recent release that is supported, here are the steps. Yet, you have to be careful not to upgrade to Red Hat Enterprise Linux 5.8, which as been release the 21st February 2012. RHEL 5.8 is not on the official supported list by VMware.

In the following screenshots we will use the yum update tool to make sure we upgrade to RHEL 5.7 only.

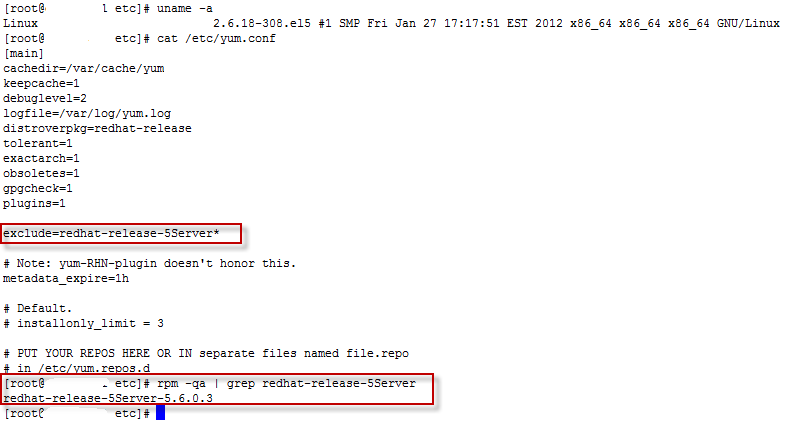
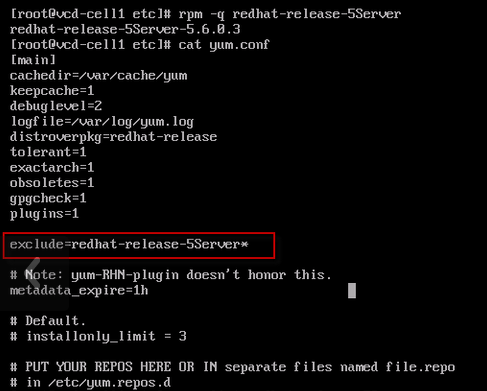
The first screenshot shows the current kernel 2.6.18-308.el5 for RHEL 5.6, and the configuration of the yum.conf file that has an explicit exclude=redhat-release-5Server* rule. We also see that we now have the redhat-release-5Server-5.6.0.3.

Current vCD-Cell settings for RHEL 5.6

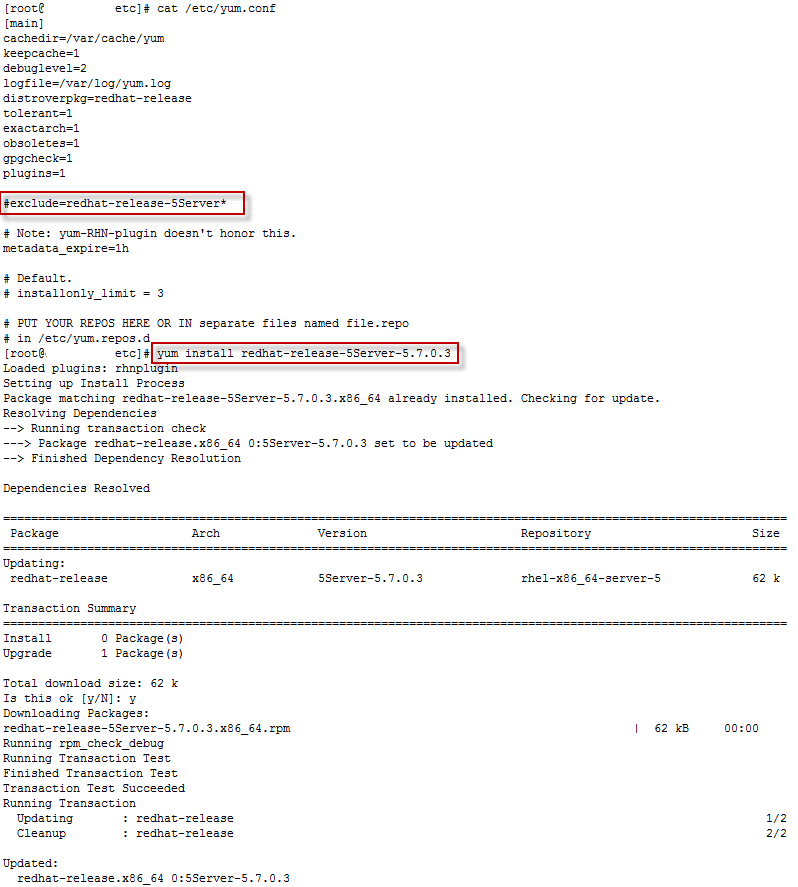
We will now modify the /etc/yum.conf so that we can download the redhat-release-5Server-5.7.0.3.x86_64.rpm file. We comment out the exclude file, and we install immediately the release file for RHEL 5.7

vCD-Cell upgrading from RHEL 5.6 to RHEL 5.7

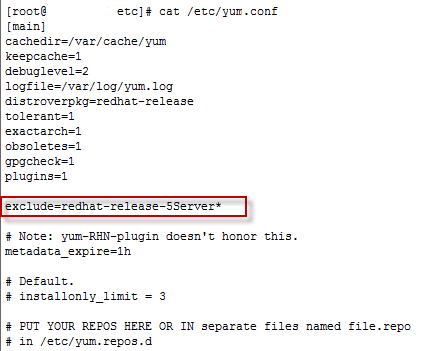
Now it’s important to immedialty renable the exclusion of the redhat-release-5Server, so that you will not by accident upgrade to RHEL 5.8

Ensure that yum cannot retrieve RHEL 5.8

Now you can run the yum upgrade to your own pace, and be sure that you are staying on the supported release of Red Hat Enterprise Linux for the vCloud Director 1.5.1


vCenter Operations Manager 5 vApp Start Order settings

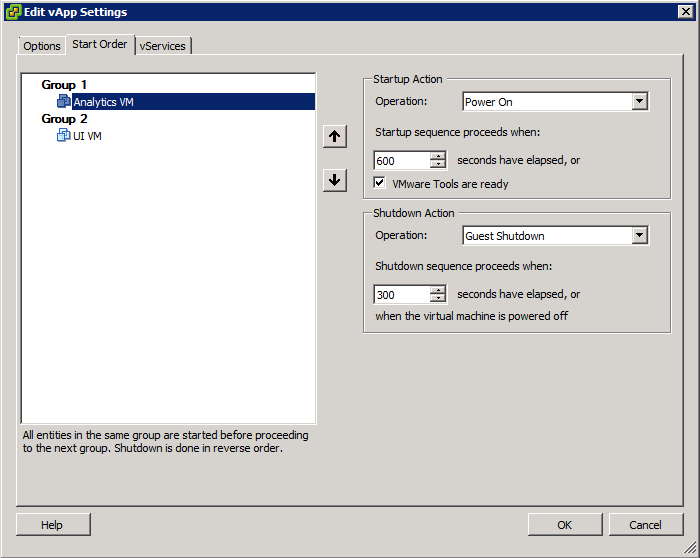
When you deploy the vCenter Operations Manager 5.0 vApp in a vSphere 5 Cluster, the vApp import creates a few settings. Here is the screenshot of the default start order.

vCenter Operations Manager 5.0 vApp Start Order Settings

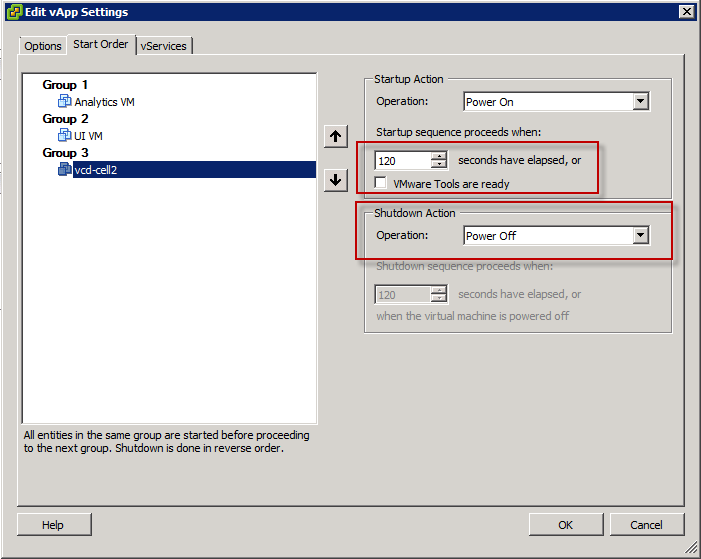
I’m adding this post, because in the past few days I have had to do a Storage vMotion of the Analytics VM, and I had to temporarily remove it from the vApp. Once I had migrated the Analytics VM, I insert the VM back in the vApp. But this changed the default start order, and the Analytics VM had default settings, such as Shutdown Action operation:PowerOff, and a different Startup sequence. You can see the default settings in the screenshot below, when I add another VM to the vApp.

vApp Start Order Settings you do NOT want

So make sure that your vApp Startup settings are properly configured when you tamper with the vApp.


Windows Server 8 Beta (Server Core) AD-DS install inside Workstation 2012 Tech Preview

I’ve spend a frustrating day with Workstation Tech Preview 2012 and with Windows Server 8 Beta en_windows_server_8_beta_x64_dvd_810648.iso

I’ve create numerous virtual machines named DC1, as I’m trying to use the Microsoft Windows Server “8” Beta Base Configuration Test Lab Guide (TLG) that is located at http://go.microsoft.com/fwlink/p/?LinkId=236358.

I have used these VMs with the VMware Tools from the TechPreview, without the VMware Tools, and with a Custom implementation without the SVGA graphic drivers. I’ve attemped my test on both the Windows Server 8 Beta with GUI and in Server Core.

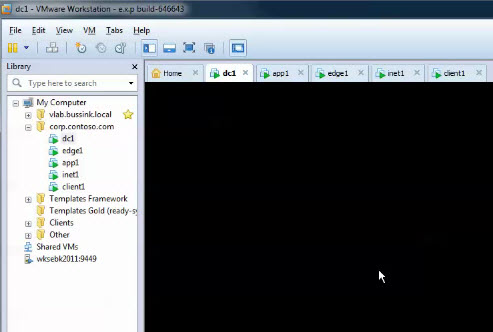
Workstation 2012 Tech Preview and Windows Server 8 Beta AD-DS install blank screen bug

As soon as I try to install and configure the Active Director Domain Services, the VM needs to reboot. Once it has rebooted, it goes in a blank screen, and there is nothing I can do. Workstation thinks the VM is running, but there is no response via the GUI in the VM, no response to ping traffic to the VM or RDP.

I installed Workstation Technology Preview 2012 on two different computers and re-downloaded the en_windows_server_8_beta_x64_dvd_810648.iso from Microsoft twice. I just can proceed with using the Workstation Technology Preview 2012 to test Windows Server 8 Domain controllers.

I made a small video of the process, which is appended to this article.

Windows Server 8 Beta (Server Core) AD-DS install inside Workstation 2012 Tech Preview

In addition it’s available on Youtube at http://www.youtube.com/watch?v=6qvptvC0Usc

Here I’m trying to install the Active Directory Domain Services on a Windows Server 8 Beta running inside the VMware Workstation 2012 Tech Preview. The install of the AD-DS and DNS service work fine, but when the domain controller reboots, there is no GUI left. In this VM the VMware Tools where not installed.

 The commands used in this video are

00:03 ipconfig

00:08 sconfig

00:30 Install-WindowsFeature AD-Domain-Services -IncludeManagementTools

01:55 Install-ADDSForest -DomainName corp.contoso.com

Once the newly promoted domain controller reboots, the GUI does not come back, and the IP addresse cannot be pinged anymore.

Workstation 2012 Tech Preview Blank Screen


Update: Well in VMware Workstation 2012 Tech Preview, if you select the a Windows 7 version or Windows Server 2008 version instead of the Windows 8 setting, your V will NOT go black screen on the dcpromo.

Disable RHEL 5.6 Release Upgrade on vCloud Director 1.5 Cell

The VMware vCloud Director 1.5 runs on the Red Hat Enterprise Linux 5.6 platform. It is supported by VMware only on version 5.6 of the Red Hat Enterprise Linux. If you are not careful and try to patch the operating system on the vCloud Director 1.5 system, you could find yourself with a RHEL 5.7 or RHEL 5.8 Release, which would cause vCloud Director to break.

To ensure that your vCloud Director 1.5 stays on the Red Hat Enterprise Linux 5.6 Release and only download patches for the operating system, we need to add a single line to the /etc/yum.conf file.

Disable RHEL 5.6 Release Upgrade

I simply add the following line in /etc/yum.conf

exclude=redhat-release-5Server*

This will exclude all newer Red Hat Releases from getting installed by yum & the Red Hat Network.

I hope this will save you so unneeded trouble.


Creating a Maintenance Plan for SQL Server 2008 R2 for vCenter/UpdateMgr/vCloud

I shall start by saying that I’m by no way a Database Administrator, but over the years I have picked up some knowledge and I have talked to a few guys that have more Knowledge on the topic to learn small tips & tricks. I have created in previous posts how to quickly create a vCenter Database using Transact-SQL scripts, and how to create a vCloud Director database using Transact-SQL script. It this small article, I will just resume how to create some Maintenance Plans to ensure that your vCenter/UpdateManager/vCloudDirector databases are backed up. I’m not using the Full Recovery model in SQL Server 2008 R2 for my lab and my clients, so these maintenance jobs should be fine. I believe that if you have a large enough environment that is critical to your day-to-day operations, you should use the Full Recovery model, but you would then also have a real Database Administrator onsite that could manage, nurture and keep your databases in proper running condition.

I have seem my share of transaction log databases for VMware vCenter go haywire, such that the Roll-Up jobs are not running anymore (Check your History Log) and the transaction log databases explodes. My personal worse situation was last year at a client that didn’t check their database and the transaction log database run out of storage on the disk when it passed the 90GB. There are procedures on the VMware Knowledge Base on how to compact and roll-up these huge transaction database, but it takes a lot of time. In most cases, we cut out losses and just purge the transactions logs.

Coming back to my Maintenance plan. We will create to sets of database maintenance plans, one for the System Dababases and one for the User databases. I need to thank my friend Eric Krejci for showing me how to separate the two maintenance plans.

System Maintenance Plan

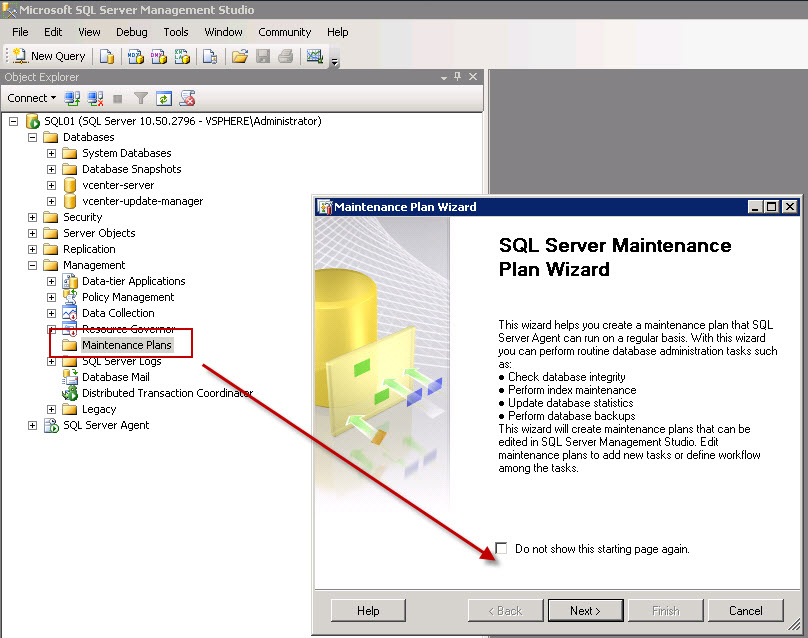
We need to connect to our database server using the SQL Server Management Studio program. And from the Management folder, select the Maintenance Plan and start the Wizard.

Start Maintenance Plan Wizard

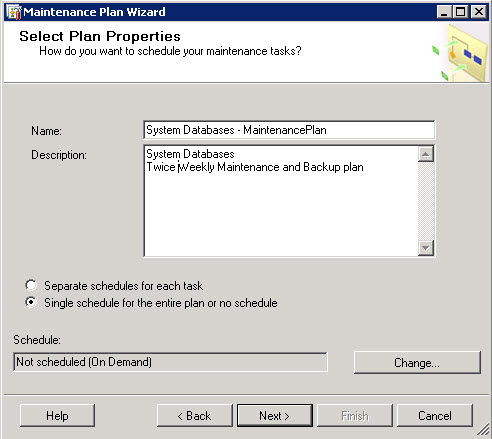
The System databases is comprised of the Master, Model, MSDB and TempDB databases. These database don’t change much, but I will select to make a Twice Weekly maintenance and Backup Plan. Please note that the MSDB database contains all the Stored Procedures for your vCenter & Update Manager database.

Define Maintenace Plan

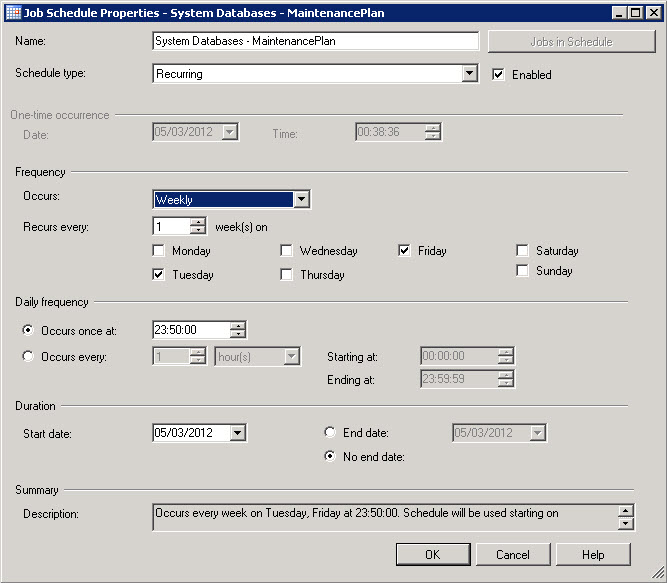
And let’s Schedule the Plan for two runs per week on Tuesday evening and Friday evening.

Job Schedule Properties

You can select any other pattern that you wish.I for one also use VMware Data Recovery 2.0 for making daily backup of my virtual machines, so I make sure that my  VMware Data Recovery schedule does not run on my databases between 23:00 and 01:00.

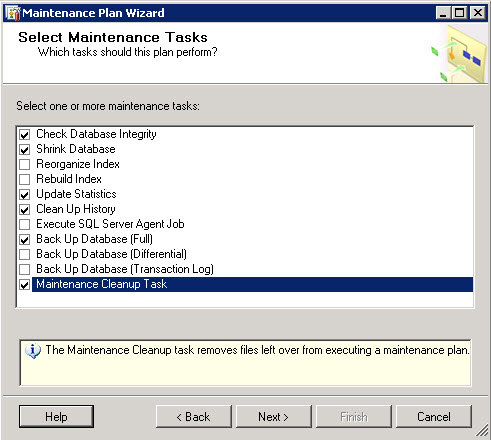
Now we can select the various Maintenance Tasks we want to run.

Select Maintenance Tasks

I have selected

  • Check Database Integrity
  • Shrink Database
  • Update Statistics
  • Clean Up History
  • Back Up Database (Full)
  • Maintenance Cleanup Task.

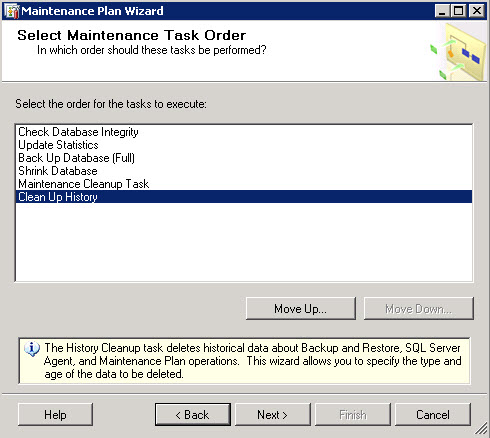
And I have changed their Order around on Select Maintenance Task Order step.

Select Maintenance Task Order

So we run

  1. Check Database Integrity
  2. Update Statistics
  3. Back Up Database (Full)
  4. Shrink Database
  5. Maintenance Cleanup Task
  6. Clean Up History

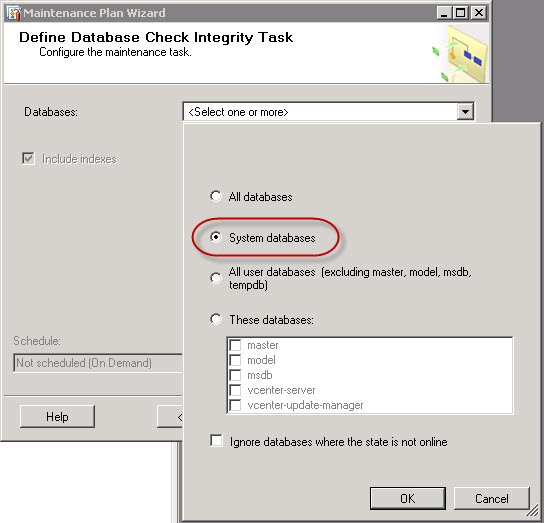
Now let’s configure the Maintenance Tasks – Define Check Database Integrity. I have selected for this first Maintenance Plan the System Databases.

Define Database Check Integrity Task – System Databases

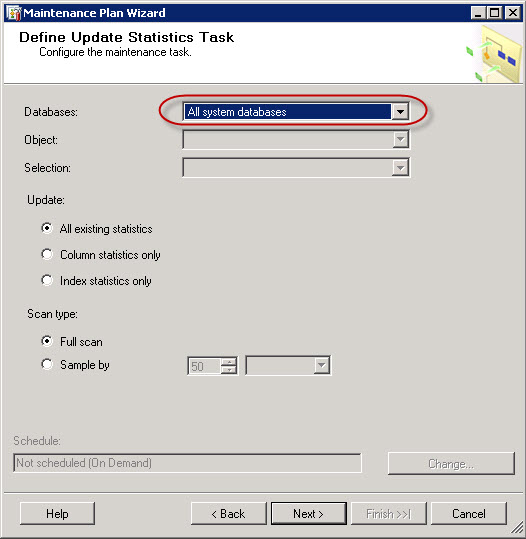
We now Define Update Statistics Task for the System Databases

Define Update Statistics Task – System Databases

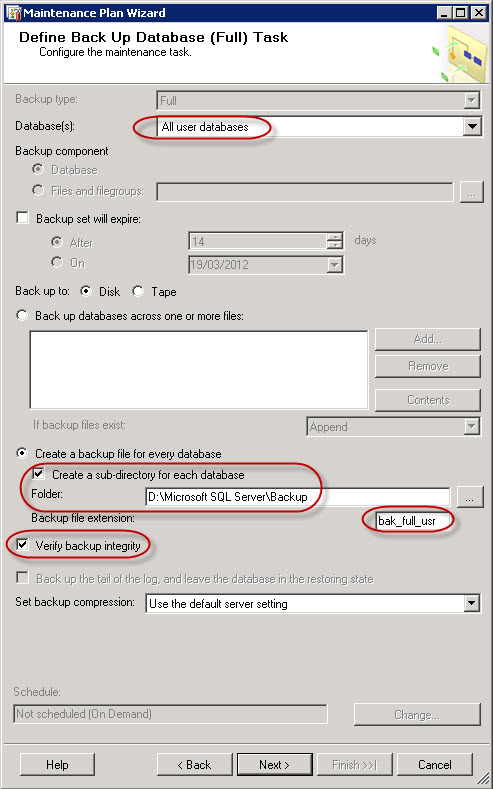
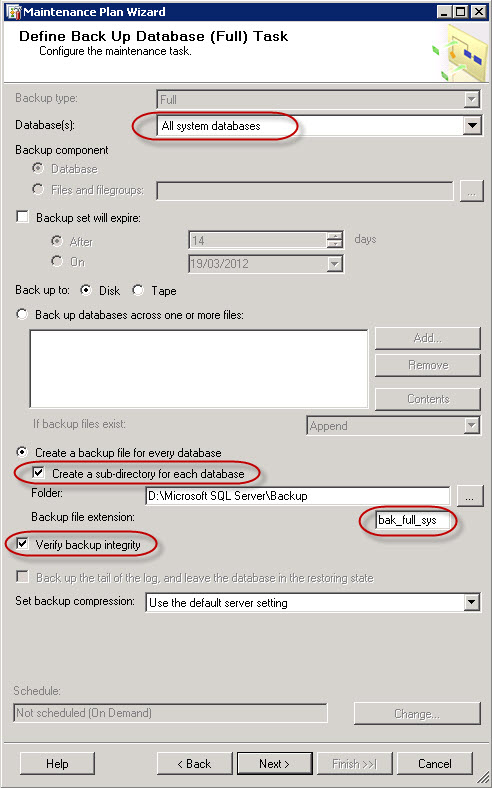
The next step is the definition of the back up job. Define Back Up Database (Full) Task. Please note that we have added the option to create a sub-directory for each database, and to verify the backup integrity. I have also modified the Backup File Extention to BAK_FULL_SYS so that we can make better use and more flexible backup cleanup maintenance job later in this article.

Define Back Up Database (Full) Task – System Databases

There is always a good discussion if you have enough Compute power to create a compressed backup or not.

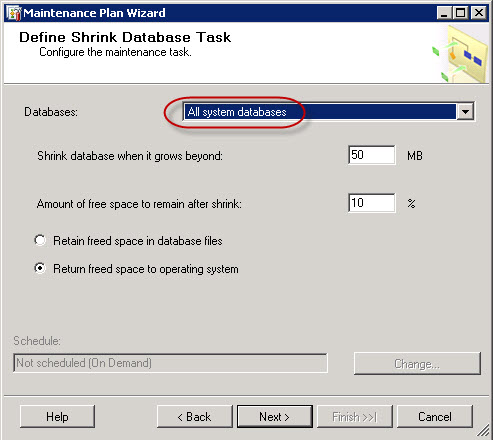
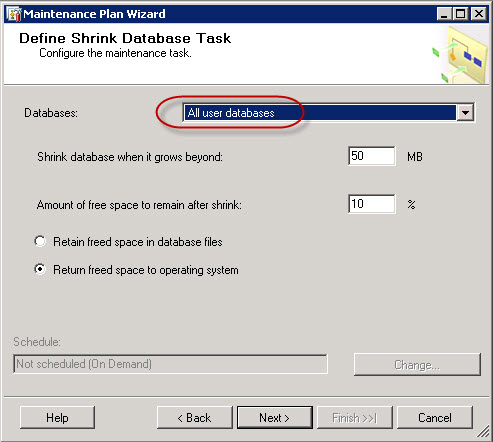
Now that we have a good full backup for the system databases we can do some database shrinkage. Define Shrink Database Task.

Update 22/03/2013. Since I created this post, I’ve stopped using the Shrink task in the maintenance plan. I rather do it sparingly manually than automate it.

Define Shrink Database Task – System Databases

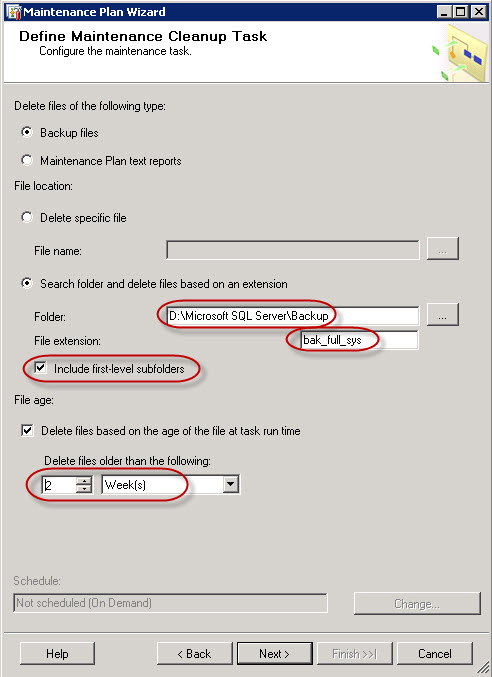
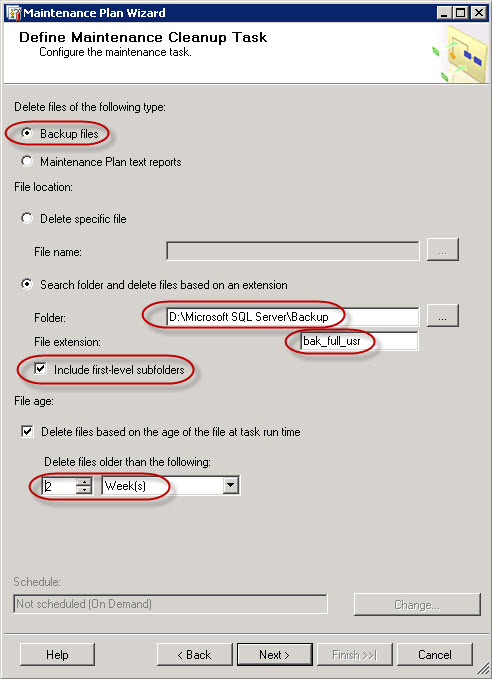
Now remember that we modified the Backup File Extension earlier. We we will now Define Maintenance Cleanup Task to erase all System Databases backups that are older than two weeks, and we will use the various sub-folders for the backups.

Define Maintenance Cleanup Task – System Databases

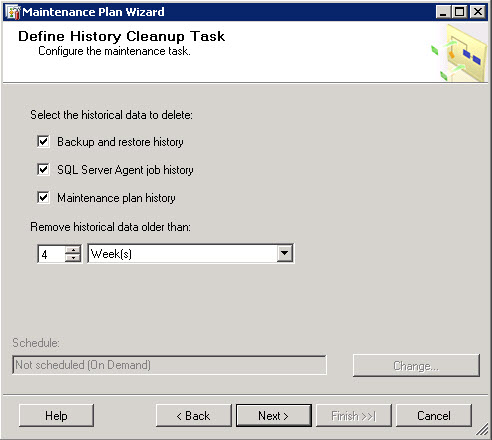
And  last we Define History Cleanup Task for the whole SQL Server 2008 R2 instance. I did not modify the settings of this tab. This Maintenance Task will cleanup the Backup and Restory History, the SQL Server Agent job history and the Maintenance Plan History.

Define History Cleanup Task

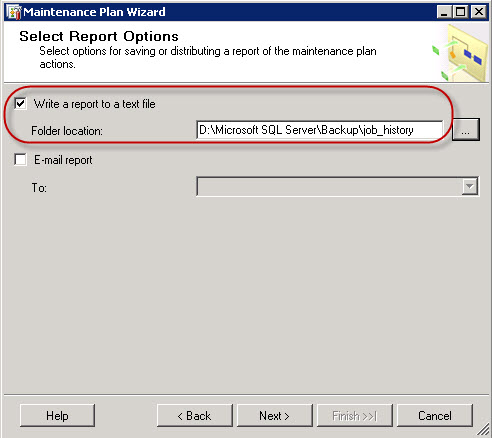
We will also save a copy the Maintenance Plan actions to a text file in the same directory as where the backup files are stored.

Select Report Option for Maintenance Plan

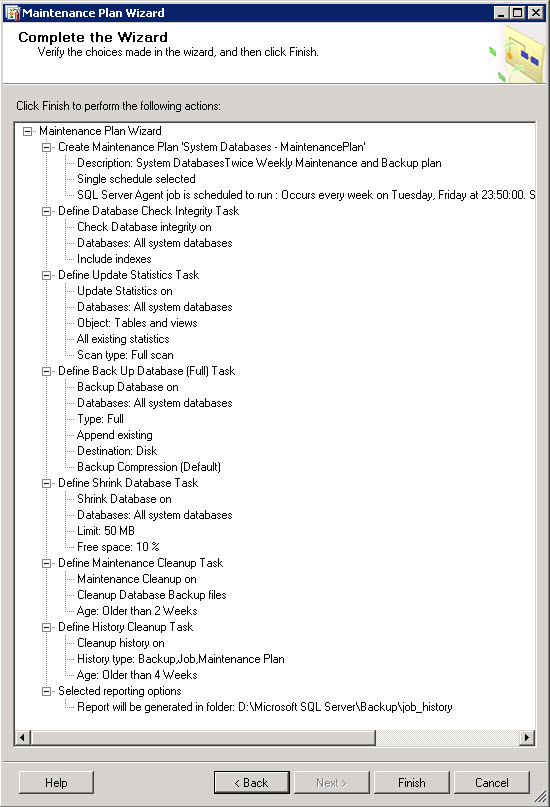
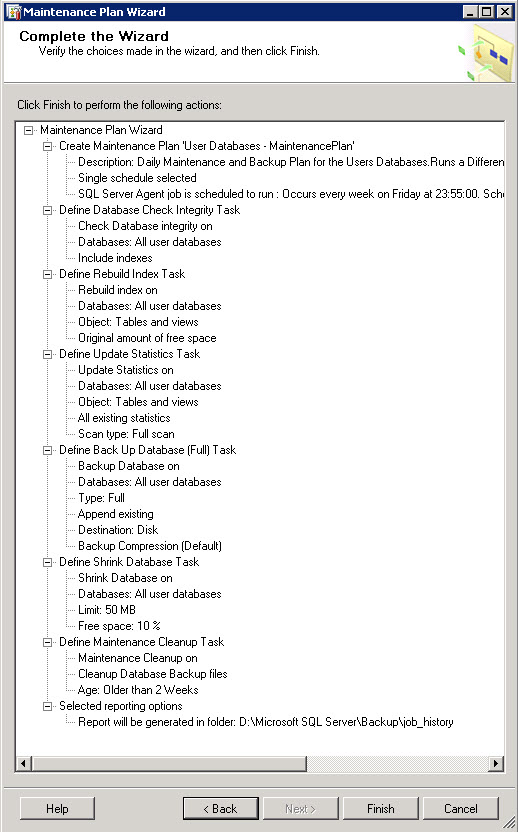
We now have a resume of the Maintenance Plan we can complete.

Maintenance Plan Wizard Complete

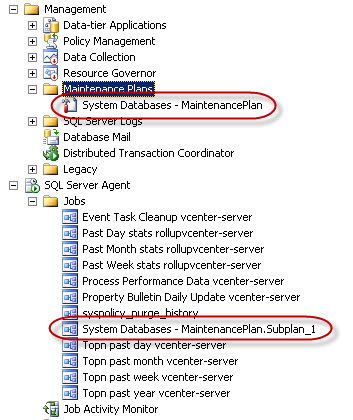
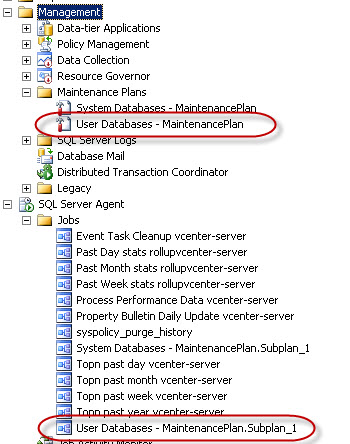
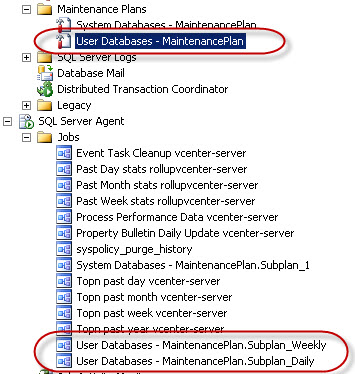
We see the new job in the Maintenance Plans section and the new job in the SQL Server Agent

Maintenance Plans & SQL Agent Jobs


User Maintenace Plan

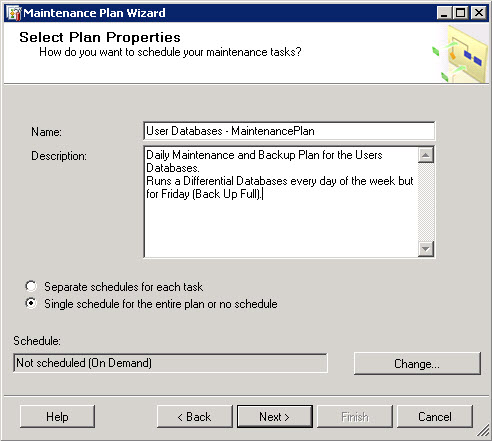
We now attack the User Databases Maintenance Plan. We start our Maintenance Plan Wizard and start the definition of the plan properties. I’m creating a Maintenance Plan for the Users Databases that will create a Differential Back Up every day, and a Full Back Up on Friday.

Users Database Maintenance Plan Properties

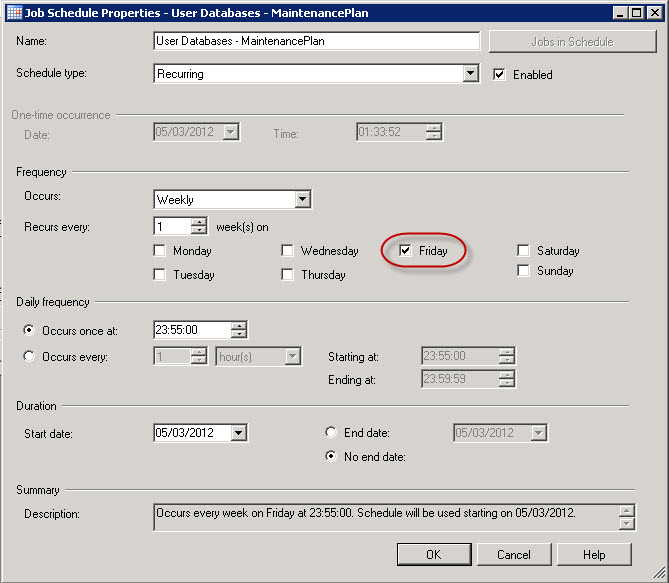
I modify the Schedule so that the main part of this Maintenance Plan including the Full Back Up happens each Friday. I will then later add a subplan to do the Differential plan each day.

User Databases Maintenance Plan – Job Schedule

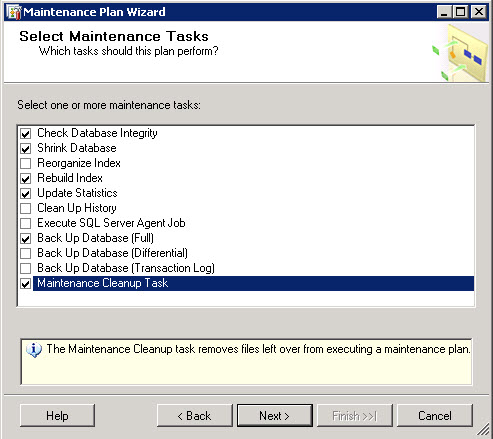
We now add the various Maintenance Tasks for our Users Databases.

Select Maintenance Tasks

I have selected

  • Check Database Integrity
  • Shrink Database
  • Rebuild Index
  • Update Statistics
  • Back Up Database (Full)
  • Maintenance Cleanup Task

And we Select Maintenance Task Order to move down the Shrink Database task after the Back Up Database (Full).

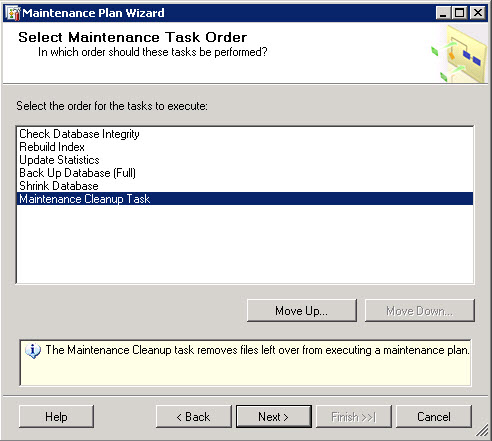
Select Maintenance Task Order

So we run

  1. Check Database Integrity
  2. Rebuild Index
  3. Update Statistics
  4. Back Up Database (Full)
  5. Shrink Database
  6. Maintenance Cleanup Task

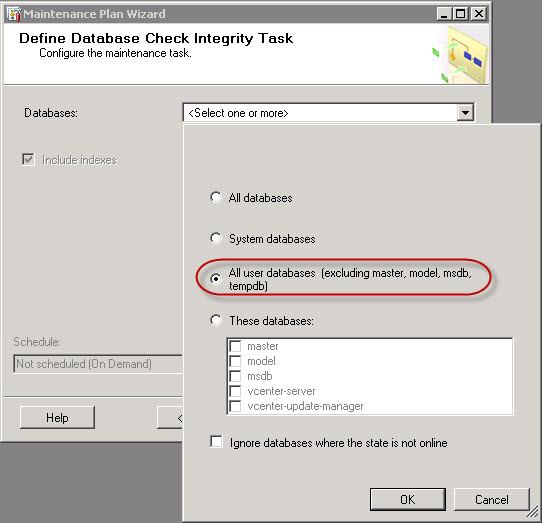
The first Task to run is the Database Check Integrity Task where we select the Users Databases

Database Check Integrity Task – User Databases

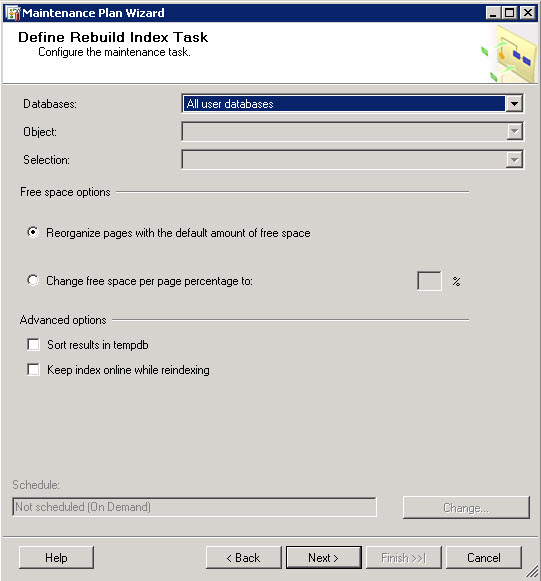
We then Rebuild Index Task for the Users Databases

Rebuild Index Task – User Databases

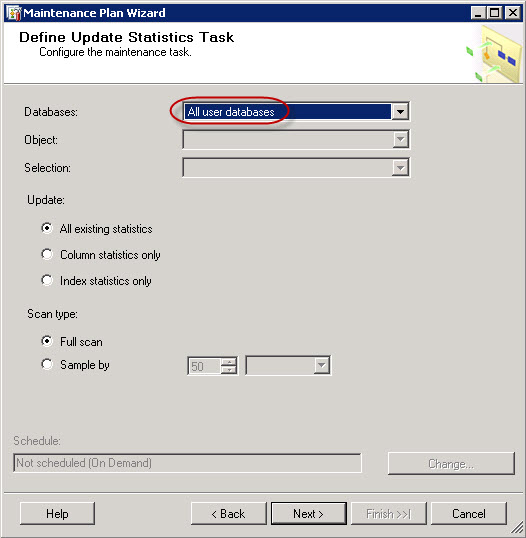
We Define Update Statistics Task for the User Databases.

Update Statistics Task – User Databases

We now do the Back Up Database (Full) Task for the User Databases. Note that we use sub-directories for each database, we changed teh Backup File extionsion to BAK_FULL_USR and we verify the integrity of the backup.

Back Up Database (Full) Task – User Databases

Once we have the Full Back Up of the User Databases we can launch the Shrink Database Task.

Shrink Database Task – User Databases

We now setup the Maintenance Cleanup Task for the User Databases so that we keep only the last two weekly full backups.

Maintenance Cleanup Task – User Databases

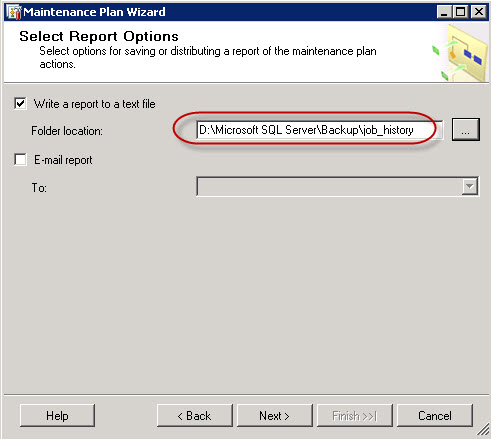
And we save the Maintenance Plan Report to the job_history directory.

Maintenance Plan Report Path

We now have a complete Maintenace Plan ready.

User Databases Maintenance Plan Wizard Complete

This creates the new Maintenance Plan and the SQL Agent Job.

Maintenance Plan & SQL Agent Jobs

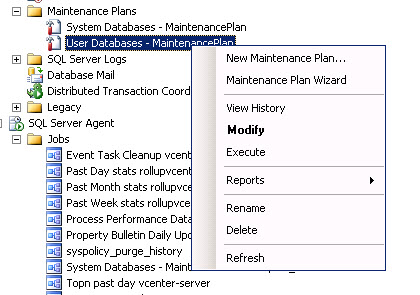
We now select to Modify the User Databases – MaintenancePlan

Modify User Databases Maintenance Plan

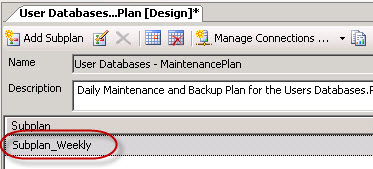
And let’s quickly rename the Subplan_1 to Subplan_Weekly in the Subplan menu.

Rename Subplan_1 to Subplan_Weekly

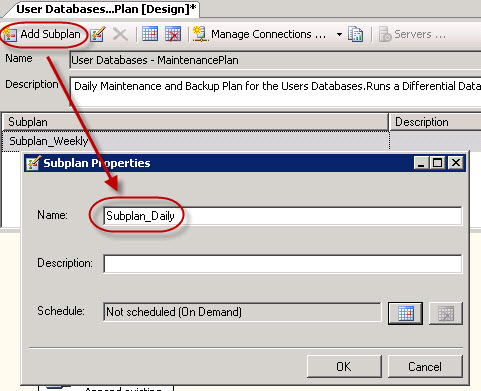
So we can now Add Subplan to this Maintenance Task

Add Subplan_Daily

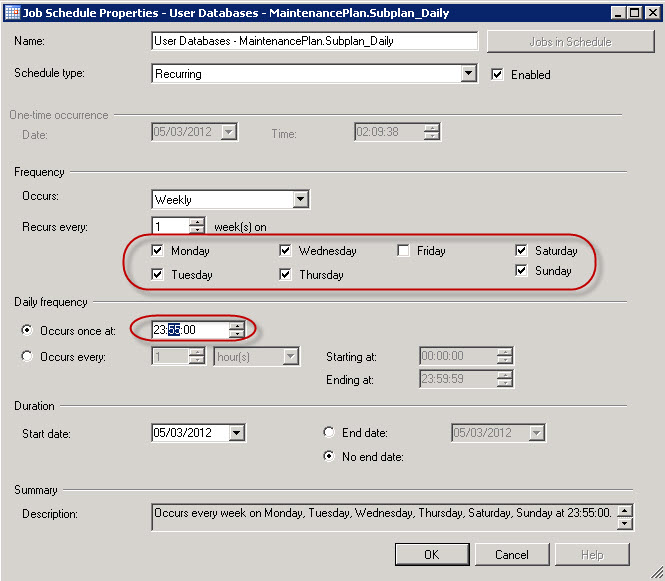
And we edit the Job Schedule to run everyday but Friday at the same time.

Job Schedule Subplan_Daily

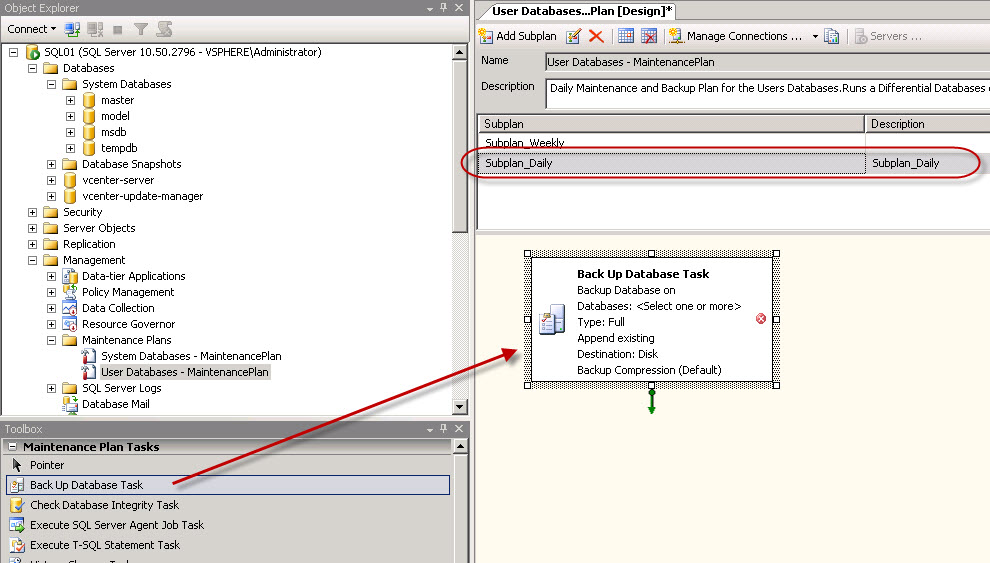
We will now drag and drop the Back Up Database Task into the Subplan_Daily

Back Up Database Task in Subplan_Daily

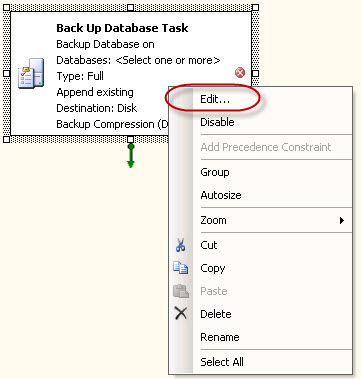
We now edit the Back Up Database Task

Edit Back Up Database Task

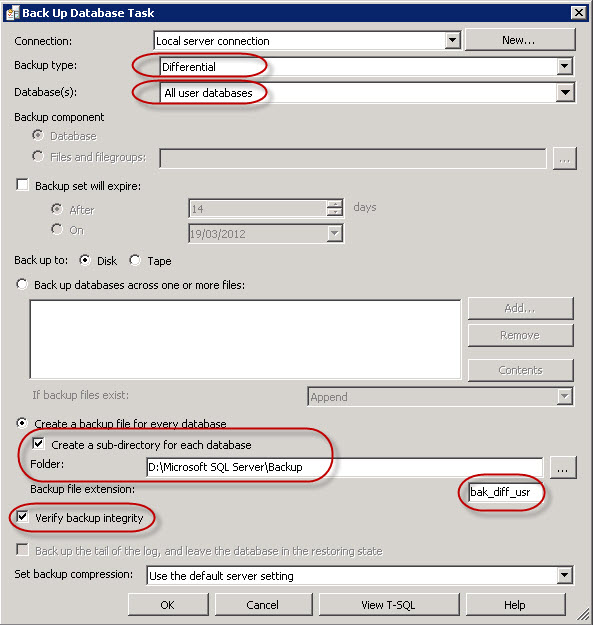
And we modify the Back Up Database Task for Differential Jobs, we also make sure the backups are written in their correct directories, that they are verified, and that the Backup File Extension is BAK_DIFF_USR.

Back Up Database Task – User Databases – Differential Job

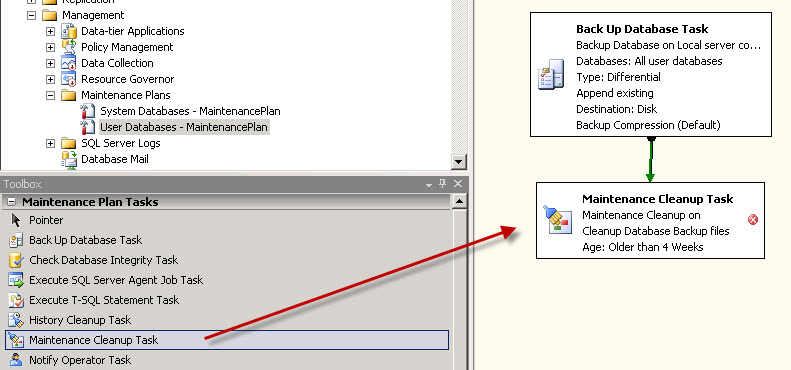
We now add the Maintenance Cleanup Task to this Subplan_Daily job and Linked it to the Back Up Database Task.

Add Maintenance Cleanup Task

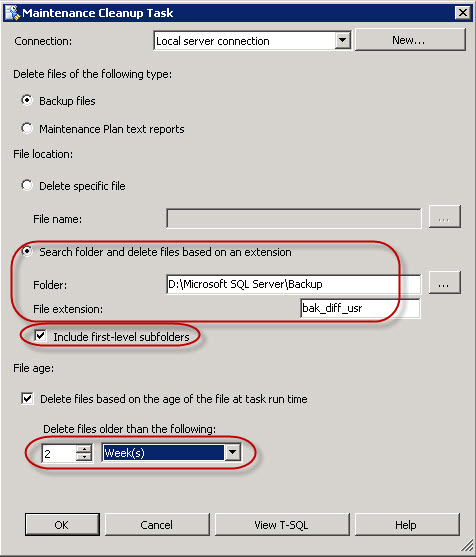
And we will edit the Maintenance Cleanup Task so that we erase the old BAK_DIFF_USR files.

Maintenance Cleanup Task 1 – Backup Files

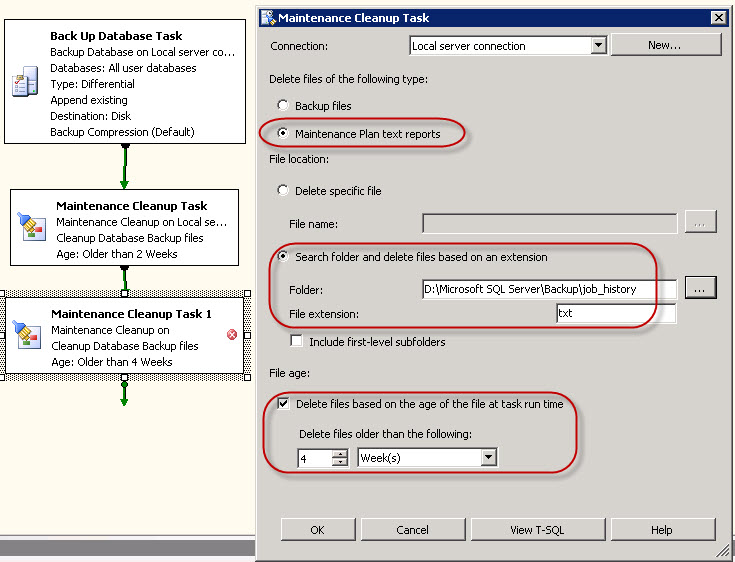
We add a 2nd Maintenance Cleanup Task to clean up the old text reports that are older than 4 weeks.

Maintenance Cleanup Task 2 – Text Reports

We are now done with the User Databases Maintenance Plan. Do NOT forget to SAVE the Maintenace Plan before quiting it.

We now have two specific SQL Server Agent Jobs.

SQL Server Agent Jobs


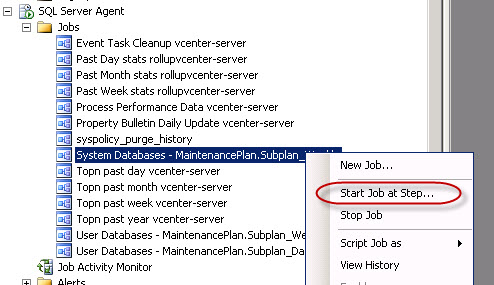
We will now run the Maintenace Plan Jobs. We start with the System Database job using Start Job at Step…

Running Maintenace Plan Jobs – System Databases

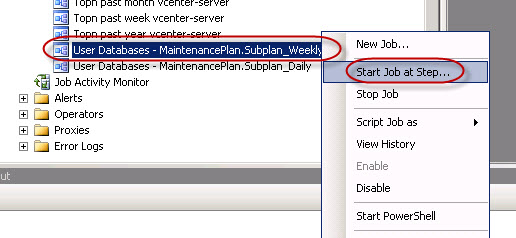
And for the User Databases we will first start the Full Back Up Task, before doing the Differential Back Up Task.

Running Maintenance Plan – User Database – Subplan_Weekly

Running Maintenance Plan – User Database – Subplan_Daily

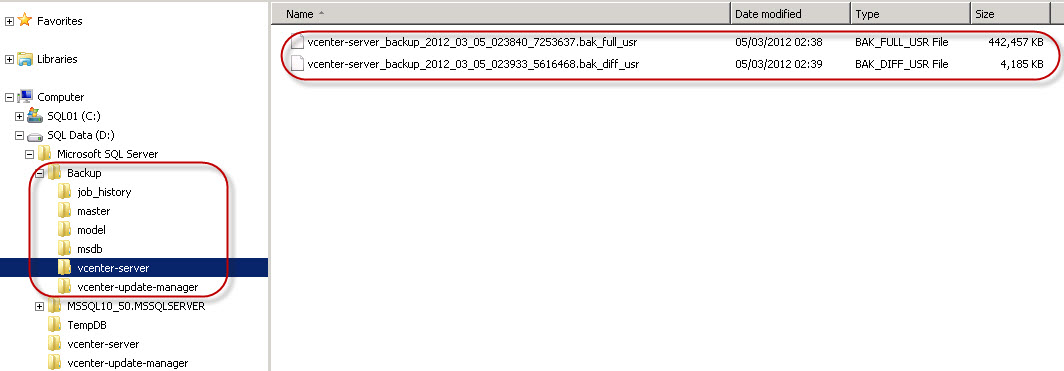
When we check the Backup folder we now have a full back of the System Databases and User Databases (Full and Differential).

vCenter Server Backup Full and Diff

There you are with a Maintenance Plan for the SQL Server 2008 R2 running your vCenter, Update Manager and vCloud Director databases.

I hope this will help you.

I have to thank once more my friend Eric Krejci as we have discussed this topic extensively a few months ago and he already wrote the same article on vCenter and SQL Backup and Maintenance on his web blog.

Generating SSL Certificates for vCenter Operations Manager 5.0

Generating SSL Certificates for usage with vCenter, Update Manager and the ESXi host is one of those tasks that keeps being push away. Accepting the self-signed certificates is fine in most situation, but getting validated certificates means a whole lot of pop-ups disappear and surprise surprise, I have also found that the vCenter Operations Manager feels smother and faster.

I recently followed Julian Wood’s excellent series on how to sign certificates for vCenter and Update Manager. Generating the SSL Certificates for vCenter Operations Manager goes along the same lines, but there are changed and maybe some configuration changes on the vCOPS UI-VM.

Julian recommends to install the latest 64-bit version of the OpenSSL Windows Binaries. Retrieve the Win64 OpenSSL v1.0.1 Light for Windows tool on the vCenter with it’s per-requisite Visual C++ 2008 Redistributables (x64) from Microsoft.com

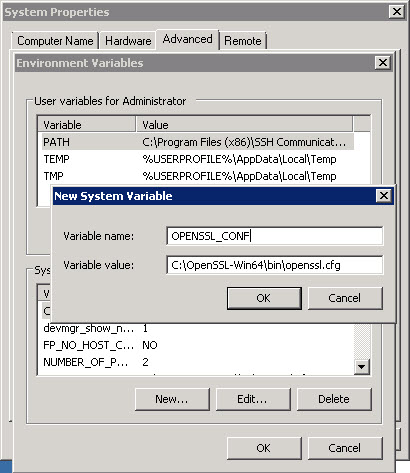
Once the OpenSSL v1.0.1 Light is installed, we can add an System Environment Variable, so that the OpenSSL tool can find the path to the OpenSSL configuration file. Because I’m going to use the OpenSSL tool on the vCenter to generate the SSL Certificates for various VMware appliance, I need the variable to stay permanent. From the Control Panel on the vCenter, I add a new System Environment Variable like follows.

Adding the OPENSSL_CONF environment variable in the Control Panel

So that the next time you start the Command Prompt to generate OpenSSL Certificates, the variable is already present.

Checking OPENSSL_CONF variable

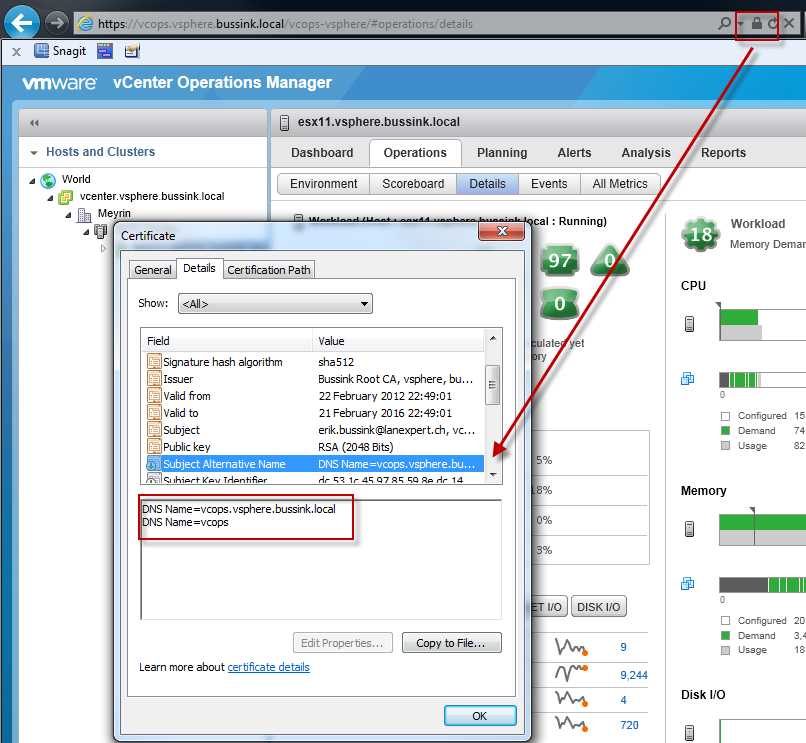
One of the best information I learned from Julian’s document is the modification of the openssl.cfg to add the option to use two subjectAltName for the DNS resolution. This allows the user to get a valid certificate when you connect to the vCenter Operations Manager 5.0, using the Fully Qualified Domain Name or simply the short name of the server.

To use this feature you will need to edit the C:\OpenSSL-Win64\bin\openssl.cfg and add “req_extensions = v3_req” to the “[ req ]” section, and add “subjectAltName = DNS:vcops.vsphere.bussink.local,DNS:vcops” to the “[ v3_req]” section. I need to add that I also modify the default key length in the certificate request to 2048 bits.

[box] [ req ]

default_bits        = 2048

req_extensions = v3_req

[ v3_req ]

subjectAltName = DNS:vcops.vsphere.bussink.local, DNS:vcops, DNS:192.168.1.18

subjectAltName = DNS:vcops.vsphere.bussink.local, DNS:vcops

[/box]

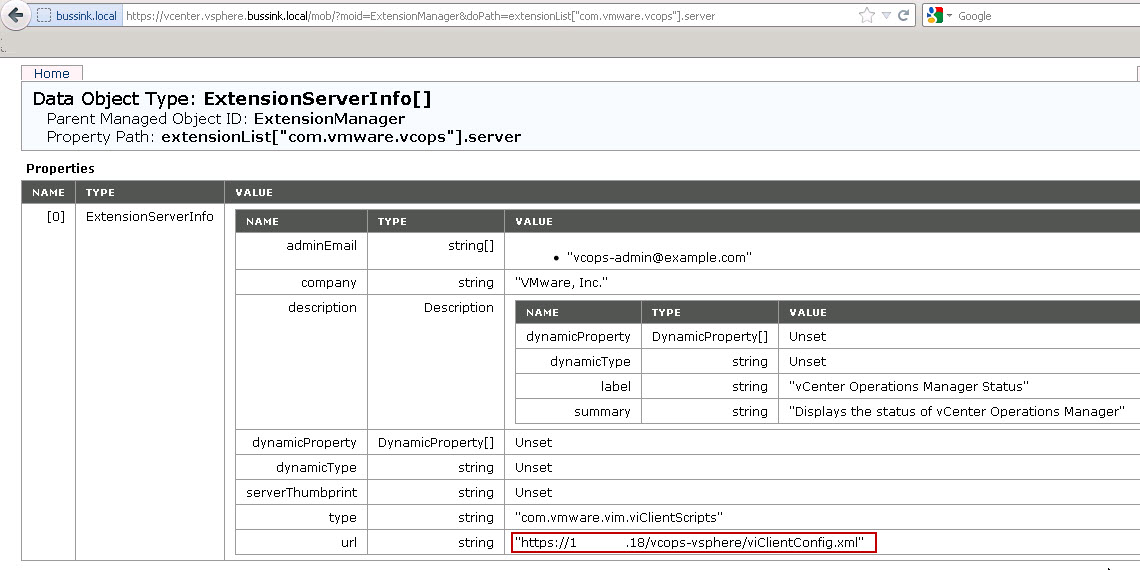
Update (29/03/2012): I added to my subjectAltName, the iPAddress of my vCenter Operations Manager UI. You will get the information from the vCenter Managed Object Reference portal ExtensionManager value (See screenshot at the bottom of the post). The entry is of format DNS:192.168.1.18

Update (02/04/2012): Thanks to Josh Perkins excellent article “vCenter Operations Manager 5 vCenter Plugin uses IP instead of DNS hostname“. I have removed the IP address subjectAltName in the certificate request in the code above.

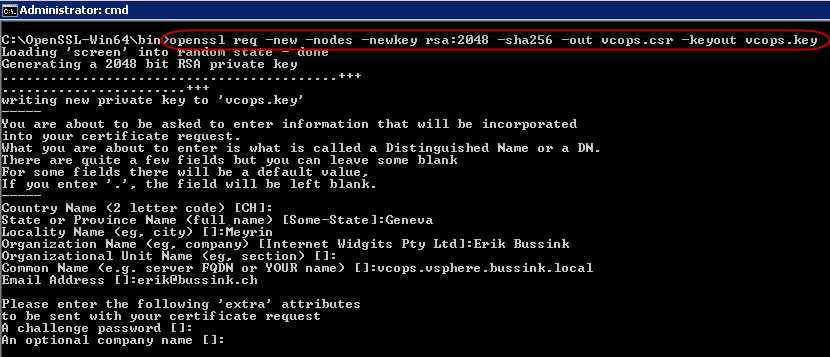
To create the Certificate file I used the following commands. Go to the bin directory of the OpenSSL tools. Generate a new Certificate Request while keeping the Cert Private key on your vCenter server. I’m generating the vCOPS private key with the 2048bit RSA algorithms and the SHA256 Message Digest algorithms.

[box] cd C:\OpenSSL-Win64\bin

openssl req -new -nodes -newkey rsa:2048 -sha256 -out vcops.csr -keyout vcops.key

[/box]

Generate vCOPS Certificate Request

Once we have the Certificate Request for the vCenter Operations Manager, we can submit it to the Public Key Infrastructure for certification. There are two ways to it, once from the command prompt and via the Web interface of the PKI.

Command Prompt Certificate Request

Windows Server 2008 R2 has a simple tool, to submit the Certificate Request directly the Microsoft Root CA (Enterprise Mode).

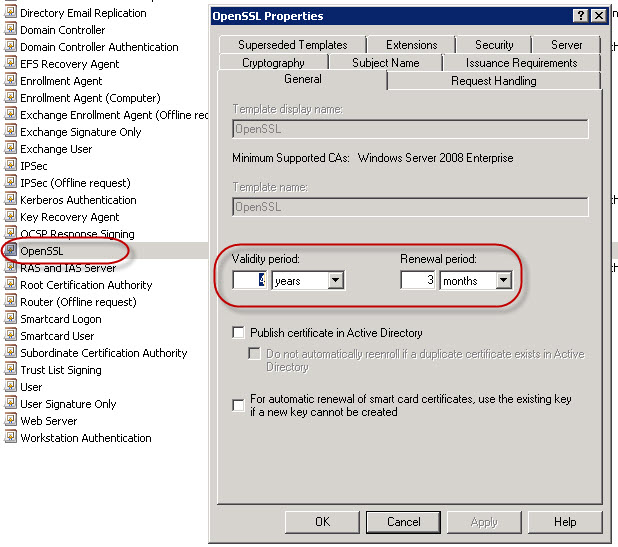
On my Certificate Authority I have cloned the default WebServer Certificate Template, and named it OpenSSL. I have also modified it’s Validity Period, Renewal Period. See completely at the bottom of this post to get an explanation and description of these changes.

My Microsoft Certificate Authority implementation is configured so that Certificate Requests need to be authorized, so the Submit/Retrieve process is composed of two commands here: certreq -submit and certreq -retrieve, if your Certificate Authority is not setup with validation, the submission/retrieval process is done in a single command.

[box]

certreq -submit -attrib “CertificateTemplate:WebServer” vcops.csr

or

certreq -submit attrib “CertificateTemplate:OpenSSL” vcops.csr[/box]


Submitting vCOPS Certificate Request from Command Prompt

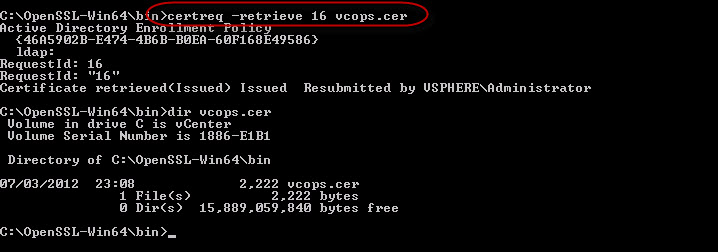
At this point the Certificate has been submitted to the Root CA authority in the domain. Please note the RequestId number when you submit the Certificate Request. Once the Certificate has been authorized and generated you can retrieve it back to the vCenter.

[box]certreq -retrieve 16 vcops.cer [/box]

Retrieve vCOPS Certificate from Command Prompt

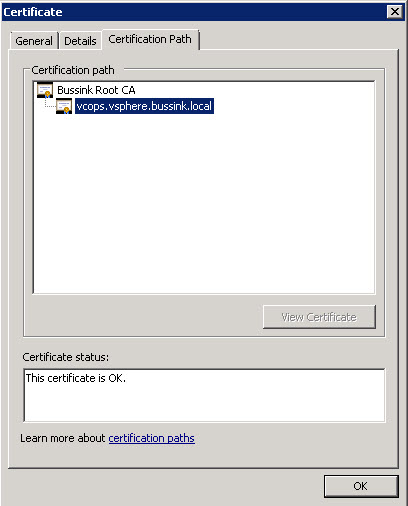
If we open the vcops.cer in Windows, we can see that the Certificate has also proper Certificates in the Certification Path. This is important to ensure that browsers can validate the vCOPS Certificate all the way up to the Certificate Authority (with the Issuing CA is it’s an Intermediate Certification Authority).

Verify your vCOPS Certificate for the Certification Path

We now need to build a PKCS#12 container file with the Certificate, the Private Key and output it to the .PFX file.

[box] openssl pkcs12 -export -in vcops.cer -inkey vcops.key -name vcops -out vcops.pfx[/box]

Build vCOPS PKCS12 Container

vCenter Operations Manager 5.0 does not use the PKCS#12 file format, but the PEM format, and requires that the Private Key is not protect by password. So we re-transform the the .PFX with the Private Key into the .PEM format.

[box] openssl pkcs12 -in vcops.pfx -inkey vcops.key -out vcops.pem -nodes[/box]

Transform vCOPS from PKCS12 Container to PEM format

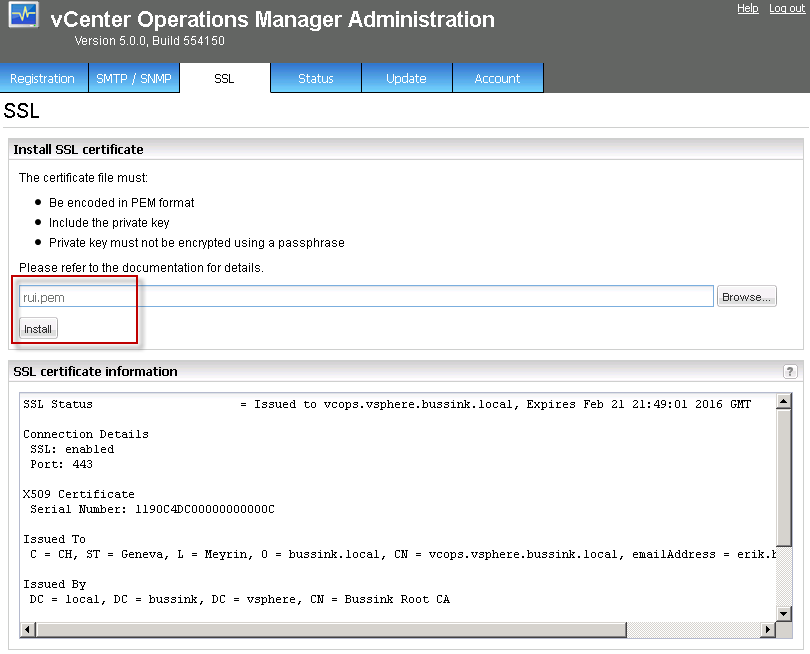
At this point open the Administrator interface of vCenter Operations Manager on the SSL pane, and import the PEM certificate.

The url is https://vcops.<your-domain>/admin/

Importing SSL Certificate in vCOPS


But here comes a tricky part. It’s debugging time.

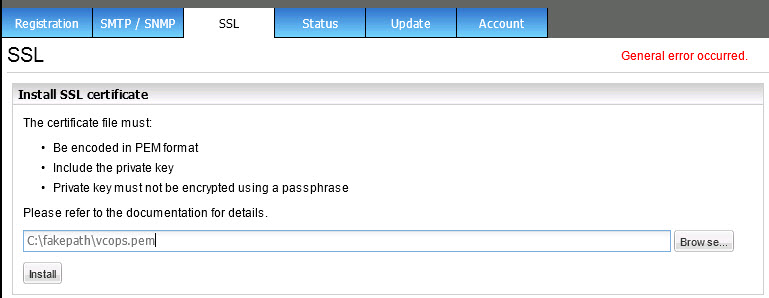
It is very possible that your Import of the OpenSSL Certificate fails with a General error occured. Like below.

OpenSSL Import General Error Occurred

What I found is that the apache2 Web Server on vCOPS did not like loading my SSL Certificate, because it saw that the certificate was for a FQDN that it could not figure out. I modified the /etc/hosts file to ensure apache2 got the proper hostname while starting up and therefore accepted the OpenSSL Certificates.

Modify /etc/hosts file on vCOPS

In the next screenshot you see the error messages from the apache2 at startup when it cannot figure out it’s name and when it does.

[box]/sbin/service apache2 restart [/box]

vCOPS apache2 startup with default /etc/hosts and modified /etc/hosts


You can always check the vCOPS log files at /var/log/vmware/ for issues.

In the screnshot below we see that I tried to install onces the vcops.pfx format, and then the vcops.pem certificate (@23:38:15), I then restarted the vCOPS Web Service and all is good after 23:46:13.

[box] tail /var/log/vmware/vcops-admin.log[/box]

Checking the vcops-admin.log for SSL install issues

We can now connect to vCenter Operations Manager using the FQDN or the short-name.

Valid SSL Certificate for vCOPS

I have also found that once the OpenSSL Certificate has been changed, that the vCOPS Interface  feels much more reactive.


Appendix 1) – My OpenSSL Certificate Template

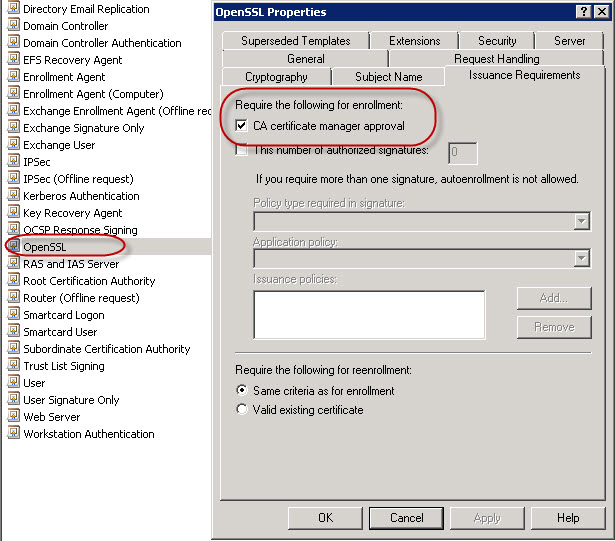
On my Active Directory Certificate Services I have cloned the default WebServer Certificate Template, and named it OpenSSL. I have also modified it’s Validity Period, Renewal Period and the need for the Certificate Authority Manager to approve all Certificate Requests.I highly recommend that you set the Validity Period for your Certificate Template. The CA Manager Approval really depends on your environment. As I sometimes do Auto-Enrollment tests for devices, I don’t want to pollute my Root CA with hundreds of superseding certificates.

OpenSSL Certificate Template Properties - Validity Period

OpenSSL Certificate Template Properties – CA Manager Approval


Appendix 2) – Retrieve the Root & Intermediate Certificate Authority Public Key using CertUtil

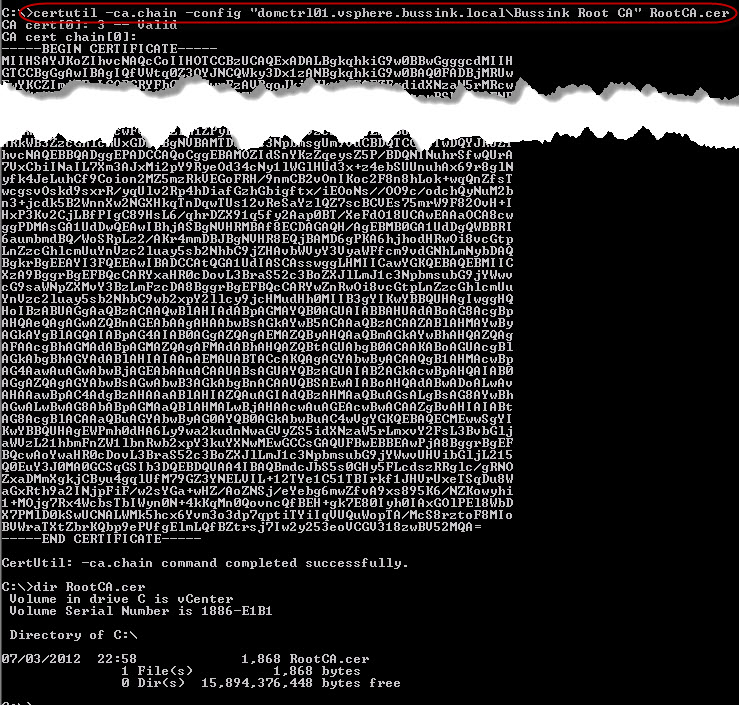
In this second appendix, I will briefly show how to retrieve the Root Certificate Authority Public Key from the command prompt. You should also retrieve the Intermediate CA if you have one.

[box] certutil -ca.cert -config “domctrl01.vsphere.bussink.local\Bussink Root CA” RootCA.cer[/box]

Retrieve Certificate Authority Public Key RootCA.cer


Update on 16/03/2012. Changed the Win64 OpenSSL v1.0.1 Light tools.

Update 27/03/2012. Added a additional subjectAltName to the Certificate request. But my had my parameters wrong.

Update (27/03/2012): I have added a new subjectAltName on the to my openssl.cfg. I added the FQDN name of my vCenter server in the Certificate request. With vCenter Operations Manager 5.0, you get the integration within the vCenter Client in the Solutions & Applications section. The SSL Certificates will therefore be checked by the vCenter Client against the vCenter FQDN name.

Update 29/03/2012. Thanks for Kinsei for having raises the question on the topic of the SSL Certificate usage via the vCenter Client. The vCenter Operations Manager is connected to the vCenter Server not by an FQDN name, but by an IP Address. You can find the value when you connect to your vCenter server’s Managed Object Reference (mob) settings portal.

https://vcenter/mob/ Content ExtensionManager ExtensionList com.vmware.vcops

 Update (02/04/2012). Here is another update. Josh Perkins has written up a great article on how to ensure that your vCenter uses a FQDN or shortname to speak to your vCenter Operations Manager. This means that administrators and user on the vSphere Client do not get invalid SSL Certificate requests anymore. Thanks Josh !!


HP ML110 G7 and VT-d DirectPath I/O Configuration and VMware FT

I’ve had quiet a few questions over the past days about the HP ProLiant ML110 G7. And here are some screenshots aboutabout using Intel VT-d or DirectPath I/O and VMware FT.

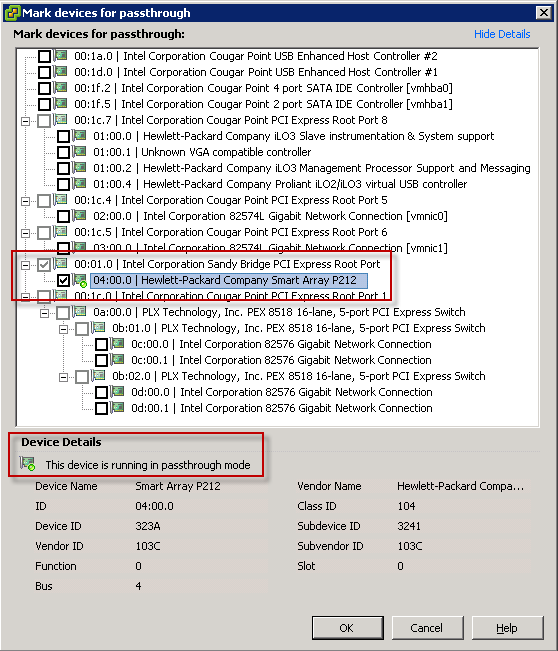
To use the Intel VT-d DirectPath I/O you need to make sure that Intel VT-d is enabled in the BIOS of the ML110 G7. Then you can assign any non used PCIe card that supports it for DirectPath I/O configuration. Assigning a PCIe device for DirectPath I/O configuration requires the ESXi to reboot.

ML110G7 and VT-d DirectPath IO Configuration

Here is a close up on the SmartArray P212 select for Passthrough mode.

SmartArray P212 in Passthrough mode

The second question I got a few time is can I also use VMware FT. Yes you can, theIntel E3 Xeon CPU are recent enough to support the Lockstep process of VMware FT. Here is a screenshot of my vShield Manager appliance running with VMware FT protection between two HP Proliant ML110 G7.

VMware FT on ML110G7


So Just to resume, the HP ProliantML110 G7 is an awesome system for ESXi 5.0 and allows you to use VMware HA & DRS, VMware FT, DirecPath I/O mode (VT-d), VMware Distributed Power Management via the HP iLO3 module.