Disable RHEL 5.6 Release Upgrade on vCloud Director 1.5 Cell

The VMware vCloud Director 1.5 runs on the Red Hat Enterprise Linux 5.6 platform. It is supported by VMware only on version 5.6 of the Red Hat Enterprise Linux. If you are not careful and try to patch the operating system on the vCloud Director 1.5 system, you could find yourself with a RHEL 5.7 or RHEL 5.8 Release, which would cause vCloud Director to break.

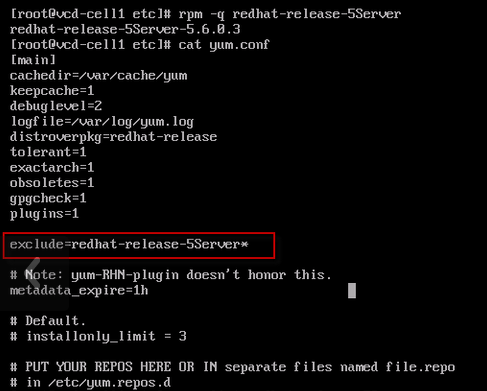
To ensure that your vCloud Director 1.5 stays on the Red Hat Enterprise Linux 5.6 Release and only download patches for the operating system, we need to add a single line to the /etc/yum.conf file.

Disable RHEL 5.6 Release Upgrade

I simply add the following line in /etc/yum.conf

exclude=redhat-release-5Server*

This will exclude all newer Red Hat Releases from getting installed by yum & the Red Hat Network.

I hope this will save you so unneeded trouble.


Creating a Maintenance Plan for SQL Server 2008 R2 for vCenter/UpdateMgr/vCloud

I shall start by saying that I’m by no way a Database Administrator, but over the years I have picked up some knowledge and I have talked to a few guys that have more Knowledge on the topic to learn small tips & tricks. I have created in previous posts how to quickly create a vCenter Database using Transact-SQL scripts, and how to create a vCloud Director database using Transact-SQL script. It this small article, I will just resume how to create some Maintenance Plans to ensure that your vCenter/UpdateManager/vCloudDirector databases are backed up. I’m not using the Full Recovery model in SQL Server 2008 R2 for my lab and my clients, so these maintenance jobs should be fine. I believe that if you have a large enough environment that is critical to your day-to-day operations, you should use the Full Recovery model, but you would then also have a real Database Administrator onsite that could manage, nurture and keep your databases in proper running condition.

I have seem my share of transaction log databases for VMware vCenter go haywire, such that the Roll-Up jobs are not running anymore (Check your History Log) and the transaction log databases explodes. My personal worse situation was last year at a client that didn’t check their database and the transaction log database run out of storage on the disk when it passed the 90GB. There are procedures on the VMware Knowledge Base on how to compact and roll-up these huge transaction database, but it takes a lot of time. In most cases, we cut out losses and just purge the transactions logs.

Coming back to my Maintenance plan. We will create to sets of database maintenance plans, one for the System Dababases and one for the User databases. I need to thank my friend Eric Krejci for showing me how to separate the two maintenance plans.

System Maintenance Plan

We need to connect to our database server using the SQL Server Management Studio program. And from the Management folder, select the Maintenance Plan and start the Wizard.
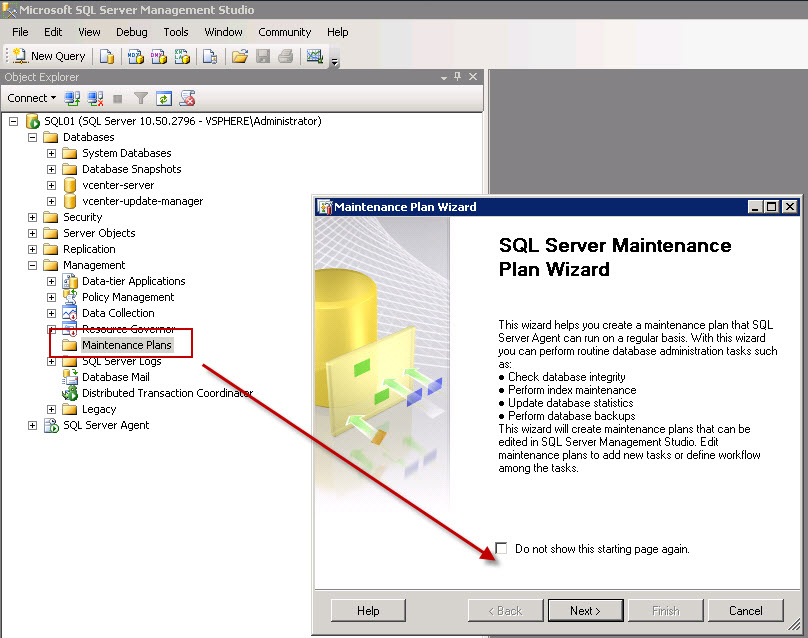
Start Maintenance Plan Wizard

The System databases is comprised of the Master, Model, MSDB and TempDB databases. These database don’t change much, but I will select to make a Twice Weekly maintenance and Backup Plan. Please note that the MSDB database contains all the Stored Procedures for your vCenter & Update Manager database.
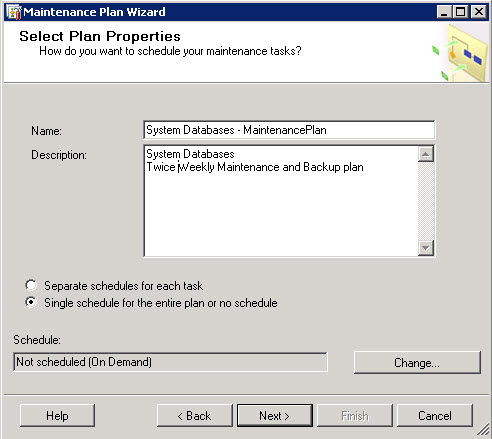
Define Maintenace Plan

And let’s Schedule the Plan for two runs per week on Tuesday evening and Friday evening.
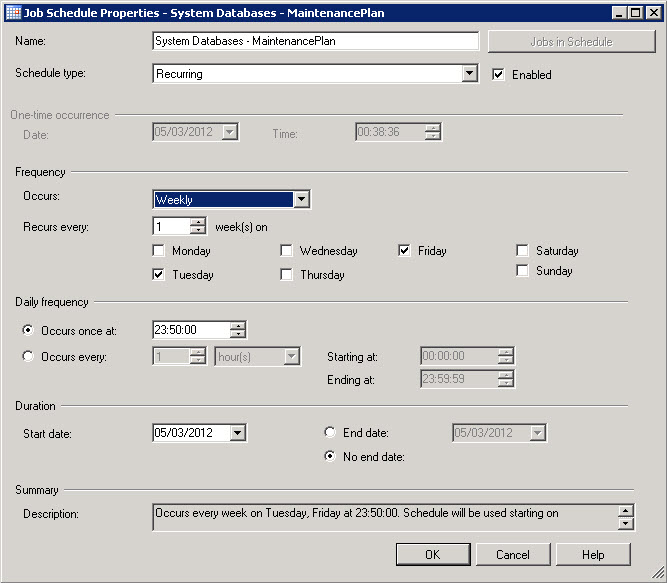
Job Schedule Properties

You can select any other pattern that you wish.I for one also use VMware Data Recovery 2.0 for making daily backup of my virtual machines, so I make sure that my  VMware Data Recovery schedule does not run on my databases between 23:00 and 01:00.

Now we can select the various Maintenance Tasks we want to run.
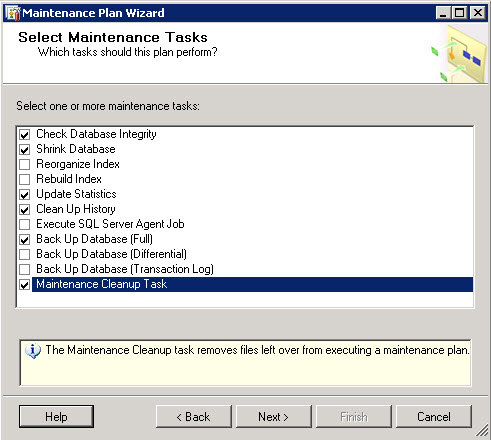
Select Maintenance Tasks

I have selected

  • Check Database Integrity
  • Shrink Database
  • Update Statistics
  • Clean Up History
  • Back Up Database (Full)
  • Maintenance Cleanup Task.

And I have changed their Order around on Select Maintenance Task Order step.
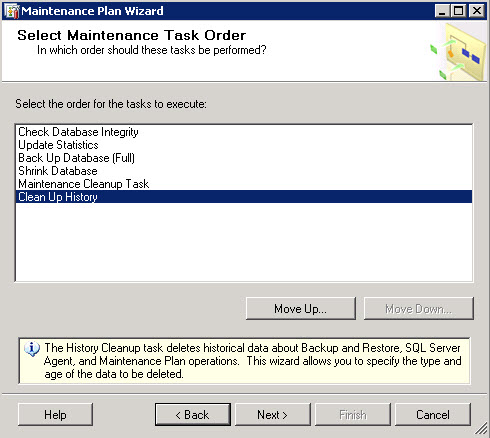
Select Maintenance Task Order

So we run

  1. Check Database Integrity
  2. Update Statistics
  3. Back Up Database (Full)
  4. Shrink Database
  5. Maintenance Cleanup Task
  6. Clean Up History

Now let’s configure the Maintenance Tasks – Define Check Database Integrity. I have selected for this first Maintenance Plan the System Databases.
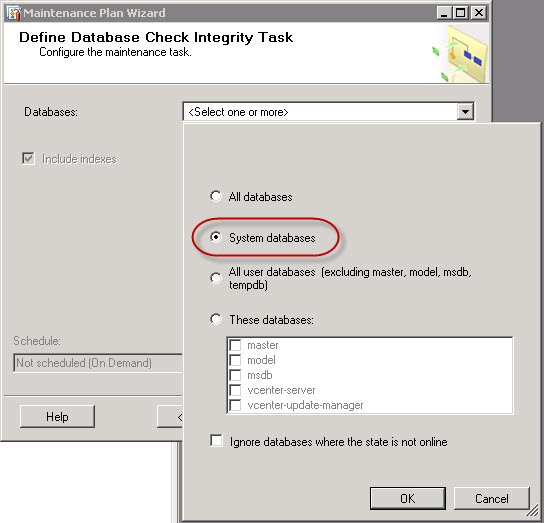
Define Database Check Integrity Task – System Databases

We now Define Update Statistics Task for the System Databases
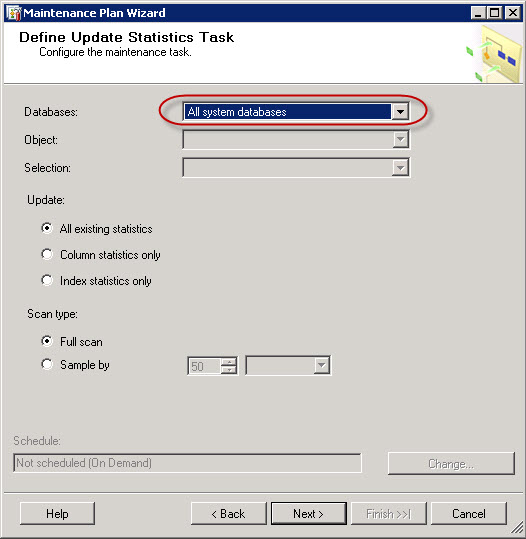
Define Update Statistics Task – System Databases

The next step is the definition of the back up job. Define Back Up Database (Full) Task. Please note that we have added the option to create a sub-directory for each database, and to verify the backup integrity. I have also modified the Backup File Extention to BAK_FULL_SYS so that we can make better use and more flexible backup cleanup maintenance job later in this article.
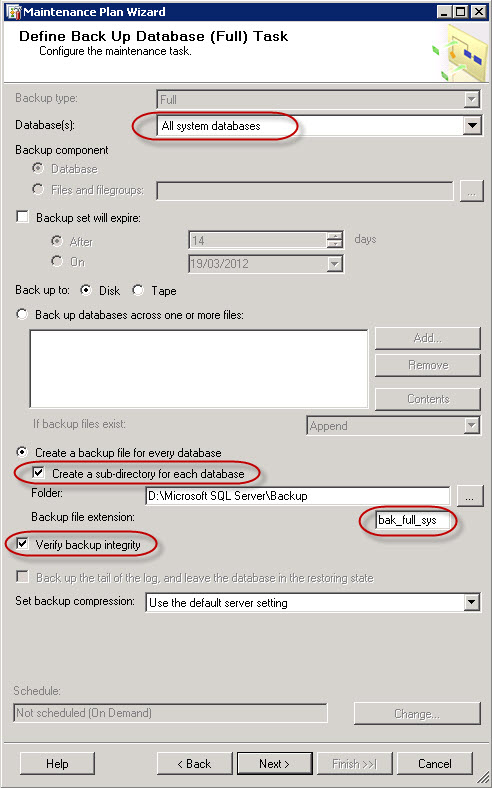
Define Back Up Database (Full) Task – System Databases

There is always a good discussion if you have enough Compute power to create a compressed backup or not.

Now that we have a good full backup for the system databases we can do some database shrinkage. Define Shrink Database Task.

Update 22/03/2013. Since I created this post, I’ve stopped using the Shrink task in the maintenance plan. I rather do it sparingly manually than automate it.
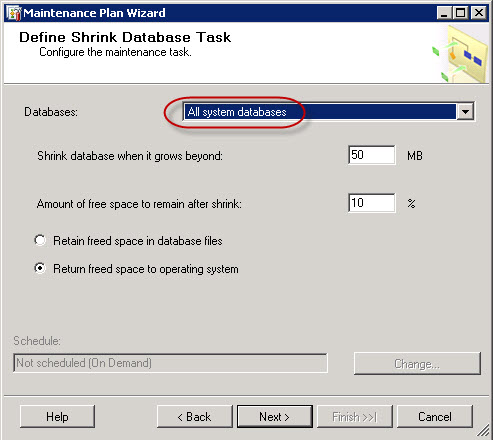
Define Shrink Database Task – System Databases

Now remember that we modified the Backup File Extension earlier. We we will now Define Maintenance Cleanup Task to erase all System Databases backups that are older than two weeks, and we will use the various sub-folders for the backups.
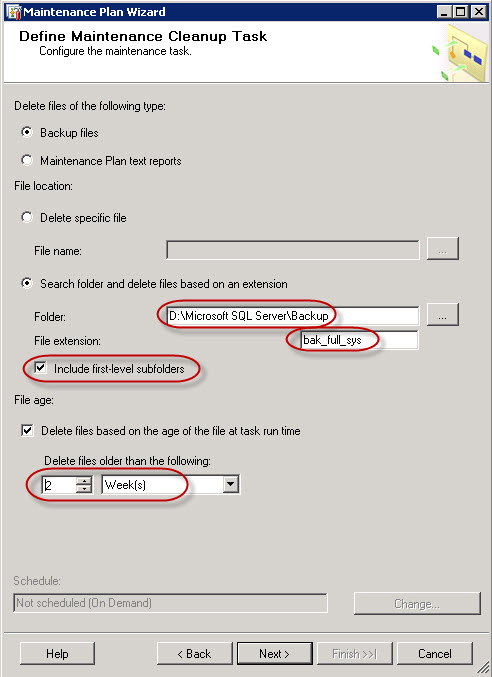
Define Maintenance Cleanup Task – System Databases

And  last we Define History Cleanup Task for the whole SQL Server 2008 R2 instance. I did not modify the settings of this tab. This Maintenance Task will cleanup the Backup and Restory History, the SQL Server Agent job history and the Maintenance Plan History.
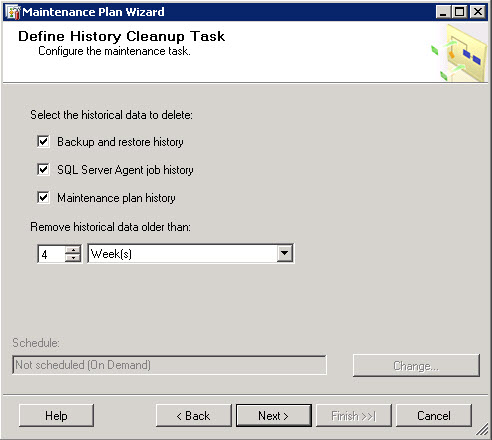
Define History Cleanup Task

We will also save a copy the Maintenance Plan actions to a text file in the same directory as where the backup files are stored.
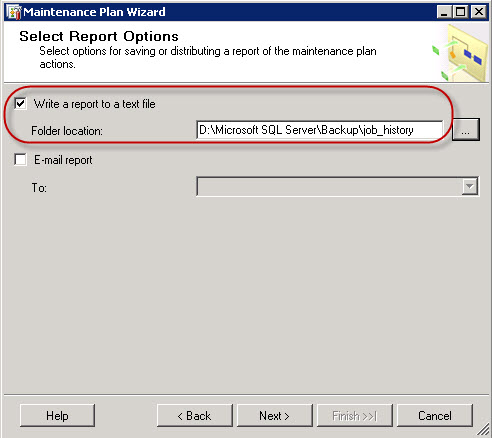
Select Report Option for Maintenance Plan

We now have a resume of the Maintenance Plan we can complete.
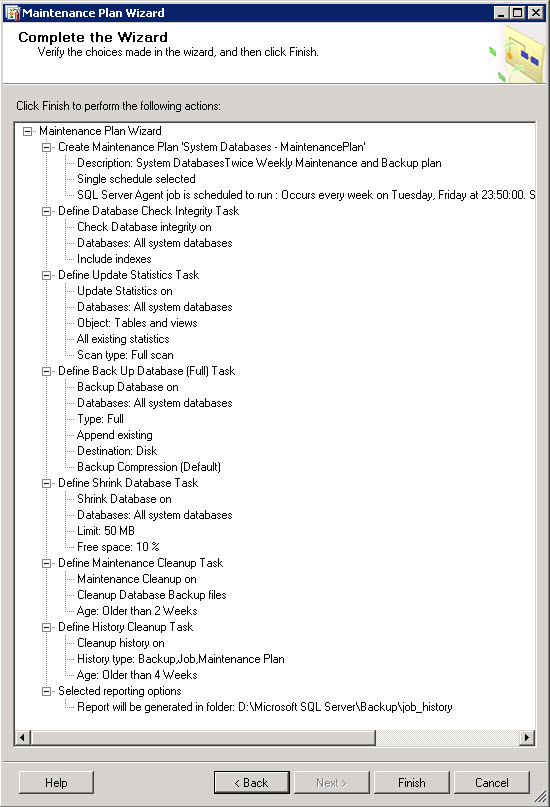
Maintenance Plan Wizard Complete

We see the new job in the Maintenance Plans section and the new job in the SQL Server Agent
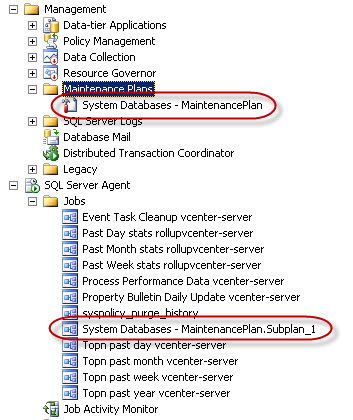
Maintenance Plans & SQL Agent Jobs


User Maintenace Plan

We now attack the User Databases Maintenance Plan. We start our Maintenance Plan Wizard and start the definition of the plan properties. I’m creating a Maintenance Plan for the Users Databases that will create a Differential Back Up every day, and a Full Back Up on Friday.
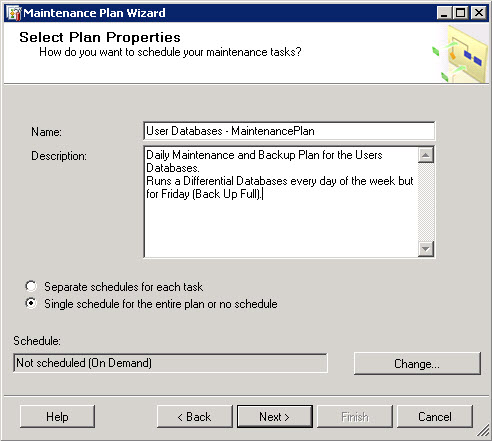
Users Database Maintenance Plan Properties

I modify the Schedule so that the main part of this Maintenance Plan including the Full Back Up happens each Friday. I will then later add a subplan to do the Differential plan each day.
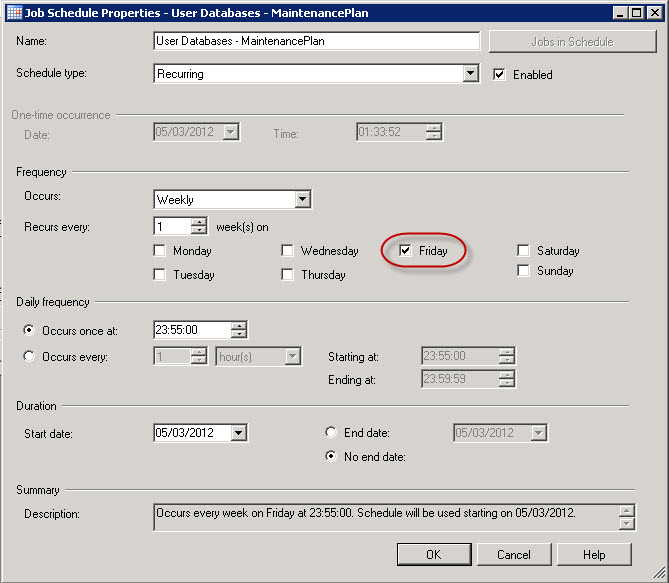
User Databases Maintenance Plan – Job Schedule

We now add the various Maintenance Tasks for our Users Databases.
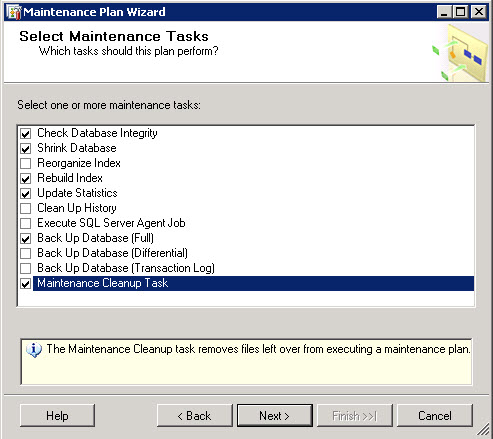
Select Maintenance Tasks

I have selected

  • Check Database Integrity
  • Shrink Database
  • Rebuild Index
  • Update Statistics
  • Back Up Database (Full)
  • Maintenance Cleanup Task

And we Select Maintenance Task Order to move down the Shrink Database task after the Back Up Database (Full).
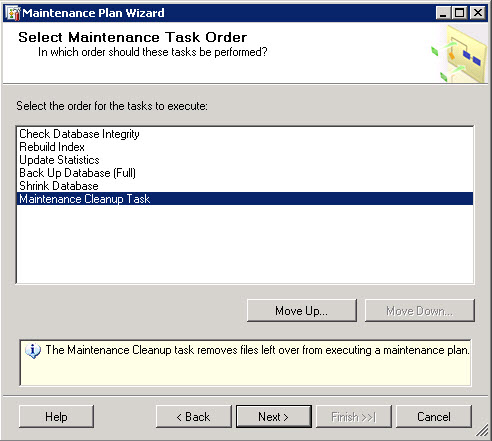
Select Maintenance Task Order

So we run

  1. Check Database Integrity
  2. Rebuild Index
  3. Update Statistics
  4. Back Up Database (Full)
  5. Shrink Database
  6. Maintenance Cleanup Task

The first Task to run is the Database Check Integrity Task where we select the Users Databases
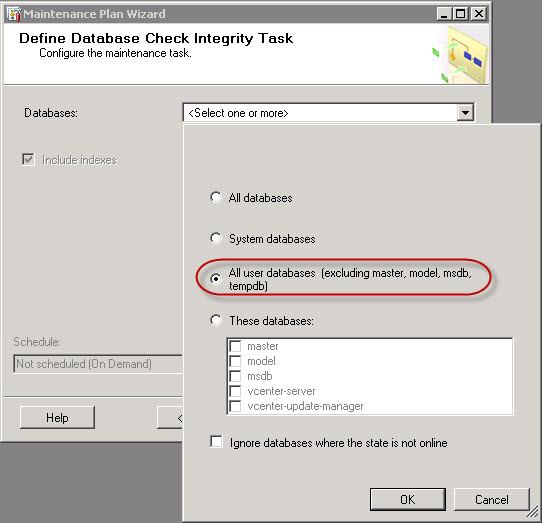
Database Check Integrity Task – User Databases

We then Rebuild Index Task for the Users Databases
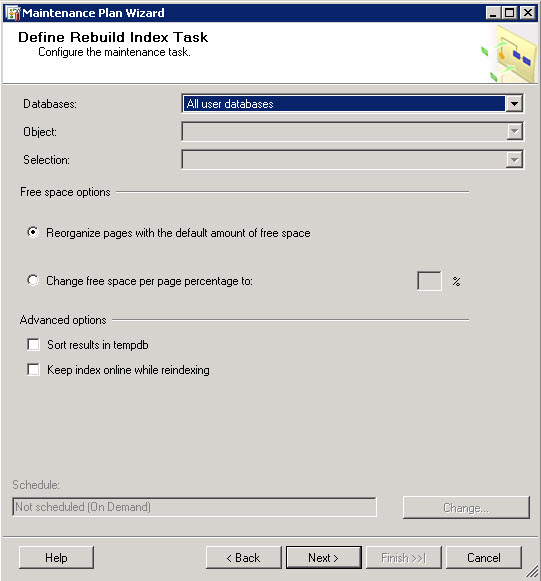
Rebuild Index Task – User Databases

We Define Update Statistics Task for the User Databases.
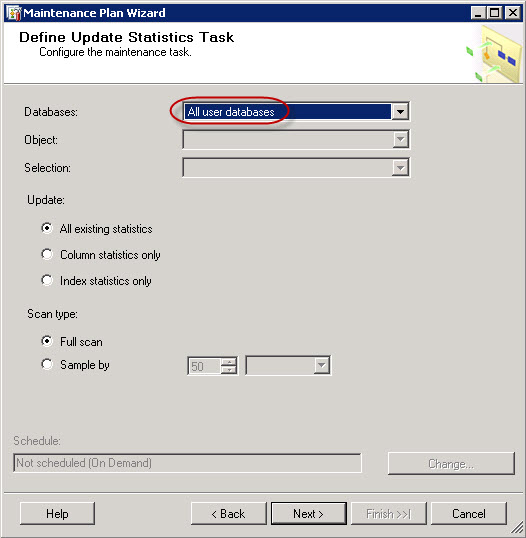
Update Statistics Task – User Databases

We now do the Back Up Database (Full) Task for the User Databases. Note that we use sub-directories for each database, we changed teh Backup File extionsion to BAK_FULL_USR and we verify the integrity of the backup.
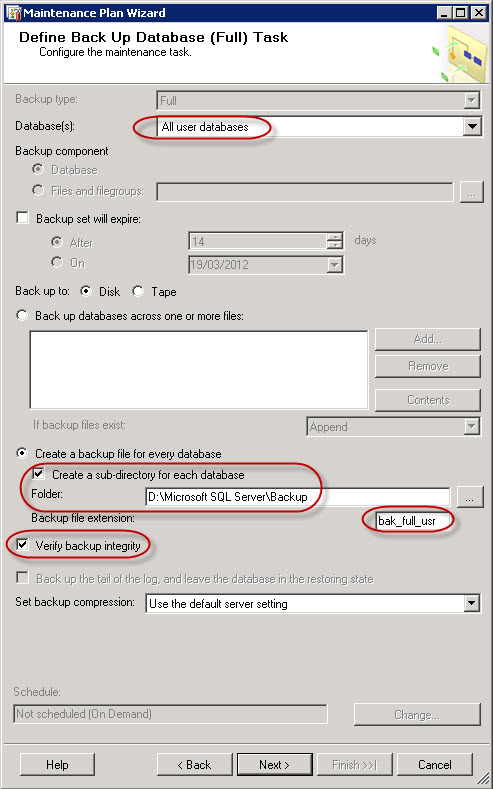
Back Up Database (Full) Task – User Databases

Once we have the Full Back Up of the User Databases we can launch the Shrink Database Task.
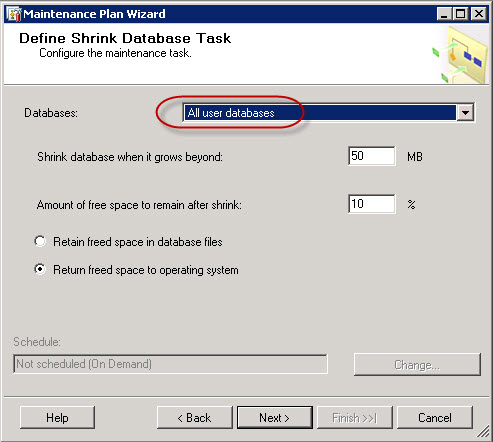
Shrink Database Task – User Databases

We now setup the Maintenance Cleanup Task for the User Databases so that we keep only the last two weekly full backups.
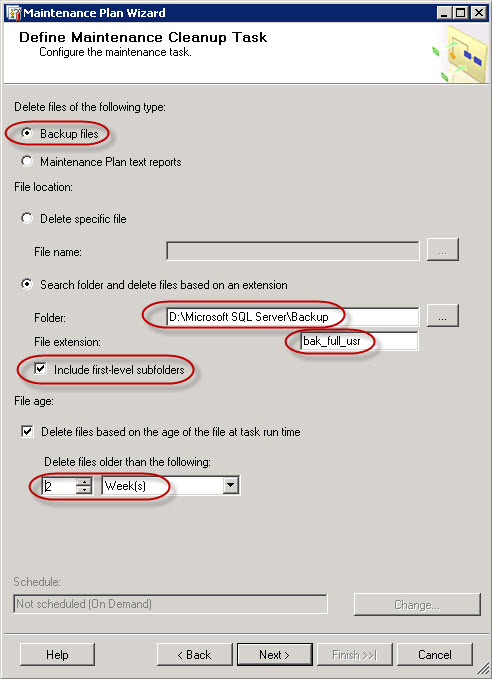
Maintenance Cleanup Task – User Databases

And we save the Maintenance Plan Report to the job_history directory.
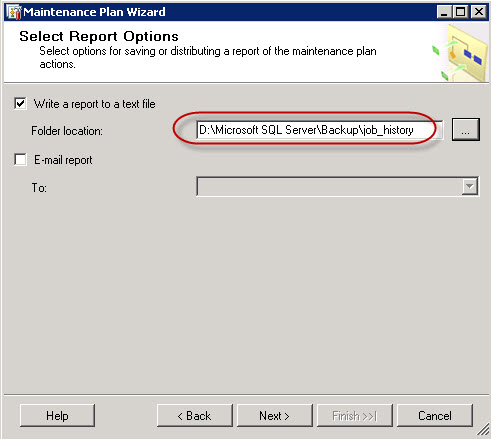
Maintenance Plan Report Path

We now have a complete Maintenace Plan ready.
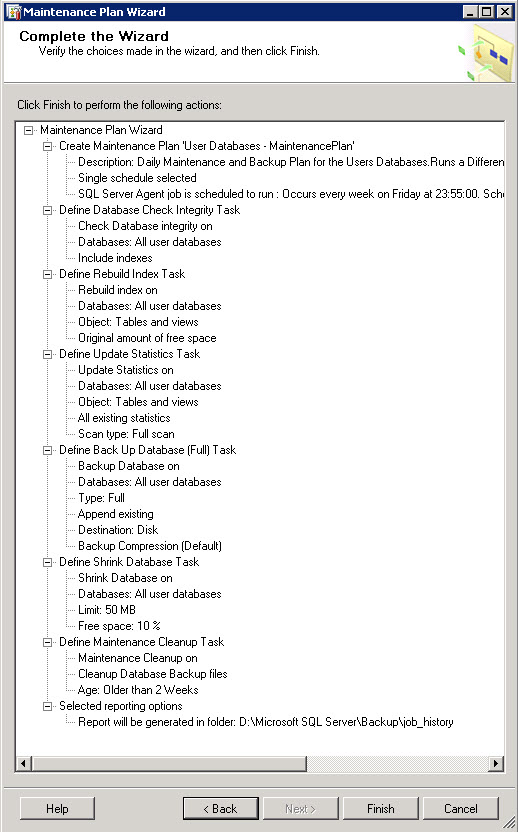
User Databases Maintenance Plan Wizard Complete

This creates the new Maintenance Plan and the SQL Agent Job.
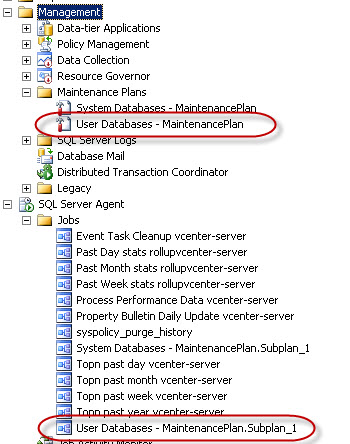
Maintenance Plan & SQL Agent Jobs

We now select to Modify the User Databases – MaintenancePlan
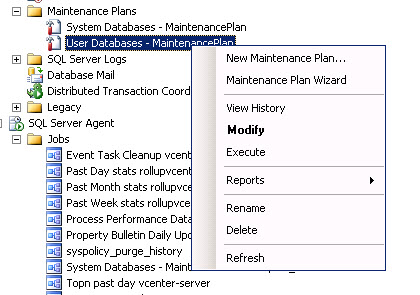
Modify User Databases Maintenance Plan

And let’s quickly rename the Subplan_1 to Subplan_Weekly in the Subplan menu.
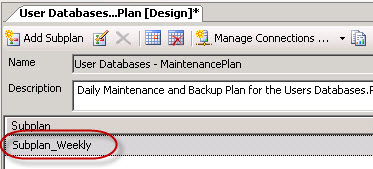
Rename Subplan_1 to Subplan_Weekly

So we can now Add Subplan to this Maintenance Task
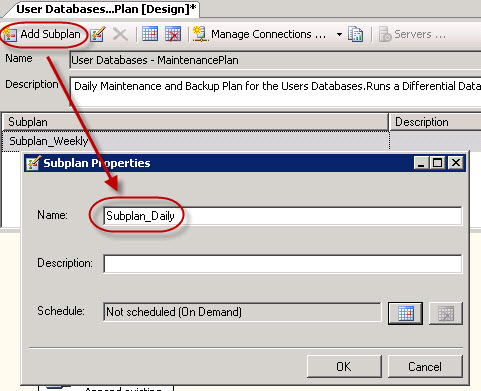
Add Subplan_Daily

And we edit the Job Schedule to run everyday but Friday at the same time.
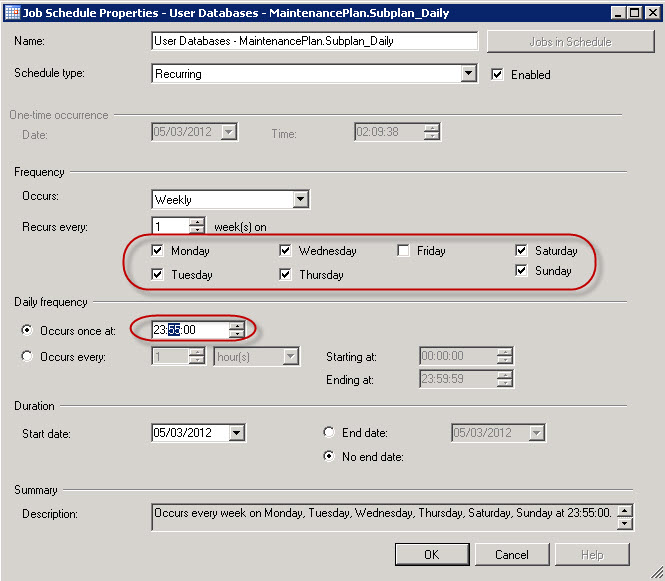
Job Schedule Subplan_Daily

We will now drag and drop the Back Up Database Task into the Subplan_Daily
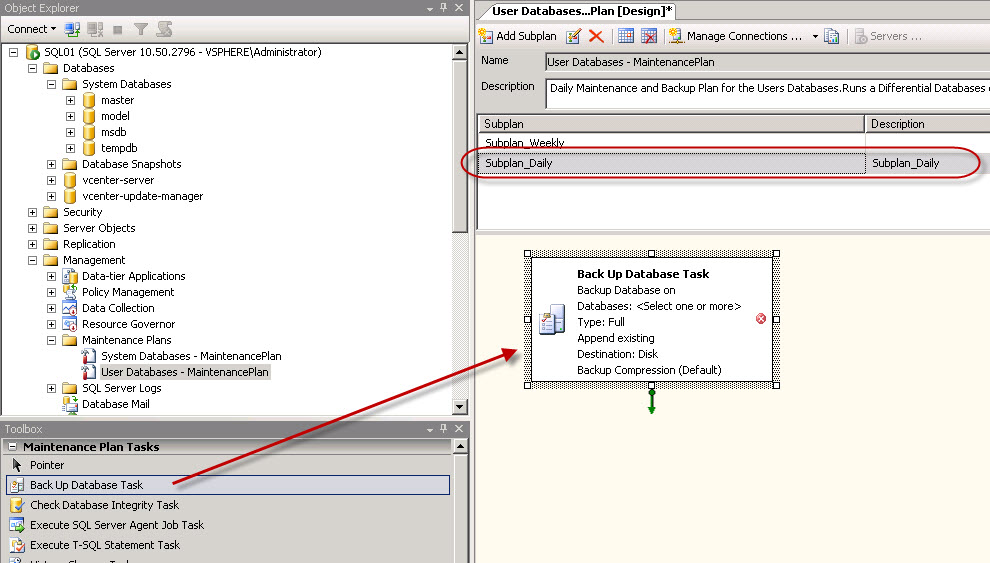
Back Up Database Task in Subplan_Daily

We now edit the Back Up Database Task
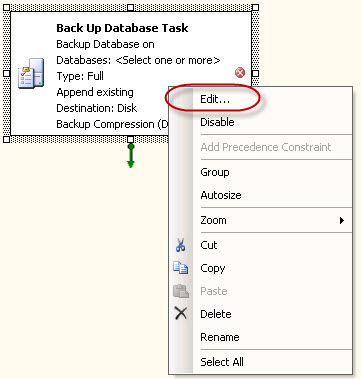
Edit Back Up Database Task

And we modify the Back Up Database Task for Differential Jobs, we also make sure the backups are written in their correct directories, that they are verified, and that the Backup File Extension is BAK_DIFF_USR.
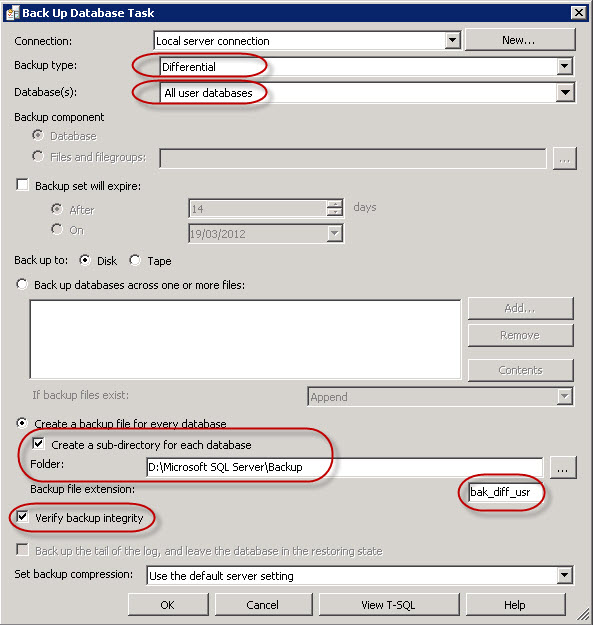
Back Up Database Task – User Databases – Differential Job

We now add the Maintenance Cleanup Task to this Subplan_Daily job and Linked it to the Back Up Database Task.
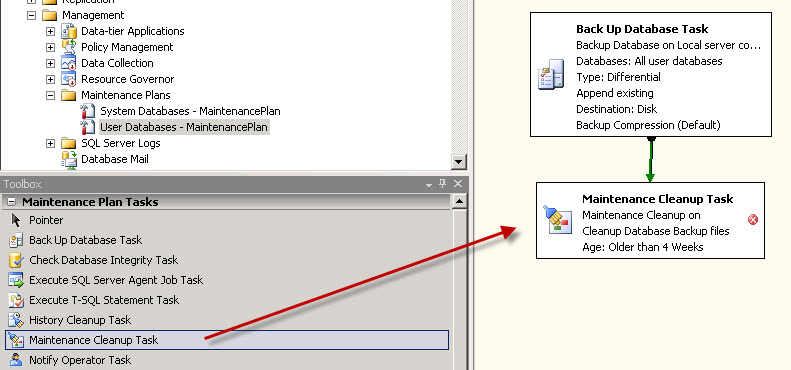
Add Maintenance Cleanup Task

And we will edit the Maintenance Cleanup Task so that we erase the old BAK_DIFF_USR files.
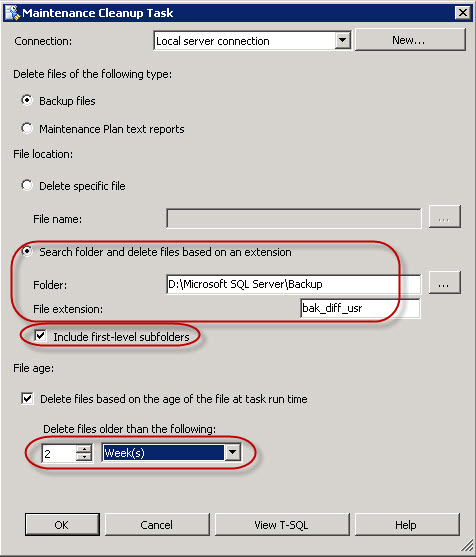
Maintenance Cleanup Task 1 – Backup Files

We add a 2nd Maintenance Cleanup Task to clean up the old text reports that are older than 4 weeks.
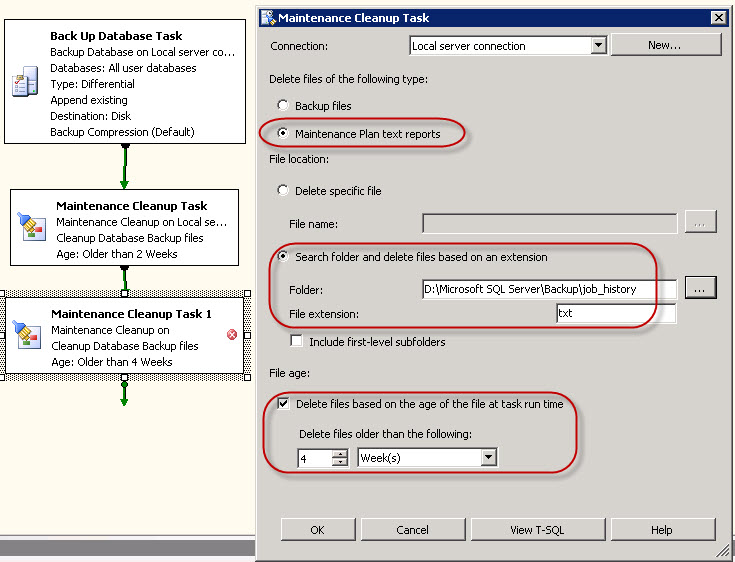
Maintenance Cleanup Task 2 – Text Reports

We are now done with the User Databases Maintenance Plan. Do NOT forget to SAVE the Maintenace Plan before quiting it.

We now have two specific SQL Server Agent Jobs.
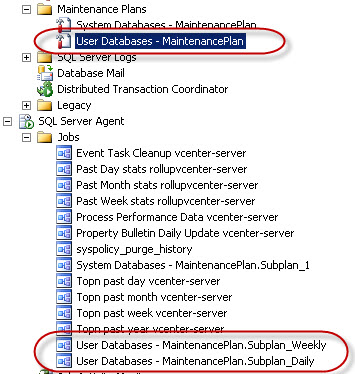
SQL Server Agent Jobs


We will now run the Maintenace Plan Jobs. We start with the System Database job using Start Job at Step…
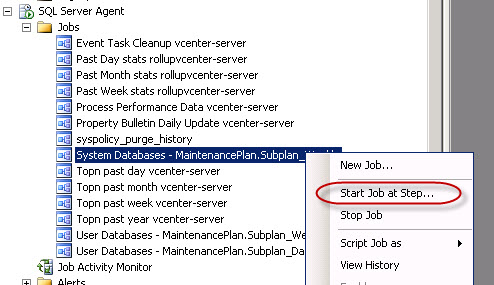
Running Maintenace Plan Jobs – System Databases

And for the User Databases we will first start the Full Back Up Task, before doing the Differential Back Up Task.
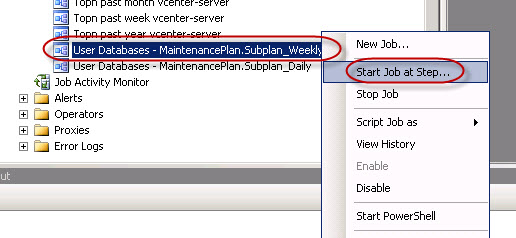
Running Maintenance Plan – User Database – Subplan_Weekly

Running Maintenance Plan – User Database – Subplan_Daily

When we check the Backup folder we now have a full back of the System Databases and User Databases (Full and Differential).
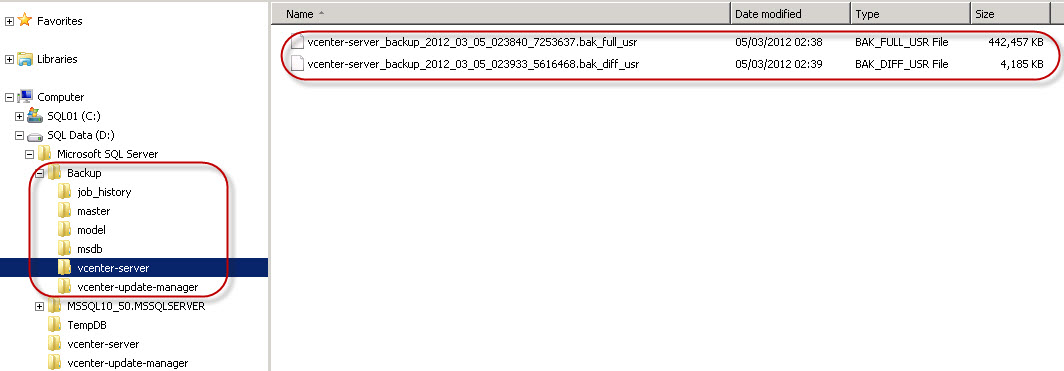
vCenter Server Backup Full and Diff

There you are with a Maintenance Plan for the SQL Server 2008 R2 running your vCenter, Update Manager and vCloud Director databases.

I hope this will help you.

I have to thank once more my friend Eric Krejci as we have discussed this topic extensively a few months ago and he already wrote the same article on vCenter and SQL Backup and Maintenance on his web blog.
Generating SSL Certificates for vCenter Operations Manager 5.0

Generating SSL Certificates for usage with vCenter, Update Manager and the ESXi host is one of those tasks that keeps being push away. Accepting the self-signed certificates is fine in most situation, but getting validated certificates means a whole lot of pop-ups disappear and surprise surprise, I have also found that the vCenter Operations Manager feels smother and faster.

I recently followed Julian Wood’s excellent series on how to sign certificates for vCenter and Update Manager. Generating the SSL Certificates for vCenter Operations Manager goes along the same lines, but there are changed and maybe some configuration changes on the vCOPS UI-VM.

Julian recommends to install the latest 64-bit version of the OpenSSL Windows Binaries. Retrieve the Win64 OpenSSL v1.0.1 Light for Windows tool on the vCenter with it’s per-requisite Visual C++ 2008 Redistributables (x64) from Microsoft.com

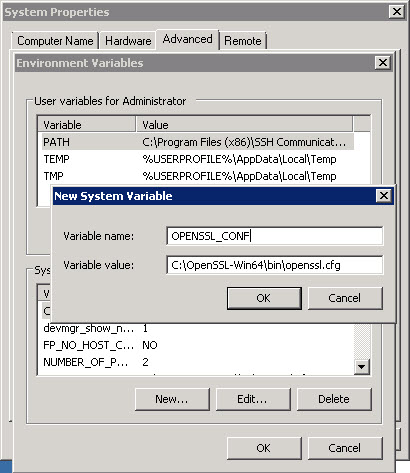
Once the OpenSSL v1.0.1 Light is installed, we can add an System Environment Variable, so that the OpenSSL tool can find the path to the OpenSSL configuration file. Because I’m going to use the OpenSSL tool on the vCenter to generate the SSL Certificates for various VMware appliance, I need the variable to stay permanent. From the Control Panel on the vCenter, I add a new System Environment Variable like follows.

Adding the OPENSSL_CONF environment variable in the Control Panel

So that the next time you start the Command Prompt to generate OpenSSL Certificates, the variable is already present.

Checking OPENSSL_CONF variable

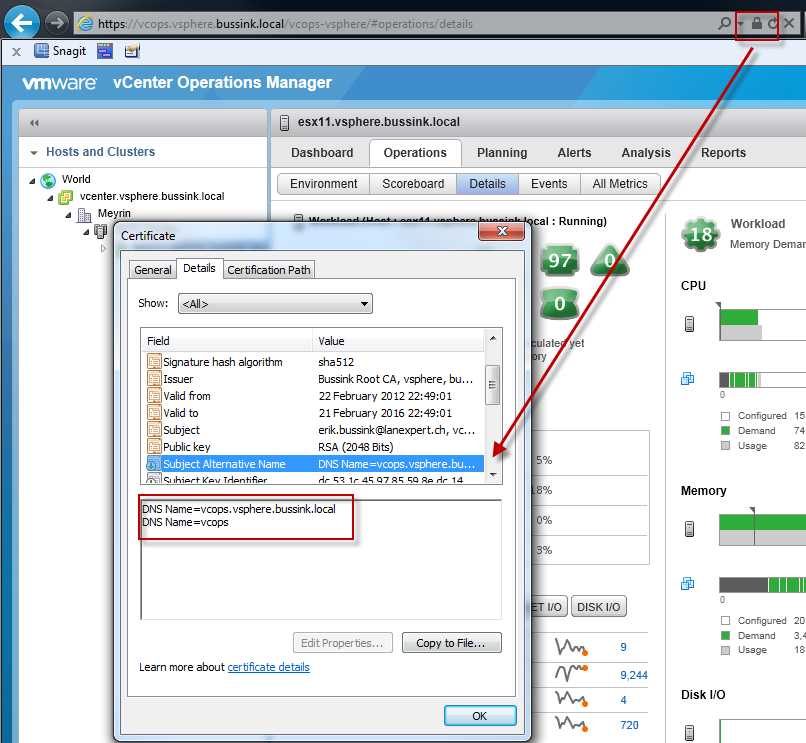
One of the best information I learned from Julian’s document is the modification of the openssl.cfg to add the option to use two subjectAltName for the DNS resolution. This allows the user to get a valid certificate when you connect to the vCenter Operations Manager 5.0, using the Fully Qualified Domain Name or simply the short name of the server.

To use this feature you will need to edit the C:\OpenSSL-Win64\bin\openssl.cfg and add “req_extensions = v3_req” to the “[ req ]” section, and add “subjectAltName = DNS:vcops.vsphere.bussink.local,DNS:vcops” to the “[ v3_req]” section. I need to add that I also modify the default key length in the certificate request to 2048 bits.

[box] [ req ]

default_bits        = 2048

req_extensions = v3_req

[ v3_req ]

subjectAltName = DNS:vcops.vsphere.bussink.local, DNS:vcops, DNS:192.168.1.18

subjectAltName = DNS:vcops.vsphere.bussink.local, DNS:vcops

[/box]

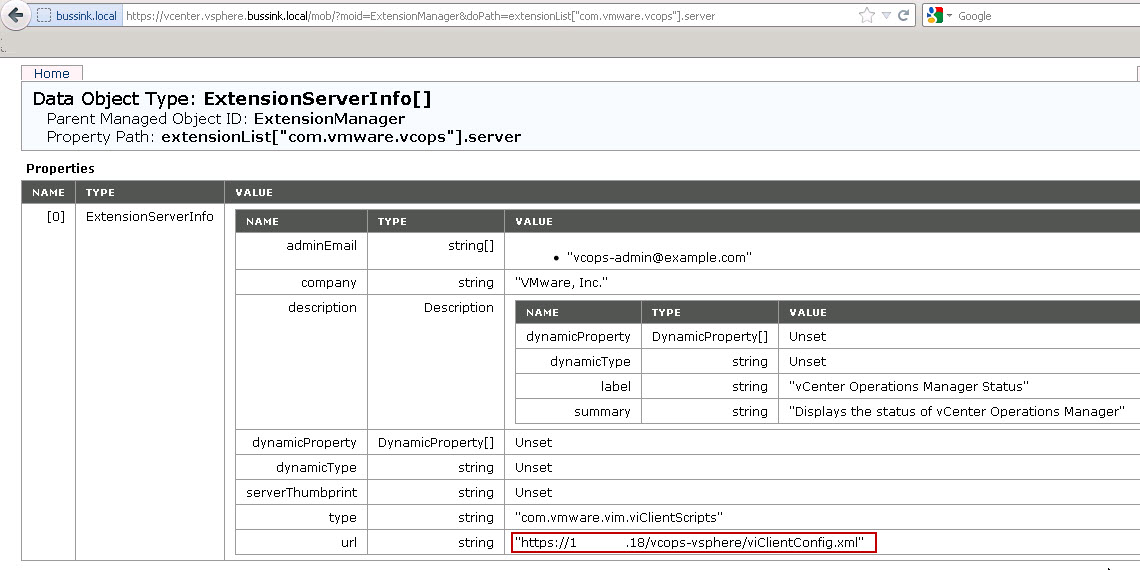
Update (29/03/2012): I added to my subjectAltName, the iPAddress of my vCenter Operations Manager UI. You will get the information from the vCenter Managed Object Reference portal ExtensionManager value (See screenshot at the bottom of the post). The entry is of format DNS:192.168.1.18

Update (02/04/2012): Thanks to Josh Perkins excellent article “vCenter Operations Manager 5 vCenter Plugin uses IP instead of DNS hostname“. I have removed the IP address subjectAltName in the certificate request in the code above.

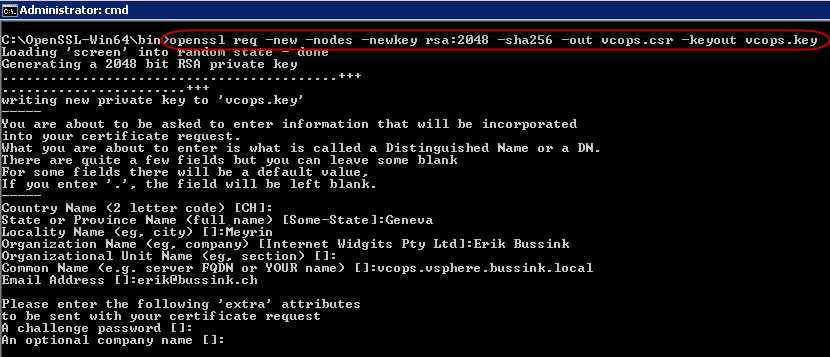
To create the Certificate file I used the following commands. Go to the bin directory of the OpenSSL tools. Generate a new Certificate Request while keeping the Cert Private key on your vCenter server. I’m generating the vCOPS private key with the 2048bit RSA algorithms and the SHA256 Message Digest algorithms.

[box] cd C:\OpenSSL-Win64\bin

openssl req -new -nodes -newkey rsa:2048 -sha256 -out vcops.csr -keyout vcops.key

[/box]

Generate vCOPS Certificate Request

Once we have the Certificate Request for the vCenter Operations Manager, we can submit it to the Public Key Infrastructure for certification. There are two ways to it, once from the command prompt and via the Web interface of the PKI.

Command Prompt Certificate Request

Windows Server 2008 R2 has a simple tool, to submit the Certificate Request directly the Microsoft Root CA (Enterprise Mode).

On my Certificate Authority I have cloned the default WebServer Certificate Template, and named it OpenSSL. I have also modified it’s Validity Period, Renewal Period. See completely at the bottom of this post to get an explanation and description of these changes.

My Microsoft Certificate Authority implementation is configured so that Certificate Requests need to be authorized, so the Submit/Retrieve process is composed of two commands here: certreq -submit and certreq -retrieve, if your Certificate Authority is not setup with validation, the submission/retrieval process is done in a single command.

[box]

certreq -submit -attrib “CertificateTemplate:WebServer” vcops.csr

or

certreq -submit attrib “CertificateTemplate:OpenSSL” vcops.csr[/box]


Submitting vCOPS Certificate Request from Command Prompt

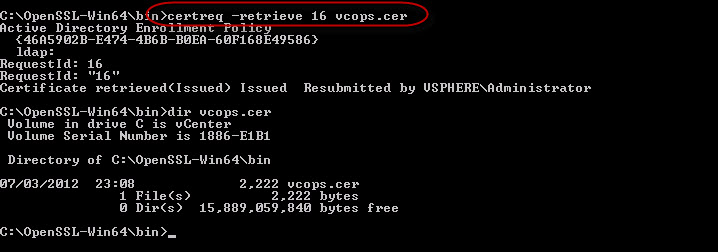
At this point the Certificate has been submitted to the Root CA authority in the domain. Please note the RequestId number when you submit the Certificate Request. Once the Certificate has been authorized and generated you can retrieve it back to the vCenter.

[box]certreq -retrieve 16 vcops.cer [/box]

Retrieve vCOPS Certificate from Command Prompt

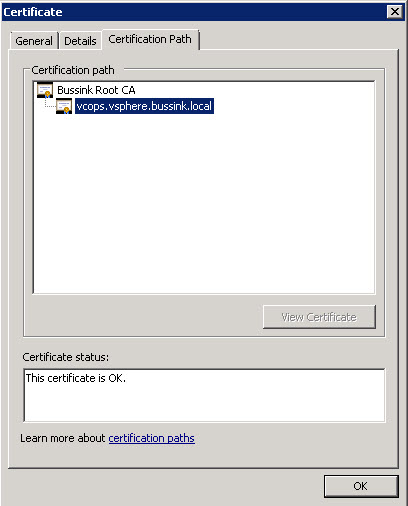
If we open the vcops.cer in Windows, we can see that the Certificate has also proper Certificates in the Certification Path. This is important to ensure that browsers can validate the vCOPS Certificate all the way up to the Certificate Authority (with the Issuing CA is it’s an Intermediate Certification Authority).

Verify your vCOPS Certificate for the Certification Path

We now need to build a PKCS#12 container file with the Certificate, the Private Key and output it to the .PFX file.

[box] openssl pkcs12 -export -in vcops.cer -inkey vcops.key -name vcops -out vcops.pfx[/box]

Build vCOPS PKCS12 Container

vCenter Operations Manager 5.0 does not use the PKCS#12 file format, but the PEM format, and requires that the Private Key is not protect by password. So we re-transform the the .PFX with the Private Key into the .PEM format.

[box] openssl pkcs12 -in vcops.pfx -inkey vcops.key -out vcops.pem -nodes[/box]

Transform vCOPS from PKCS12 Container to PEM format

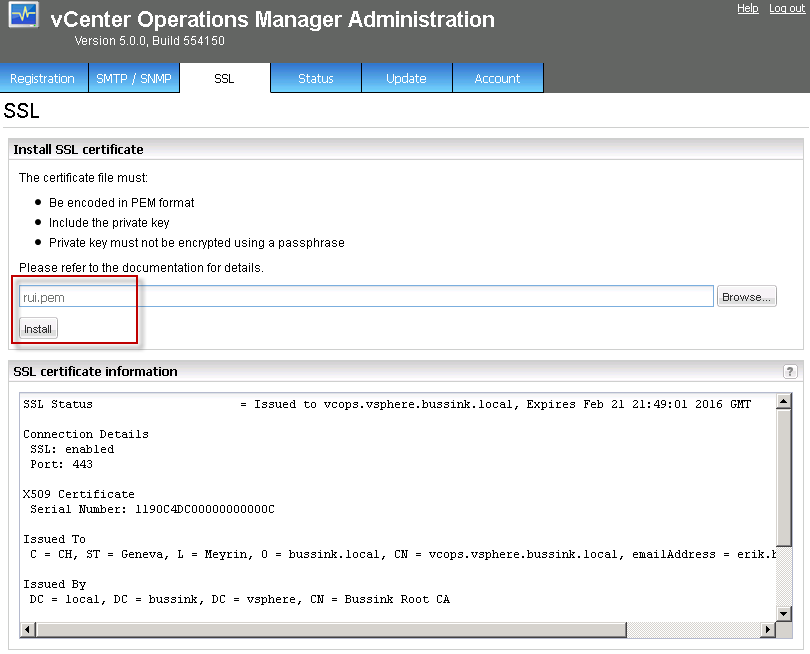
At this point open the Administrator interface of vCenter Operations Manager on the SSL pane, and import the PEM certificate.

The url is https://vcops.<your-domain>/admin/

Importing SSL Certificate in vCOPS


But here comes a tricky part. It’s debugging time.

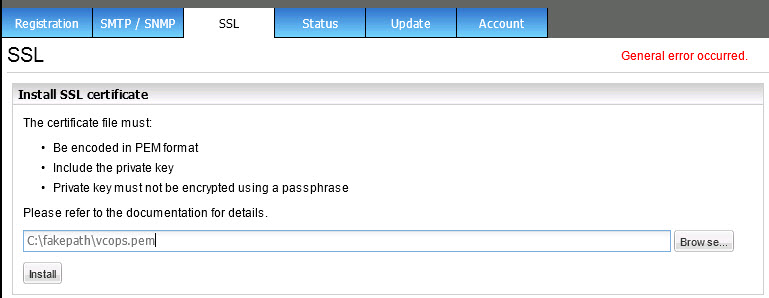
It is very possible that your Import of the OpenSSL Certificate fails with a General error occured. Like below.

OpenSSL Import General Error Occurred

What I found is that the apache2 Web Server on vCOPS did not like loading my SSL Certificate, because it saw that the certificate was for a FQDN that it could not figure out. I modified the /etc/hosts file to ensure apache2 got the proper hostname while starting up and therefore accepted the OpenSSL Certificates.

Modify /etc/hosts file on vCOPS

In the next screenshot you see the error messages from the apache2 at startup when it cannot figure out it’s name and when it does.

[box]/sbin/service apache2 restart [/box]

vCOPS apache2 startup with default /etc/hosts and modified /etc/hosts


You can always check the vCOPS log files at /var/log/vmware/ for issues.

In the screnshot below we see that I tried to install onces the vcops.pfx format, and then the vcops.pem certificate (@23:38:15), I then restarted the vCOPS Web Service and all is good after 23:46:13.

[box] tail /var/log/vmware/vcops-admin.log[/box]

Checking the vcops-admin.log for SSL install issues

We can now connect to vCenter Operations Manager using the FQDN or the short-name.

Valid SSL Certificate for vCOPS

I have also found that once the OpenSSL Certificate has been changed, that the vCOPS Interface  feels much more reactive.


Appendix 1) – My OpenSSL Certificate Template

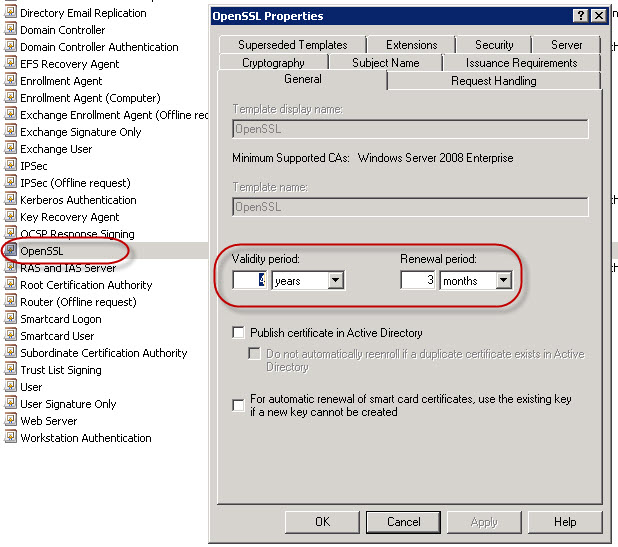
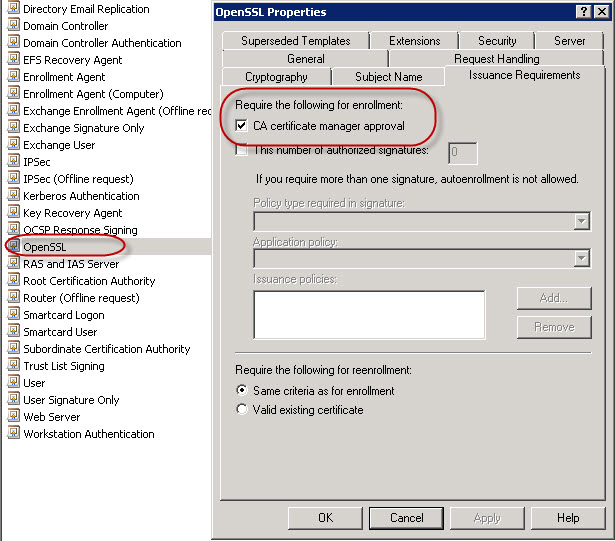
On my Active Directory Certificate Services I have cloned the default WebServer Certificate Template, and named it OpenSSL. I have also modified it’s Validity Period, Renewal Period and the need for the Certificate Authority Manager to approve all Certificate Requests.I highly recommend that you set the Validity Period for your Certificate Template. The CA Manager Approval really depends on your environment. As I sometimes do Auto-Enrollment tests for devices, I don’t want to pollute my Root CA with hundreds of superseding certificates.

OpenSSL Certificate Template Properties - Validity Period

OpenSSL Certificate Template Properties – CA Manager Approval


Appendix 2) – Retrieve the Root & Intermediate Certificate Authority Public Key using CertUtil

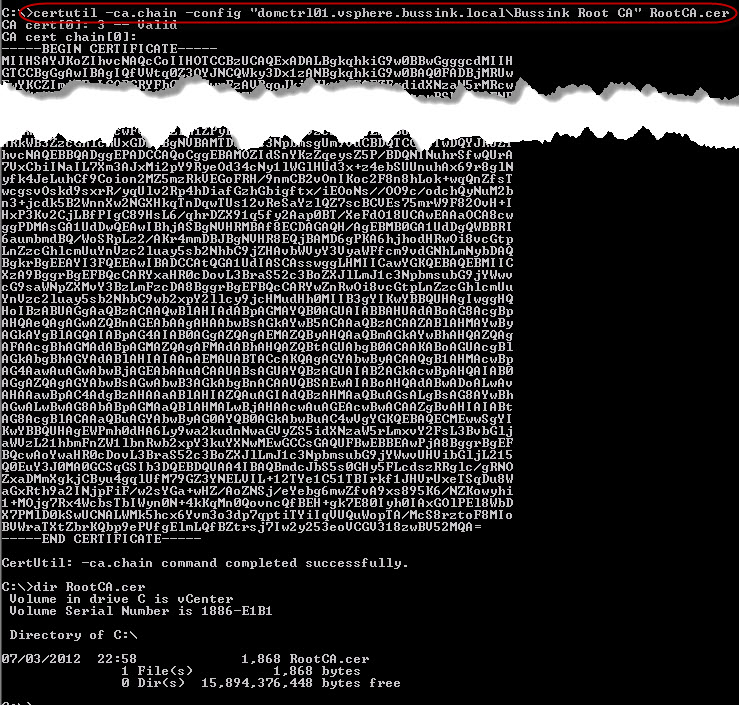
In this second appendix, I will briefly show how to retrieve the Root Certificate Authority Public Key from the command prompt. You should also retrieve the Intermediate CA if you have one.

[box] certutil -ca.cert -config “domctrl01.vsphere.bussink.local\Bussink Root CA” RootCA.cer[/box]

Retrieve Certificate Authority Public Key RootCA.cer


Update on 16/03/2012. Changed the Win64 OpenSSL v1.0.1 Light tools.

Update 27/03/2012. Added a additional subjectAltName to the Certificate request. But my had my parameters wrong.

Update (27/03/2012): I have added a new subjectAltName on the to my openssl.cfg. I added the FQDN name of my vCenter server in the Certificate request. With vCenter Operations Manager 5.0, you get the integration within the vCenter Client in the Solutions & Applications section. The SSL Certificates will therefore be checked by the vCenter Client against the vCenter FQDN name.
Update 29/03/2012. Thanks for Kinsei for having raises the question on the topic of the SSL Certificate usage via the vCenter Client. The vCenter Operations Manager is connected to the vCenter Server not by an FQDN name, but by an IP Address. You can find the value when you connect to your vCenter server’s Managed Object Reference (mob) settings portal.

https://vcenter/mob/ Content ExtensionManager ExtensionList com.vmware.vcops

 Update (02/04/2012). Here is another update. Josh Perkins has written up a great article on how to ensure that your vCenter uses a FQDN or shortname to speak to your vCenter Operations Manager. This means that administrators and user on the vSphere Client do not get invalid SSL Certificate requests anymore. Thanks Josh !!


HP ML110 G7 and VT-d DirectPath I/O Configuration and VMware FT

I’ve had quiet a few questions over the past days about the HP ProLiant ML110 G7. And here are some screenshots aboutabout using Intel VT-d or DirectPath I/O and VMware FT.

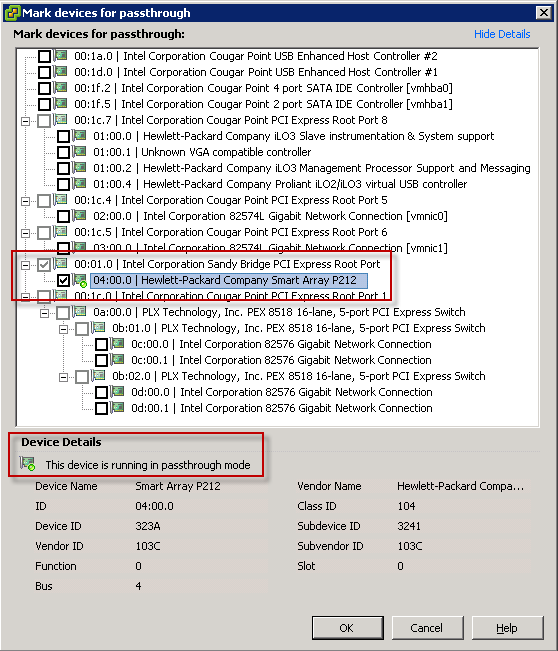
To use the Intel VT-d DirectPath I/O you need to make sure that Intel VT-d is enabled in the BIOS of the ML110 G7. Then you can assign any non used PCIe card that supports it for DirectPath I/O configuration. Assigning a PCIe device for DirectPath I/O configuration requires the ESXi to reboot.

ML110G7 and VT-d DirectPath IO Configuration

Here is a close up on the SmartArray P212 select for Passthrough mode.

SmartArray P212 in Passthrough mode

The second question I got a few time is can I also use VMware FT. Yes you can, theIntel E3 Xeon CPU are recent enough to support the Lockstep process of VMware FT. Here is a screenshot of my vShield Manager appliance running with VMware FT protection between two HP Proliant ML110 G7.

VMware FT on ML110G7


So Just to resume, the HP ProliantML110 G7 is an awesome system for ESXi 5.0 and allows you to use VMware HA & DRS, VMware FT, DirecPath I/O mode (VT-d), VMware Distributed Power Management via the HP iLO3 module.


Using vCenter Update Manager for HP ESXi installations

This post will explain how to use the vCenter Update Manager to create a custom Hewlett-Packard Extensions baseline, so that you can install the HP Drivers on your ESXi install and the HP CIM Management Tools.

Having just purchased a set of HP Proliant ML110 G7, I found out that HP has release at least two sets of drivers for ESXi 5.0.

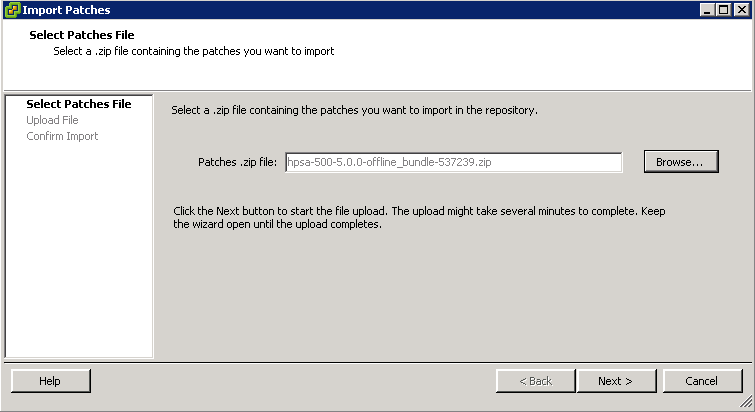
The first one is the VMware ESXi 5.0 Driver CD for the HP SmartArray version 5.0.0-24.0 released on 2011/08/22. I recommend that you download this driver from the VMware website on your vCenter and extract it in a convenient place, as we will need the hpsa-500-5.0.0-offline_bundle-537239.zip file. We will come back to this file later.

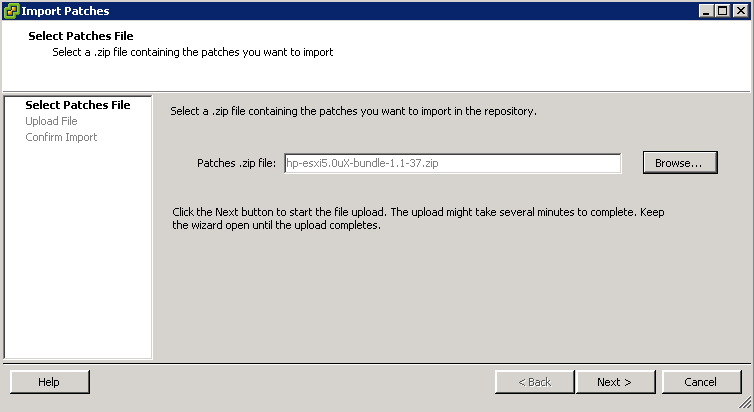
The second one is the HP ESXi 5.0 Offline Bundle now in version 1.1 since December 2011. This bundle contains multiple drivers such as the HP Common Information Model (CIM) Providers, HP Integrated Lights-Out (iLO) driver and HP Compaq ROM Utility (CRU) driver. Download this file but don’t extract it. We will use the file hp-esxi5.0uX-bundle-1.1-37.zip as is.

On your vCenter, jump to the Update Manager Administration pane, and select the Import Patches option.

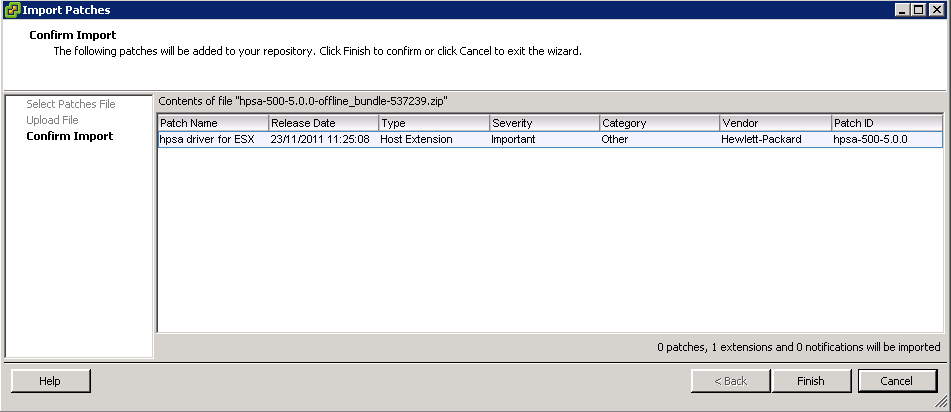
We first import the HP SmartArray Driver

Import hpsa-500-5.0.0-offline_bundle

Importing HP SmartArray Driver for ESX

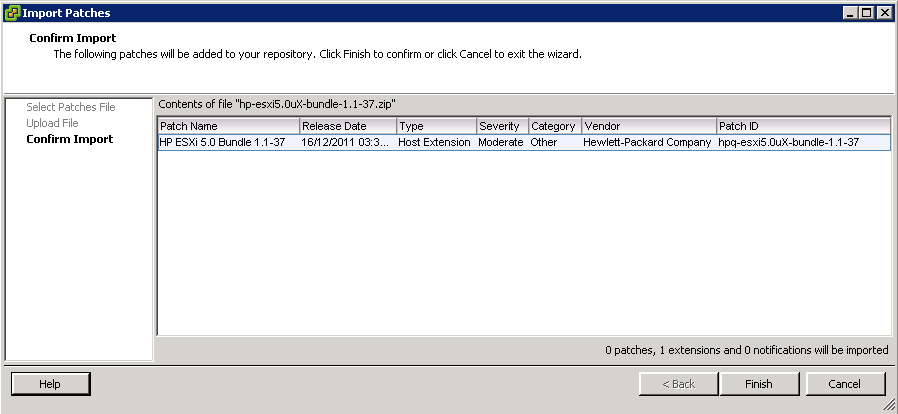
We then import the HP ESXi 5.0 Offline Bundle

Import HP-ESXi5.0-bundle-1.1.37

Import HP-ESXi5.0-bundle-1.1.37

And we now see both offline bundles in the Patch Repository

Patch Repository

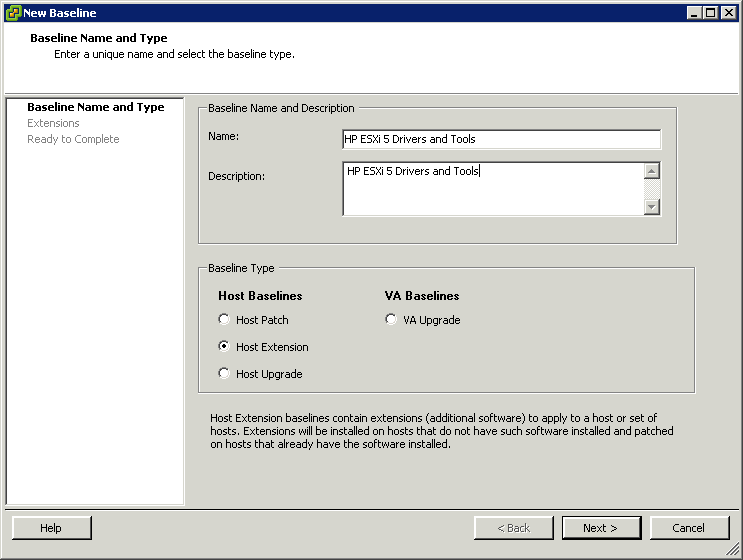
We will now create a new Baseline Extension for these offline patches so we can apply them to our HP servers.

Create a new Baseline - Host Extension

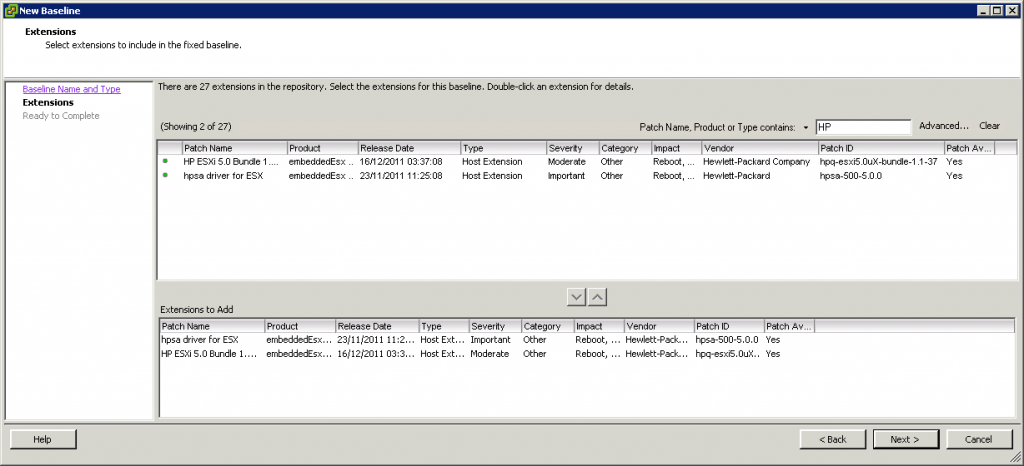
Add the HP Drivers and Tools to the new Host Extension

Add HP Drivers to Host Extension

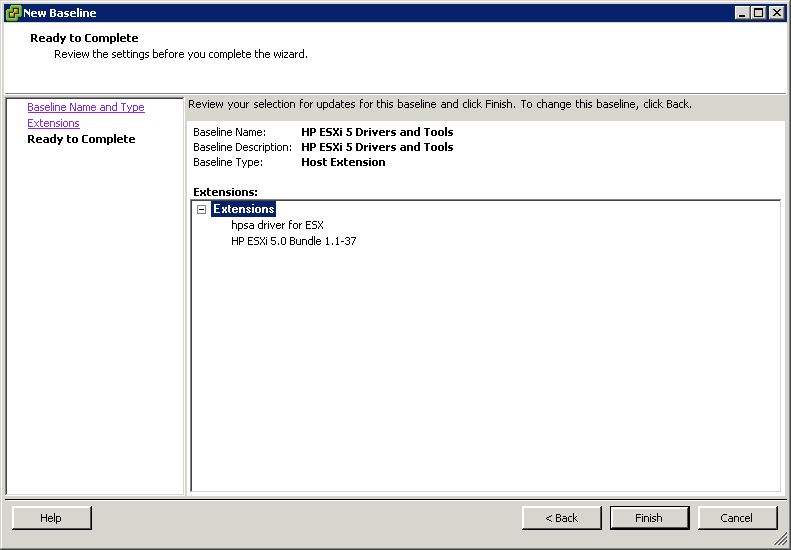
And save the New Baseline

Save new Baseline

Lets attach this new Baseline Host Extension to our HP ML110 G7 Cluster and Scan the Cluster.

Attach new Baseline to Cluster and Scan

We can now Remediate our HP Proliant ML110 G7 host with the new Host Extension. Please note that you cannot remediate VMware Patches and the Host Extensions at the same time. You will need to do this in two passes.

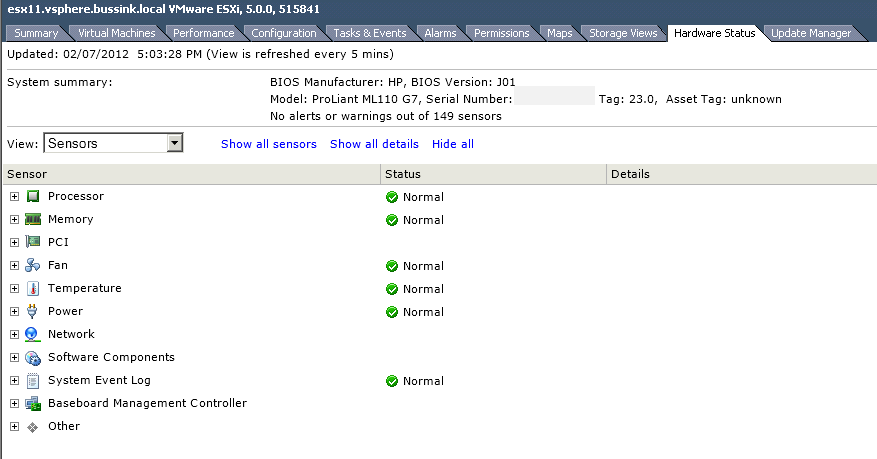
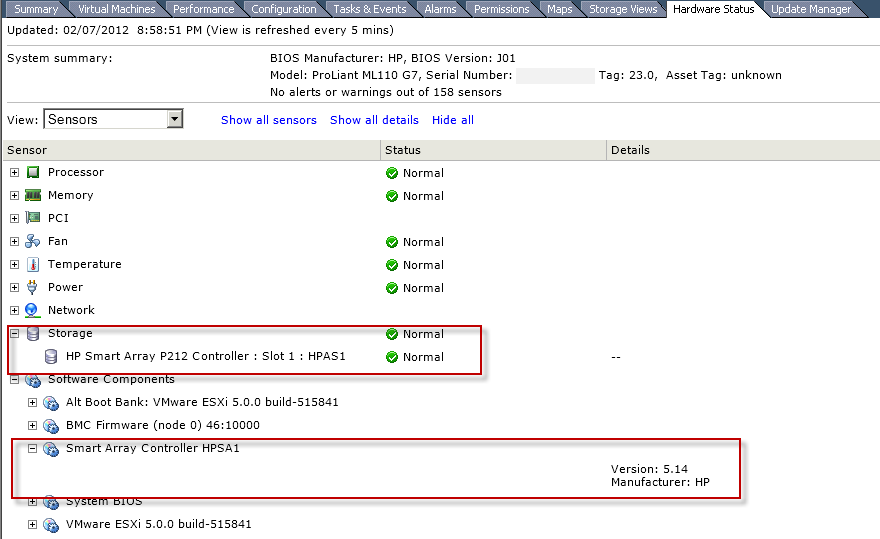
Here is the Hardware Status of an HP ML110 G7 before applying the HP Host Extension patches

ML110G7 Prior to HP Drivers and Tools

and after having the remediation.

ML110G7 with Storage Information & SmartArray Driver

Thanks to these drivers, we could now see the HP SmartArray Array Status if there where any disks attached to it.


HP ML110 G7 and Power Management (iLO3 & vSphere DPM)

The HP ML110 G7 works great with VMware vSphere 5.0 once the C-States has been modified.

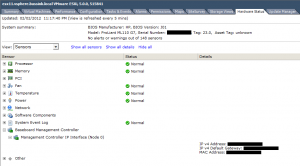
In the following screenshot we can have a glimpse of the Hardware Status of the ML110 G7. We can clearly see that this ML110 G7 with it’s integrate iLO3 controller gives the same information as the more expensive HP Proliant servers.

ML110 G7 Hardware Status and ILO3

And such as it’s bigger brothers, if we access the ILO3 Administration Console

ML110 G7 ILO3 Overview

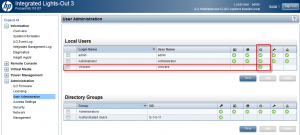
and create a dedicate vmware user with Power Controls.

ML110 G7 ILO3 User Administration

Once this is done we just need to add in the IPMI/ILO Settings for Power Management

IPMI/iLO Settings for Power Management

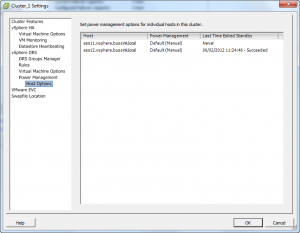
And to test the functionality. Now we can use Distributed Power Management on the ML110 G7 Cluster.

Distributed Power Management

The more I test the ML110 G7, the more I like it.

vSphere 5.0 on HP ML110 G7

Last friday, I came across this very interesting deal, Two HP ProLiant ML110 G7 with Xeon E3-1220 (Quad-Core @3.1Ghz) for the price of one. So Two HP ML110 G7 for $960 seemed a great bargain to me. I got some extra Kingston memory and I should have some decent lab servers.

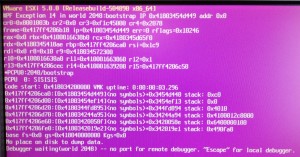
But when I started installing VMware ESXi 5.0.0 Build 504980 on the HP ML110 G7 it kernel dumped.

HP ML110 G7 crashing during ESXi 5.0 Build 504890 startup

After having filmed the crash, the last thing that came up before the crash was ACPI.

I looked up the Performance Best Practices for VMware vSphere 5.0 PDF for specific ACPI settings and Power States. It does have some specific tuning tips on page 14/15

  • In order to allow ESXi to control CPU power-saving features, set power management in the BIOS to “OS Controlled Mode” or equivalent. Even if you don’t intend to use these power-saving features, ESXi  provides a convenient way to manage them.
  • NOTE Some systems have Processor Clocking Control (PCC) technology, which allows ESXi to manage power on the host system even if its BIOS settings do not specify “OS Controlled mode.” With this technology, ESXi does not manage P-states directly, but instead cooperates with the BIOS to determine the processor clock rate. On HP systems that support this technology, it’s called Cooperative Power Management in the BIOS settings and is enabled by default. This feature is fully supported by ESXi and we therefore recommend enabling it (or leaving it enabled) in the BIOS.
  • Availability of the C1E halt state typically provides a reduction in power consumption with little or no impact on performance. When “Turbo Boost” is enabled, the availability of C1E can sometimes even increase the performance of certain single-threaded workloads. We therefore recommend that you enable  C1E in BIOS.
  • However, for a very few workloads that are highly sensitive to I/O latency, especially those with low CPU  utilization, C1E can reduce performance. In these cases, you might obtain better performance by disabling C1E in BIOS, if that option is available
  • C-states deeper than C1/C1E (i.e., C3, C6) allow further power savings, though with an increased chance of performance impacts. We recommend, however, that you enable all C-states in BIOS, then use ESXi host power management to control their use

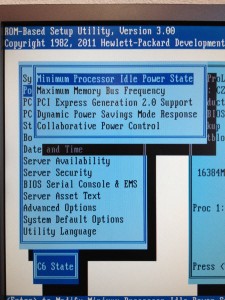
So I modified the Power Management settings in the HP ML110 G7 BIOS.

[box]

HP Power Profile: Custom

HP Power Regulator: OS Control Mode

Advanced Power Management Options \ Minimum Processor Idle Power State: C6 States[/box]

Just changing the No C-States to the C6 States will allow you to install and run ESXi 5.0 on the HP ML110 G7.

ML110 G7 BIOS Advanced Power Management Options C6 States

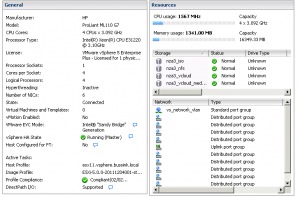
And here is the beautifully screenshot of the ML110 G7 in the vCenter

ESXi 5.0 on ML110 G7

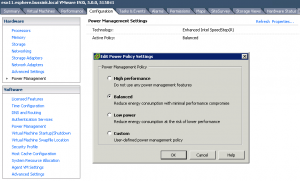
And a closer look at the Power Management Settings tab from vCenter 5.0. You can now change the power settings without having to reboot and modify the BIOS.

ESXi 5.0 Power Management with ML110 G7

I hope this will be usefull to other people in preparing their VCP5 Certification and for a great home lab equipment.

And for those that want to test further, the ML110 G7 supports Intel VT-d.

First Steps with PowerCLI


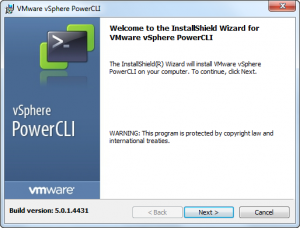
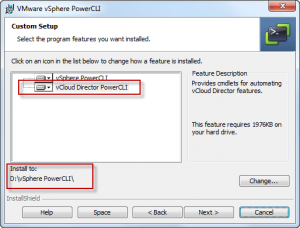
When starting to use PowerCLI 5.0.1 for the first time, there are a few things that will help you start off a good foot. I for one, have decided when installing the PowerCLI on my system to modify the installation to add the vCloud Director PowerCLI feature and to change the path of installation, so that I can quickly find my .PS1 on my development machine.

Installing PowerCLI 5.0.1 Build 4431

Selecting vCloud Director PowerCLI feature & changing install Path

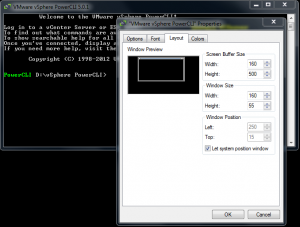
Once installed on my development machine, I add start the PowerCLI to my taskbar and start it. I then modify the Layout settings to get a better usable window.

Modifying PowerCLI Layout

And now we are getting to the two basic commands you add to your PowerCLI to ensure you can run RemoteSigned code.

[box] set-ExecutionPolicy RemoteSigned[/box]

Set-ExecutionPolicy RemoteSigned

As I’m developping my code on a system other than the vCenter Server. I will get SSL Certificates warnings if I remotely connect to my vCenter. To ignore the Certificate warnings I use to following command

[box] Set-PowerCLIConfiguration -InvalidCertificateAction Ignore -WarningAction SilentlyContinue[/box]

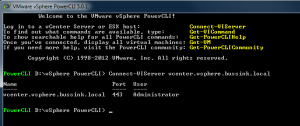
Set-PowerCLIConfiguration -InvalidCertificateAction Ignore -WarningAction SilentlyContinue

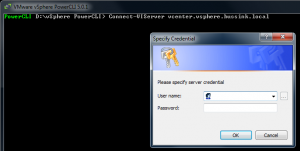
When connecting to my vCenter I now only get a pop-uo for the User Credentials.

Connect-VIServer will request Credentials

I can also save my credentials for future use.

Connect-VIServer with Credentials saving

And so the next time I don’t even need to re-enter these credentials.

Connect-VIServer using saved Credentials


Create vCenter database quickly with Transact-SQL

Creating new databases for VMware vCenter is something I have to do over and over again. I use mostly Microsoft SQL Server 2008 R2 so here are six quick procedures to simplify the creation and make all your vCenter databases to the same standard. I keep my Transact-SQL scripts in Evernote, so I just need to make six Copy & Paste and my vCenter database is created within 3 minutes. You can find the Transact-SQL to download at the bottom of this post.

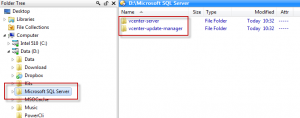
My general rule when I create the VMware vCenter database is to have my user database on a separate disk from the operating system. This disk is formatted with 64K block size. SQL Server works with two specific IO request size 8K and 64K in general, so having 64K block size is optimum for SQL Server databases (See Disk partition alignment Best Practice for SQL Server ). I usually create a directory path for my SQL database D:\Microsoft SQL Server in which I will create two directories for the vCenter databses, vcenter-server and vcenter-update-manager.

Microsoft SQL Server directory structure for User Databaes

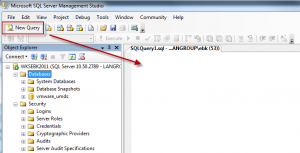
Using the Microsoft SQL Server Management Studio interface we can start a New Query, in which we will add the Transact-SQL code.

SQL Server Management Studio – Open a New Query

Now let’s insert the Transact-SQL script to create the new vcenter-server database. My database settings limit the database to grow past 16GB, and increases the database as it grows by blocks of 512MB. The initial size starts at 1GB. The code below is a bit wide for this blog, but you can find the full Transact-SQL code at the bottom.

USE [master]
GO
CREATE DATABASE [vcenter-server] on PRIMARY
(NAME = N’vcenter-server’, FILENAME = N’D:\Microsoft SQL Server\vcenter-server\vcenter-server.mdf’, SIZE = 1024MB, MAXSIZE = 16384MB, FILEGROWTH = 512MB)
LOG ON
(NAME = N’vcenter-server_log’, FILENAME = N’D:\Microsoft SQL Server\vcenter-server\vcenter-server.ldf’, SIZE = 512MB, MAXSIZE = 2048MB, FILEGROWTH = 256MB)
COLLATE SQL_Latin1_General_CP1_CI_AS
GO

vCenter SQL Database creation with settings

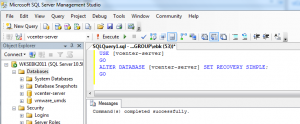
Lets now change the Recovery mode of our database for our needs, to Simple.

USE [vcenter-server]
GO
ALTER DATABASE [vcenter-server] SET RECOVERY SIMPLE;
GO

vCenter SQL Database alter recovery mode to Simple

Lets create a dedicated vCenter database user such as vpxdb.

USE [vcenter-server]
GO
CREATE LOGIN [vpxdb] WITH PASSWORD = ‘insert-a-password-here’, DEFAULT_DATABASE = [vcenter-server], DEFAULT_LANGUAGE=[us_english], CHECK_POLICY=OFF
GO
CREATE USER [vpxdb] for LOGIN [vpxdb]
GO

SQL Database vpxdb user creation

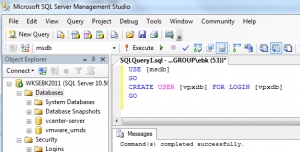
Now we let the newly create database user connect to the vCenter database.

USE [msdb]
GO
CREATE USER [vpxdb] FOR LOGIN [vpxdb]
GO

SQL Database vpxdb user login for vCenter Database

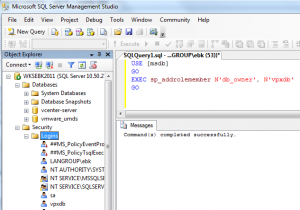
We allow the newly create vpxdb database user have db_owner rights to the [MSDB] database, so that the user can create the SQL Agent jobs in SQL.

USE [msdb]
GO
EXEC sp_addrolemember N’db_owner’, N’vpxdb’
GO

SQL Database user vpxdb db_owner rights to MSDB

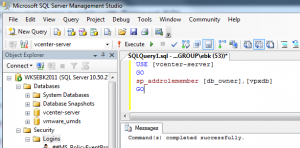
And last we change the ownership of the vCenter Database for the vpxdb user.

USE [vcenter-server]
GO
sp_addrolemember [db_owner],[vpxdb]
GO

SQL Database user vpxdb db_owner rights to vcenter-database

You can find the all the Transact-SQL code in this simple text file vCenter-SQL-TransactSQL-database.txt. If you want the same type of Transact-SQL script to help you setup the vCenter Update Manager database check out this text file vCenter-Update-Manager-SQL-TransactSQL-database.txt

ESXi Multi-NIC & Multi-VLAN vMotion on UCS

I’ve been deploying a Cisco UCS Chassis with multiple Cisco B230 M2 Blades. Yet the uplinks switches of the Fabric Interconnect are medium-Enterprise sized Switches, and not some Nexus 5K or better. In a vSphere 5.0 cluster designs you add one or more NICs to the vMotion interface. With the enhancements of Sphere 5.0 you can combine multiple 1G or 10G network cards for vMotion, and get better performance.

Duncan Epping wrote on the 14th December 2011 on his site
[quote]”I had a question last week about multi NIC vMotion. The question was if multi NIC vMotion was a multi initiator / multi target solution. Meaning that, if available, on both the source and the destination multiple NICs are used for the vMotion / migration of a VM. Yes it is!”[/quote]

I was a bit worried by having my ESXi 5.0 vMotion traffic go up the Fabric Interconnect from my source Blade, across the network switches and back down the Fabric Interconnect and the target Blade. I decided to create two vmkernel port for vMotion per ESXi, and segregate them in two VLAN. Each VLAN is only used inside one Fabric Interconnect.

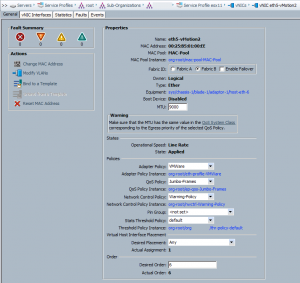
vNIC Interface eth4 for vMotion-A on Fabric A (VLAN 70)

vNIC Interface eth4-vMotionA

vNIC Interface eth5 for vMotion-B on Fabric B (VLAN 71)

vNIC Interface eth5-vMotionB

And now let’s try this nice configuration.

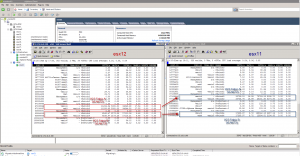
The VM that would be used for testing purposes is a fat nested vESX with 32 vCPU and 64GB of memory (named esx21). It is vMotion’ed from esx12 (Source network stats in Red) towards esx11 (Target network stats in Blue).

The screenshot speaks for itself… we see that the vMotion uses both NICs and VLANs to transfer the memory to esx11. It flies at a total speed of 7504MbTX/s to 7369MbRX/s in two streams. One stream cannot pass the 5400Mb/s rate, because of the limitation of the Cisco 2104XP FEX and the 6120XP Fabric Interconnect. Each 10Gb link is used by two B230 M2 blades.

If you want to learn how to setup Multi-NIC vMotion, check out Duncan’s post on the topic.

Thanks go to Duncan Epping (@duncanyb) and Dave Alexander (@ucs_dave) for their help.