SQL Server Transact-SQL Line Numbering

When you use Microsoft SQL Server on a regular basis with Transact-SQL scripts, it is a sometimes useful to quickly find the proper line of code.

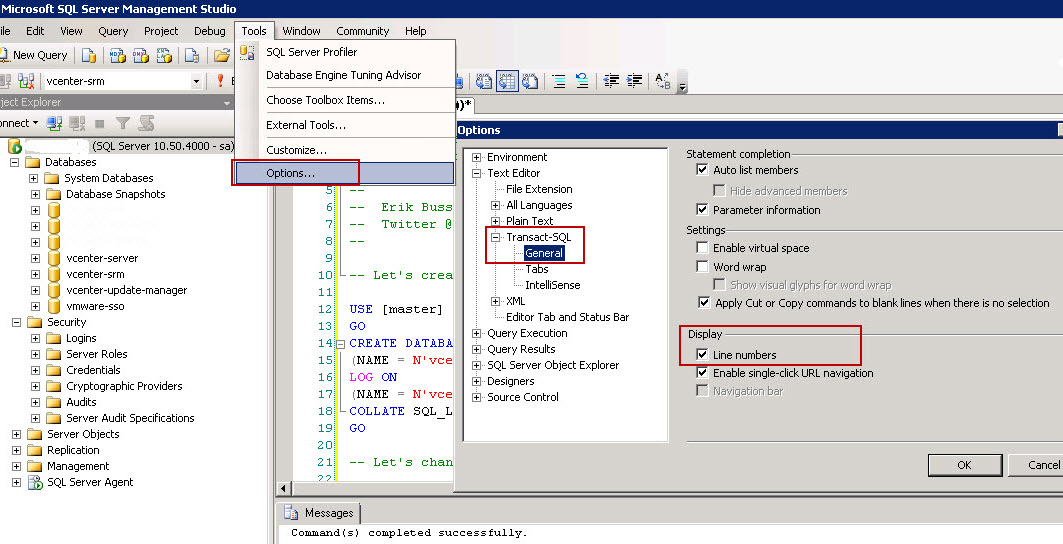
This is a quick tip on how to activate the Line Numbering when working with Transact-SQL.

Activating Line Numbering for Transact-SQL

Activating Line Numbering for Transact-SQL

I hope this will be helpful.


2013 Homelab refresh

Preamble

It’s now 2013, and it’s time to have a peak at my homelab refresh for this year.


Background

In the past three years, I’ve ran a very light homelab with VMware ESXi. I mainly used my workstation (Supermicro X8DTH-6F) with Dual Xeon 5520 @2.26Ghz (8-Cores) and 72GB of RAM to run most of the virtual machines and for testing within VMware Workstation, and only ran domain controllers and 1 proxy VM on a small ESXi machine, a Shuttle XG41. This gives a lot of flexibilty to run nearly all the virtual machines on a large beefed up workstation. There are quiet a few posts on this topic on various vExpert websites (I highly recommend Eric Sloof’s Super-Workstation).

I sometimes do play games (I’m married with a gamer), and when I do I have to ensure my virtual machines are powered down within VMware Workstation, as my system could and has crashed during games. Having corrupted VM is no fun.


Requirements

What I want for 2013 in the homelab, is a flexible environment composed of a few quiet ESXi hosts with my larger workstation being able to add new loads or test specific VM configuration. For this I need a infrastructure that is small, quiet and stable. Here are the requirements for my 2013 homelab infrastructure

  1. Wife Acceptance Factor (WAF)
  2. Small
  3. Quiet
  4. Power Efficient

Having purchased a flat, I don’t have a technical room (nothing like my 2006 computer room) or a basement. So having a few ESXi hosts on 24 hours a day, requires a high Wife Acceptance Factor. The system have to be small & quiet. In addition, if they are power efficient, it will make the utility bill easier.


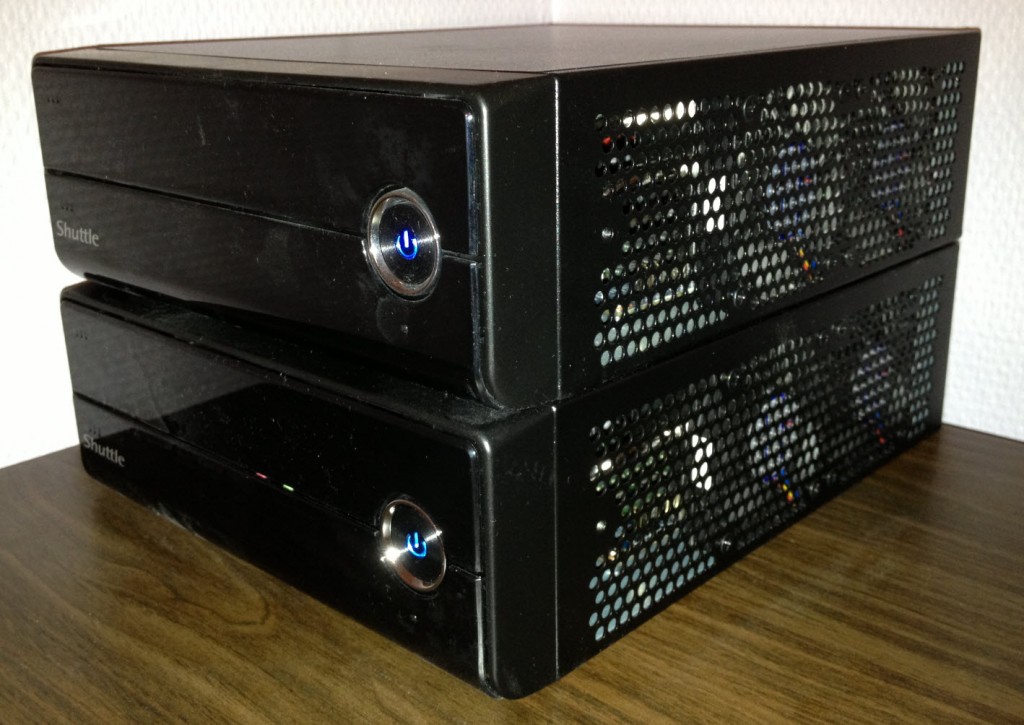
Shuttle XH61V

The Shuttle XH61V is small black desktop based on the Intel H61 chipset. It comes in a 3.5L metal case with very quiet ventilators. You just need to purchase the Shuttle XH61V, a Intel 1155 Socket 65W processor, two memory SODIMMs (laptop memory) and local storage. Assembly can be done in less than 30 minutes.
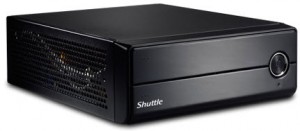
Shuttle XH61V

Shuttle XH61V

The Shuttle XH61V comes with two NICs and support for a mSATA (Bootable) connector, a PCIe x1 slot, and two 2.5″ Devices. The Shuttle XH61V comes with two gigabit network cards. They are Realtek 8168 cards. These work flawlessly, but they do not support Jumbo frames.
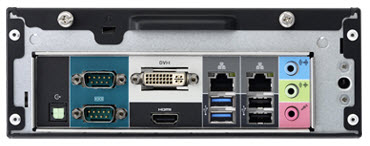
Shuttle XH61V Back

Shuttle XH61V Back

For storage, I decided to boot from a mSATA device, and to keep a Intel SSD for a fast upper-tier local storage, and one large Hybrid 2.5″ Harddisk for main storage. I do have a Synology DS1010+ on the network that is the centralized NFS storage, but I want some fast local storage for specific virtual machines. It’s still early 2013, so I have not yet upgraded my older Synology or created a new powerful & quiet Nexenta Community Edition home server. On the next image you can see that three Shuttle XH61V take less space than a Synology DS1010+
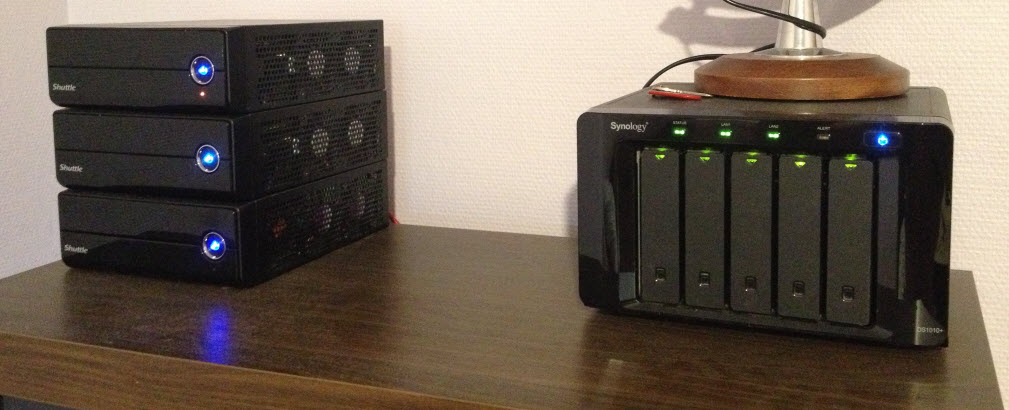
Three Shuttle HX61V with Synology DS1010+

VMware ESXi installation

Installing VMware ESXi is done quickly as all the devices drivers are on the ESXi 5.1 VMware-VMvisor-Installer-5.1.0-799733.x86_64.iso install cdrom.
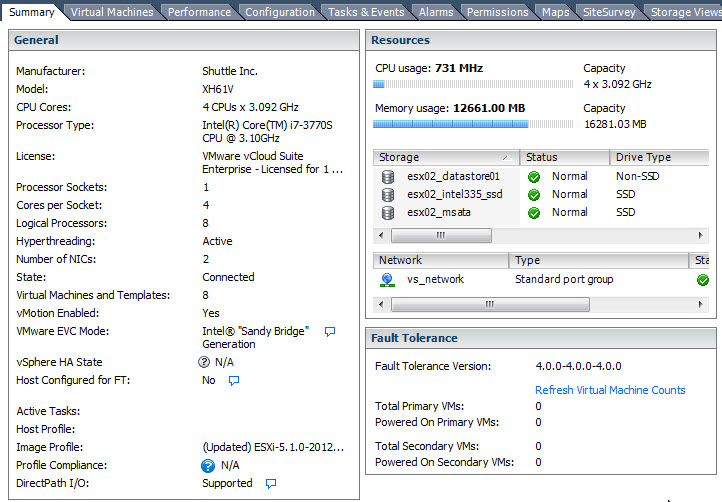
ESXi 5.1 on XH61V

ESXi 5.1 on XH61V

Here is the Hardware Status for the Shuttle XH61V
ESXi XH61V Hardware Status

Here is an updated screenshot of my vSphere 5.1 homelab cluster.
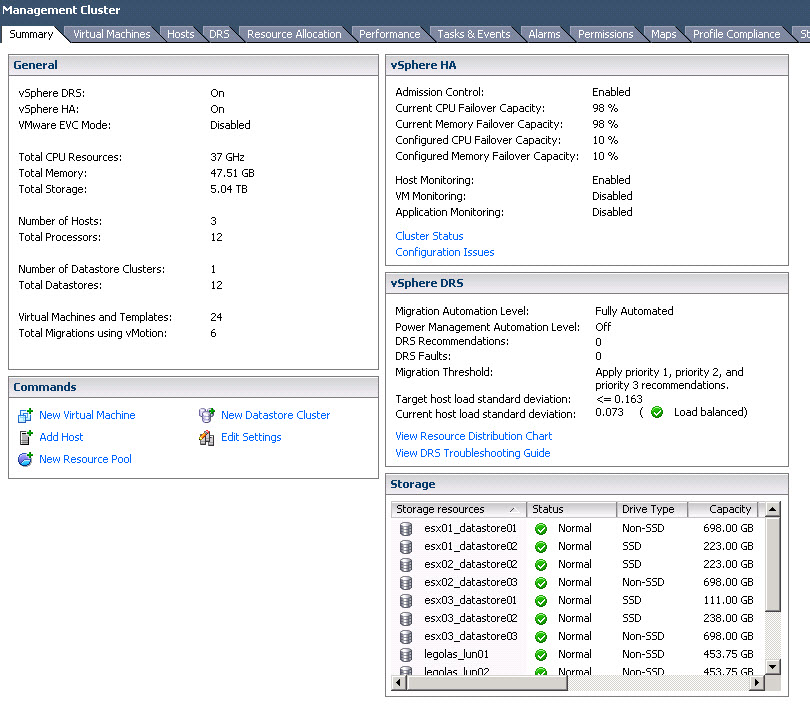
Management Cluster


Bill of Materials (BOM)

Here is my updated bill of materials (BOM) for my ESXi nodes.

  • Shuttle XH61V
  • Intel Core  i7-3770S CPU @3.1Ghz
  • Two Kingston 8GB DDR3 SO-DIMM KVR1333D3S9/8G
  • Kingston 16GB USB 3.0 Key to boot ESXi (Change BIOS as you cannot boot a USB key in USB3 mode)
  • Local Storage Intel SSD 525 120GB
  • Local Storage Intel SSD 520 240GB
  • Local Storage Seagate Momentus XT 750GB

Planned upgrade: I hope to get new Intel SSD 525 mSATA boot devices to replace the older Kingston SSDnow when they become available.


Performance & Efficiency

In my bill of materials, I selected the most powerful Intel Core i7 processor that I could fit in the Shuttle XH61V. Because I’m running virtual appliances and virtual machines like vCenter Operations Manager, SQL Databases, Splunk. There are some less expensive Core i3 (3M Cache), Core i5 (6M Cache) or Core i7 (8M Cache) processor that would work great.

What is impressive, is that the Shuttle XH61V comes with a 90W power adapter. We are far from the 300W mini-boxes/XPC or even the HP MicroServer with their 150W power adapters. Only the Intel NUC comes lower with a 65W power adapter and a single gigabit network (@AlexGalbraith has a great series of post on running ESXi on his Intel NUC ).

Just for info, the Intel Core i7-3770S has a cpubenchmark.net score of 9312. Which is really good for a small box that uses 90W.

The Shuttle XH61V is also very quiet... it’s barely a few decibels above the noise of a very quiet room. To tell you the thru… the WAF is really working, as my wife is now sleeping with two running XH61V at less than 2 meters away. And she does not notice them… 🙂


Pricing

The pricing for a Shuttle XH61V with 16GB memory and a USB boot device (16GB Kingston USB 3.0) can be kept to a about $350 on newegg. What will increase the price is the performance of the LGA 1155 Socket 65W processor ( Core i3-2130 from $130 to Core  i7-3770S at $300) and what additional local storage you want to put in.
vSphere 5.1 Cluster XH61V

The sizing of the homelab in early 2013 is so far from the end of 2006 when I moved out of my first flat, when I had a dedicated Computer room.

Update 18/03/2012. DirectPath I/O Configuration for Shuttle XH61v BIOS 1.04
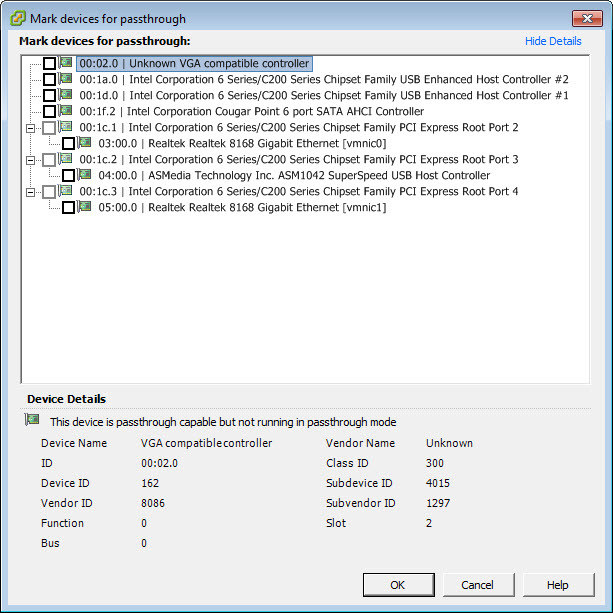
XH61v DirectPath I/O Configuration

XH61v DirectPath I/O Configuration


Update 22/03/2013.  mSATA SSD Upgrade

I’ve decided to replace the Intel 525 30GB mSATA SSD that is used for booting ESXi and to store the Host Cache with a larger Intel 525 120GB mSATA SSD. This device will give me more space to store the Host Cache and will be used as a small Tier for the Temp scratch disk of my SQL virtual machine.

The ‘published’ performance for the Intel 525 120GB mSATA are

Capacity
Sequential
Read/Write (up to)
Random 4KB
Read/Write (up to)
Form Factor
30 GB SATA 6 Gb/s       500 MB/s / 275 MB/s  5,000 IOPS / 80,000 IOPS mSATA
60 GB SATA 6 Gb/s       550 MB/s / 475 MB/s 15,000 IOPS / 80,000 IOPS mSATA
120 GB SATA 6 Gb/s       550 MB/s / 500 MB/s 25,000 IOPS / 80,000 IOPS mSATA
180 GB SATA 6 Gb/s       550 MB/s / 520 MB/s 50,000 IOPS / 80,000 IOPS mSATA
240 GB SATA 6 Gb/s       550 MB/s / 520 MB/s 50,000 IOPS / 80,000 IOPS mSATA
 Show More Detailed Product Specifications >


vCenter Infrastructure Navigator 2.0 integrated with vSphere Web Client

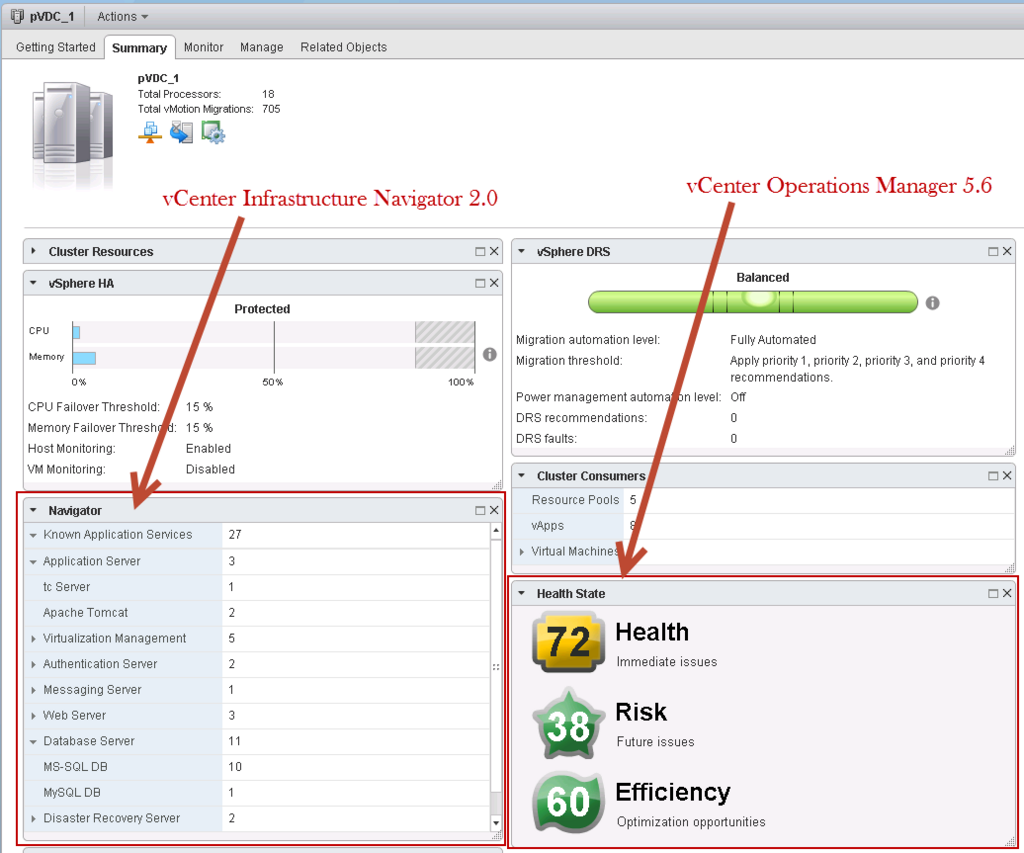
Looking back at the screenshot of the vSphere Web Client, we see that the vCenter Infrastructure Navigator 2.0 has identified 27 Known Application Services.

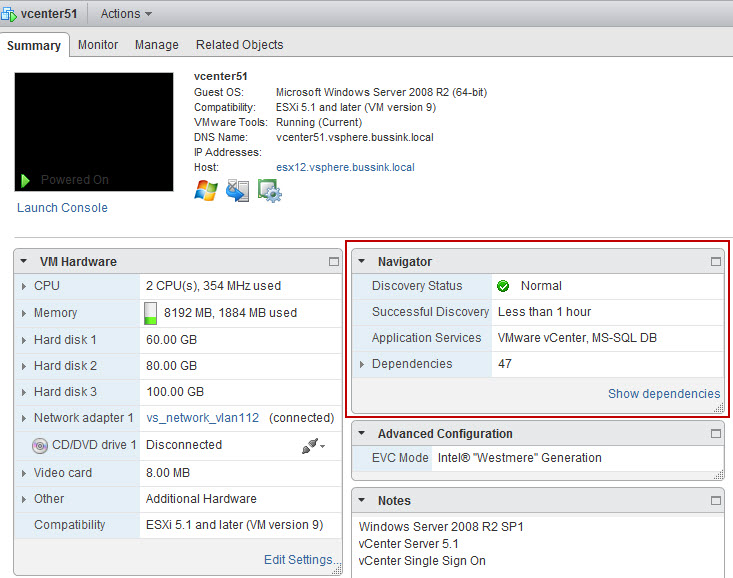
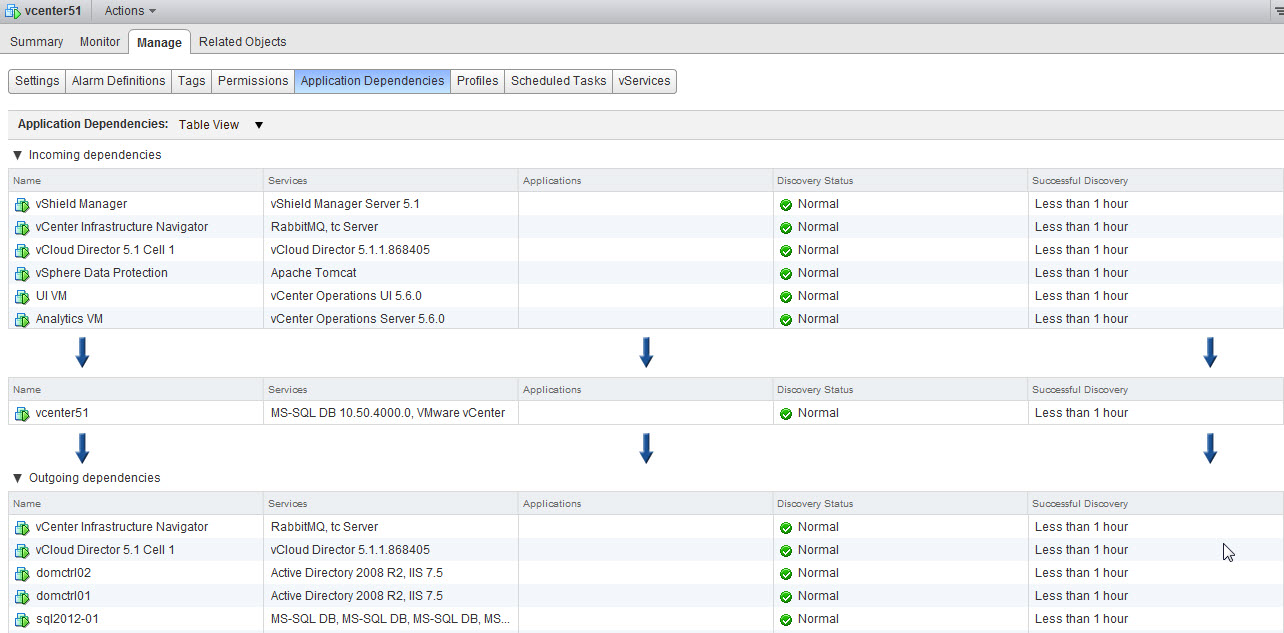
If we want to see how the vCenter 5.1 communicates with other infrastructure elements in the virtual environment, there are two ways to look at it. First from the vCenter 5.1 VM we see that there are a few dependencies.

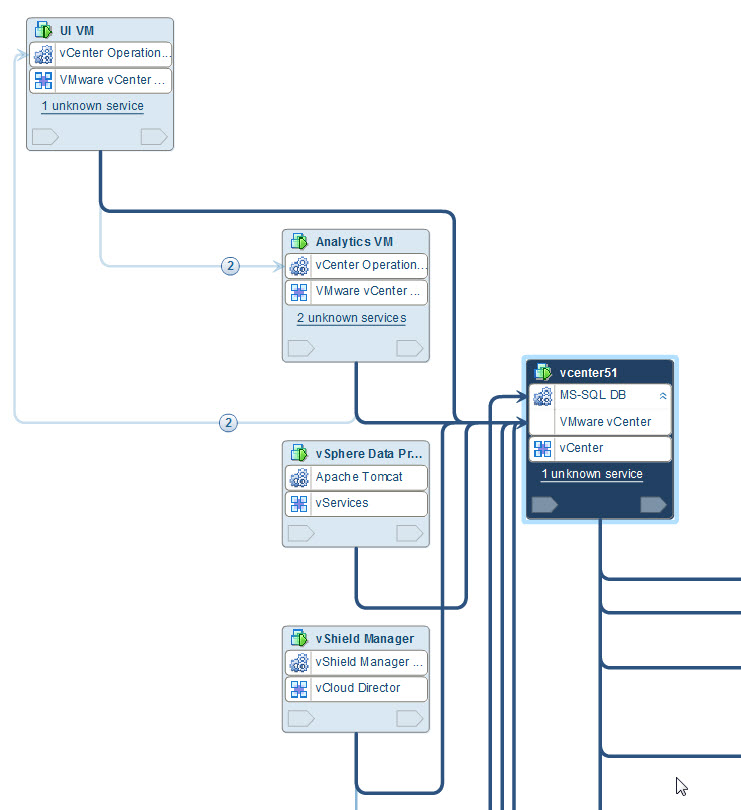
When examining the Show Dependencies we get the Map view. Here is only a element of the Map View as it scales to over 47 dependencies.

But you can also see the Table View, where we see incoming dependencies and outgoing dependencies.


I know this functionality of incoming and outgoing dependencies will be very useful to some of my clients.


vCenter Operations Manager 5.6 integrated with vSphere Web Client

Today VMware released vCenter Operations Manager 5.6 and vCenter Infrastructure Navigator 2.0. These products are now very tightly integrated with the vCenter 5.1 and plug into the vSphere Web Client.

In the screenshot below, you see two new floating windows with the proper information for the element you are managing.

In this case, I’m looking at a my pVDC_1 Cluster, and vCenter Infrastructure Navigator has identified 27 known applications, while vCenter Operations Manager 5.6 is telling me that the health of my Cluster could be better.

In addition, within vSphere Web Client, you can move the floating information panes around to better suit your needs and see what’s important. Or to take advantage of a screensize.


vCNS Edge Gateway re-sizing Compact/Large/X-Large

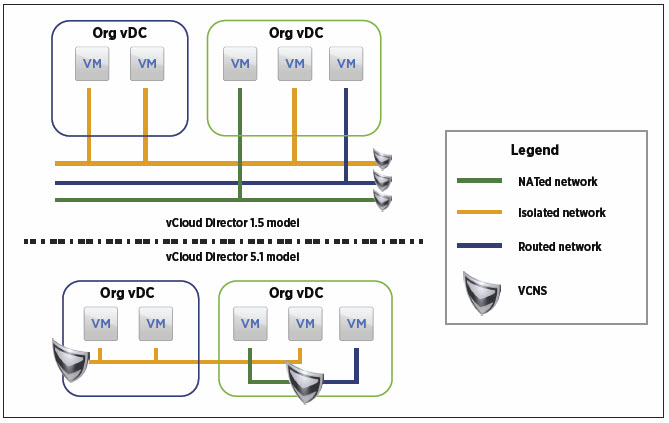
With the release of the vCloud Director 5.1, a series of networking enhancements to how Organization vDC communicate have been made. This gives Organizations (Tenants) a lot more choice in creating their vApps and even allows connectivity with other Organizations (Tenants).

vCloud Network and Security (vCNS) now provides a Gateway which was previously known as the vShield Edge Gateway. In previous releases of vCloud Director, the vCNS Gateway providing network services and security was not visible to the Organization (Tenant) in vCloud Director. The newer vCNS Gateway has become a first-class entity and is available thru the vCloud Director user interface.

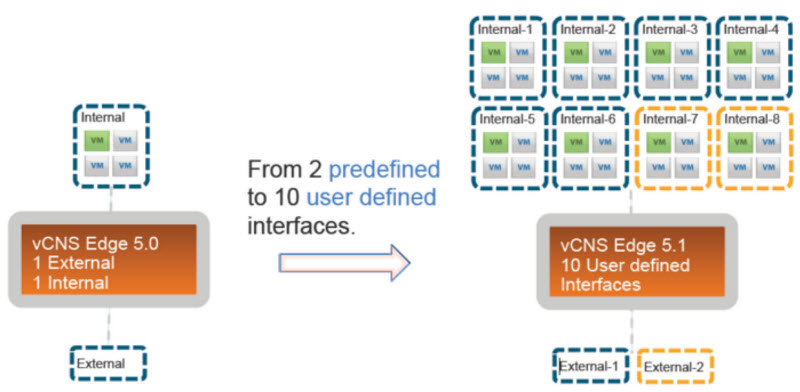
The vCNS Gateway has new capabilities, and now provides up to 10 interfaces to external networks. These interfaces can have IP addresses assigned, they can rate control the limit the bandwidth  to external networks.

The vCNS Gateway provides DHCP service, Firewall rules with 5-tuples, NAT using both Source (SNAT) and Destination (DNAT) rules, Static Routing, VPN Endpoint with support for multiple subnets (spoke design) and Load Balancing services.

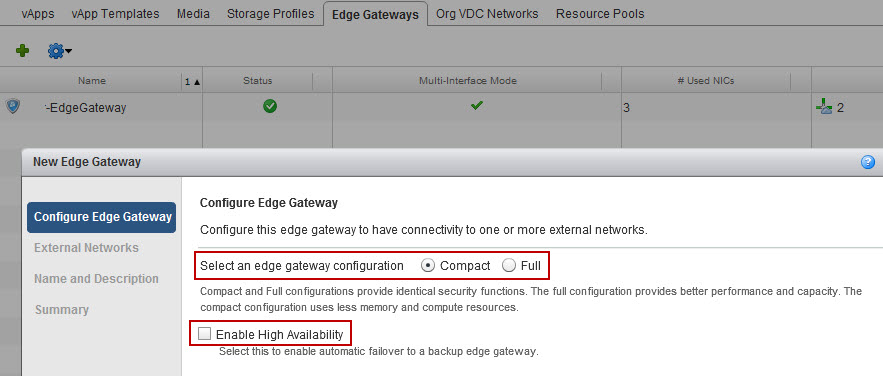
The vCNS Gateway (when used with the vCNS Advanced license) even provides High-Availability. This means a 2nd instance of the Edge Gateway is deployed and it’s settings are synchronized with the first one.

When deploying a vCNS Edge Gateway, you can select between two versions, the “Compact” and the “Full”. The “Full” version can provide higher throughput than it’s smaller brother, but it also consumes more resources. The “Full” is also referenced as the “Large” version from within the vShield Manager 5.1 appliance.

And there is even a larger version of the Edge Gateway, the “X-Large” version. This version is not visible from within vCloud Director user interface. So how could a vCloud Director Administrator change the size of a vCNS EdgeGateway ? Well he can using the vShield Manager 5.1 user interface.

  1. Compact resources: 1 vCPU and 256MB of memory
  2. Full/Large resources: 2 vCPU and 1GB of memory
  3. X-Large resources: 2 vCPU and 8GB of memory

Converting the EdgeGateway to Compact, Large or X-Large is very easy. Select the size, and it will re-deploy a new vCNS EdgeGateway.

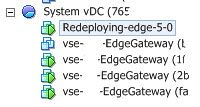
It first renames the old vCNS EdgeGateway to Redeploying-edge-5-0, then it instanciates the new vCNS EdgeGateway, start the new instance, transfers the settings and switches over, and removes the older version.

Because the X-Large Edge Gateway consumes some serious resources (2 vCPU and 8GB of memory), it seems fair that this operation is not available within vCloud Director, but requires the validation and modification to be done by the vShield Manager Administrator.


Some vCenter Operations Manager 5.x tweaks

Web Interface Timeout Issues

I often use the Web Interface of vCenter Operations Manager to check the infrastructure. Because while the client module exist for the vSphere Client, I don’t find it as optimized in the display and the pane jumping. One of the smaller annoying parts of using vC Ops via the Web Interface is the quick timeout of the user authentication. This can been tweaked by making a small change on the User Interface virtual machine.

Simply edit the /usr/lib/vmware-vcops/tomcat/webapps/vcops-vsphere/WEB-INF/web.xml  file, near the top you will find the following section

<session-config>
<session-timeout>value</session-timeout>
</session-config>

You can increase the time to 60, 90 or 120 minutes or set the time to infinite with a ‘-1’ value.

Once modified, just restart the vCenter Operations Manager Admin interface with the command

vcops-admin restart

This is referenced in the VMware KB Article 2015135.


 Log Files Location

With the release of vCenter Operations Manager 5.0. and later, the log files have been moved to their own partition, so that if there are lots of logs, they do not file the system partition of the two virtual machines in the vApp.

The logs have been moved to /data/vcops/logs

  • catalina-web.log
  • localhost-web.log
  • manager-web.log
  • host-manager-web.log

This is referenced in the VMware KB Article 2032786.


Adding Storage for vCenter Operations Manager

Things have changed a lot since the first version of the vCenter Operations Manager 1.0. The data stored on both virtual machine that forms the vApp is now using the Logical Volume Manager, so adding more space to the Analytics VM or the User Interface VM, is very easy. Simply add a new Disk (Thick Provision Eager Zeroed for performance) to the virtual machines. On restart the new disk will be added the the data_vg (data volume group).

Let’s just check the Analytics VM before adding a new disk


localhost:~ # <strong>lvdisplay</strong>
--- Logical volume ---
LV Name /dev/data_vg/data
VG Name data_vg
LV UUID aTXaIF-ZhHn-uUhg-0F6o-qHjy-9sI8-Q0QmlN
LV Write Access read/write
LV Status available
# open 1
LV Size 400.00 GB
Current LE 102399
Segments 1
Allocation inherit
Read ahead sectors auto
- currently set to 1024
Block device 253:0

localhost:~ # lvs
LV VG Attr LSize Origin Snap% Move Log Copy% Convert
data data_vg -wi-ao 400.00G

localhost:/data # df -k
Filesystem           1K-blocks      Used Available Use% Mounted on
/dev/sda3              8111996   2177068   5522864  29% /
udev                   3580976       100   3580876   1% /dev
tmpfs                  3580976         0   3580976   0% /dev/shm
/dev/sda1               132206     18149    107231  15% /boot
/dev/mapper/data_vg-data
412845232 100011536 291862384  26% /data

When I power-down the Analytics VM, I added a 16GB hard disk to the VM, after restart we clearly see the new size.


localhost:~ # <strong>lvdisplay</strong>
--- Logical volume ---
LV Name                /dev/data_vg/data
VG Name                data_vg
LV UUID                aTXaIF-ZhHn-uUhg-0F6o-qHjy-9sI8-Q0QmlN
LV Write Access        read/write
LV Status              available
# open                 1
LV Size                415.99 GB
Current LE             106494
Segments               2
Allocation             inherit
Read ahead sectors     auto
- currently set to     1024
Block device           253:0

localhost:~ # lvs
LV   VG      Attr   LSize   Origin Snap%  Move Log Copy%  Convert
data data_vg -wi-ao 415.99G

localhost:~ # df -k
Filesystem 1K-blocks Used Available Use% Mounted on
/dev/sda3 8111996 2177952 5521980 29% /
udev 3580976 104 3580872 1% /dev
tmpfs 3580976 0 3580976 0% /dev/shm
/dev/sda1 132206 18149 107231 15% /boot
/dev/mapper/data_vg-data
429355112 100014632 307530516 25% /data

This is referenced in the VMware KB Article 2016022.

Visio 2013 and Visio Stencils issue (Fixed)

[Update 10/30/2012 Thanks to Maxm]

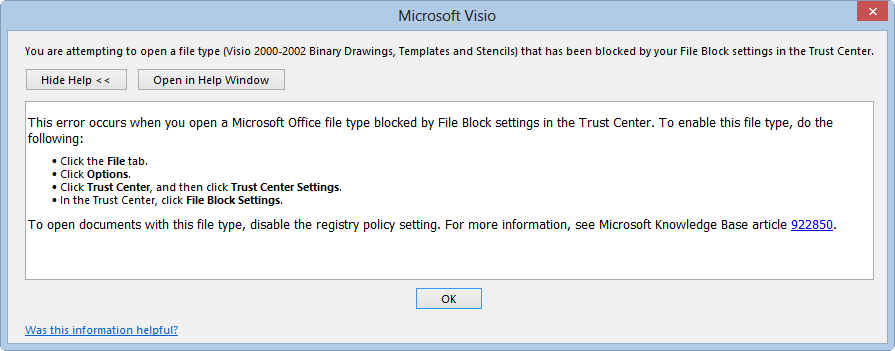
I use Visio a lot to create diagrams for my customers and colleagues. But when I tried to import Cisco Stencils I retrieved from the Cisco website, or HP Proliant Stencils from VisioCafe with the Visio 2013 RTM, you get the following error message.

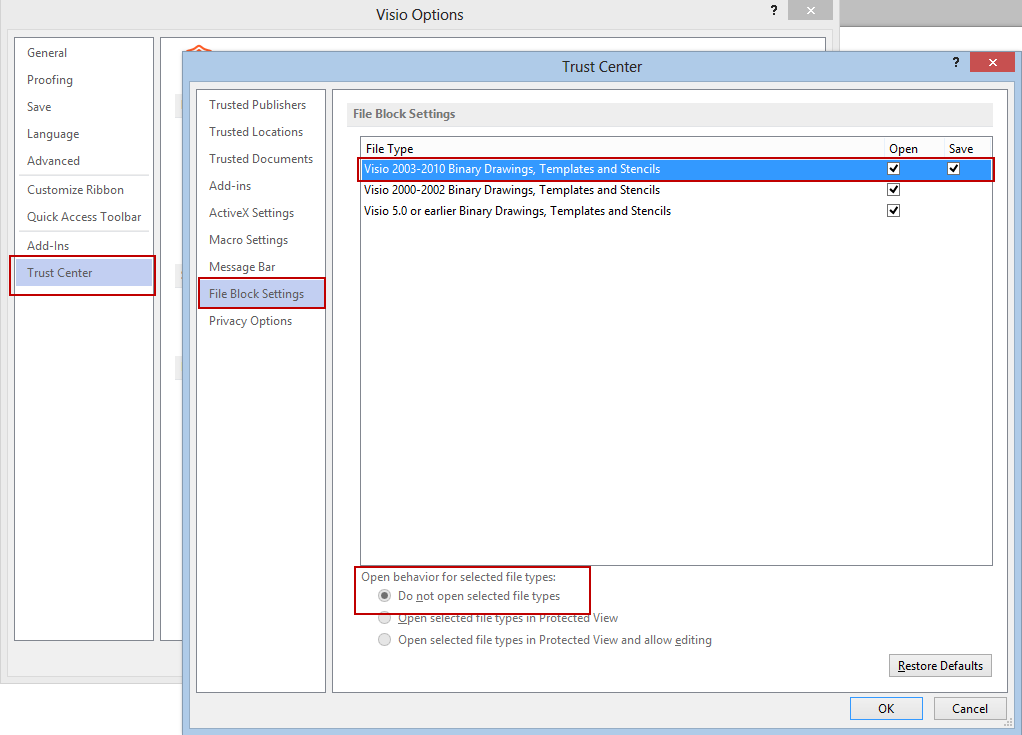
There is a setting in Visio 2013 in the Options, Trust Center, File Block Settings that should enable you to allow Visio 203-2010 Stencils to be opened (HP, Cisco, EMC)
But unfortunately something is wrong… the Option at the bottom cannot be changed from “Do not open selected file types”

So think hard before upgrading to Visio 2013 if you need to use Stencils.

I’ll communicate again on the topic if I find a solution or if Microsoft respond to my ’Send a Frown’

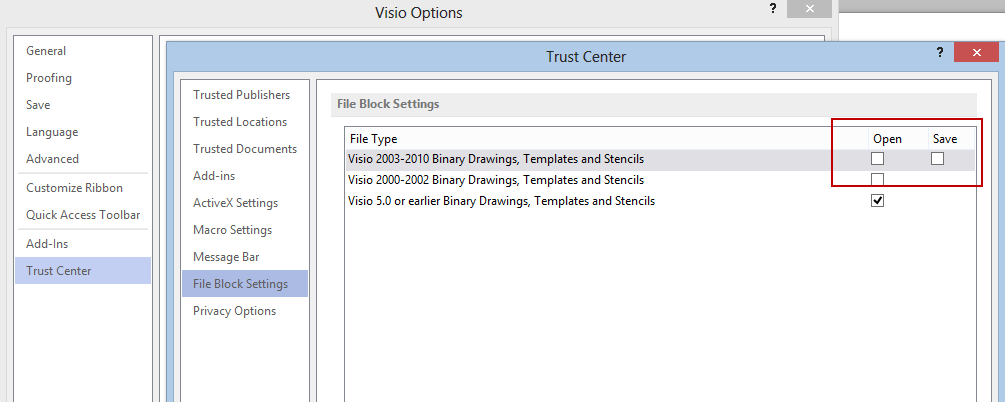
Thanks to Maxm and his reply I found the problem. The trick is to untick the boxes to be able to open Stencils. Seems backwards to me, but that’s Microsoft for you.

Visio 2013 Untick Boxes in File Block Settings

Upgrading vCenter Operations Manager to 5.0.2

Yesterday, VMware released version 5.0.2 of the vCenter Operations Manager. Here are the release notes for version 5.0.2.  Reading the release notes, I’m looking forward to the New Text Widget in the Enterprise version of the product.

Here are the three key benefits put forward by VMware

  • Actionable intelligence to automated manual operations processes
  • Visibility accross infrastructure and applications for rapid problem resolution
  • Proactively ensures optimal resource utilization and virtual and cloud infrastructure performance

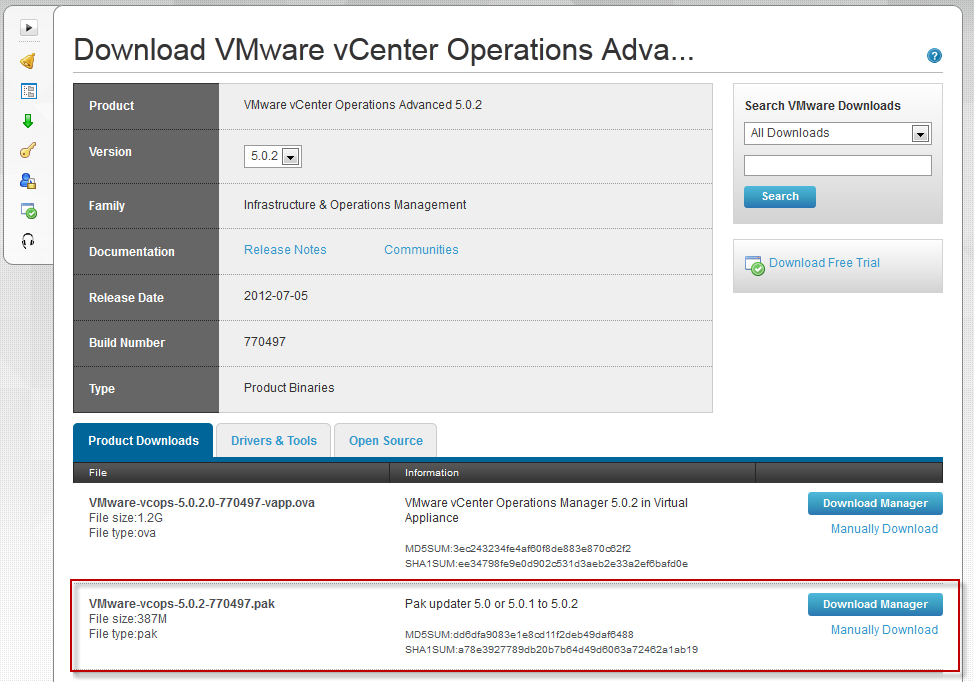
So if you are running version 5.0.0 or 5.0.1, you can easely upgrade to the latest version using the VMware-vcops-5.0.2-770497.pak (386MB) file.

First you need to download the VMware-vcops-5.0.2-770497.pak file from the VMware Portal

vCenter Operations Manager 5.0.2 PAK download

At this point I highly recommend that you make a clone of your vCenter Operations Manager 5 servers, in case the upgrade fails. Once the upgrade is started there is no way to turn back or to downgrade back to 5.0.0/5.0.1

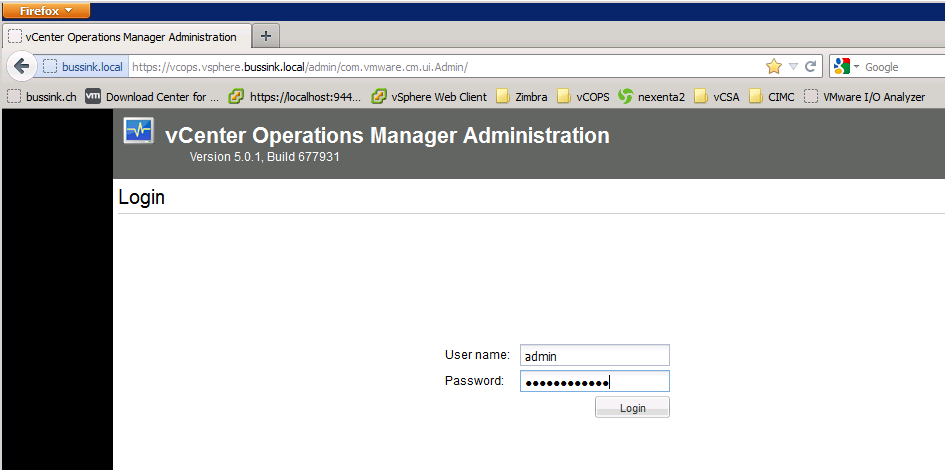
You then need to connect to the vCenter Operations Manager Administration panel.  https://vcops.domainname/admin/

Connect to the vCenter Operations Manager Administration

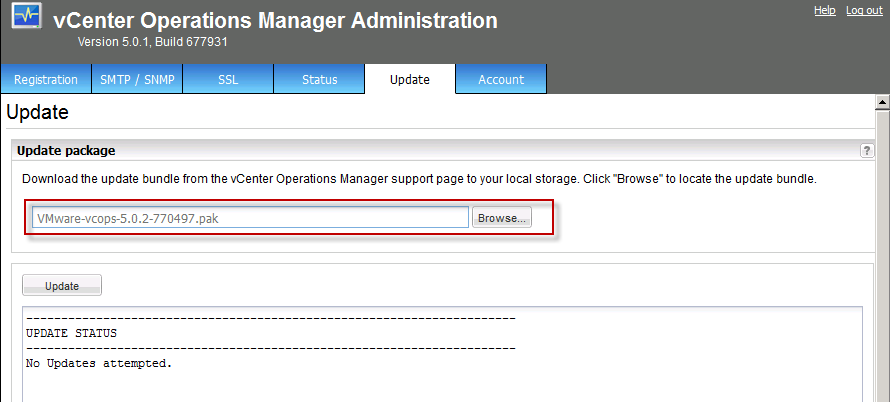
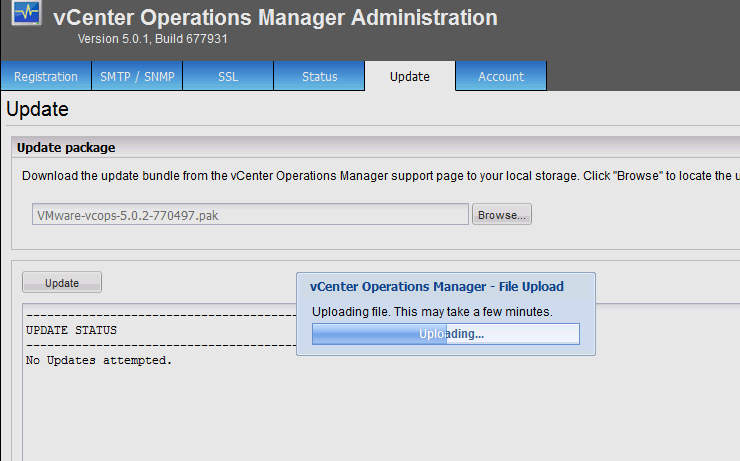
From the Update Tab, you can select the path to the VMware-vcops-5.0.2-770497.pak file.

Select update package VMware-vcops-5.0.2-770497.pak

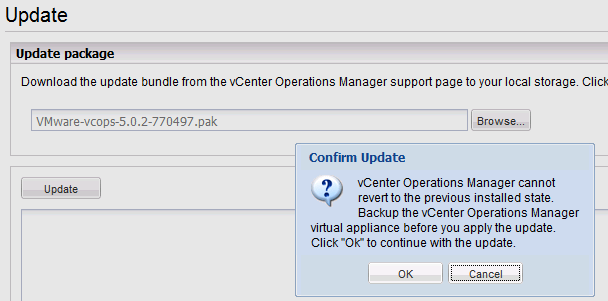
When you start the update you get the warning box to remind you to make a backup of your vCenter Operations Manager environment.

One Way Ticket, so Backup

It starts uploading the .pak file

uploading…

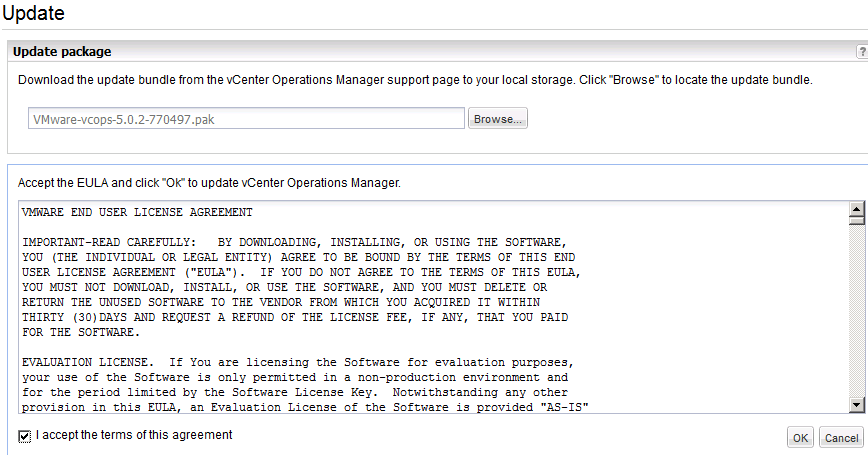
You get to accept the EULA once more.

EULA

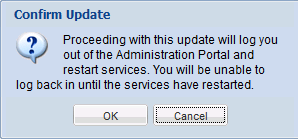
Final warning message before starting the upgrade process.

Warning Message

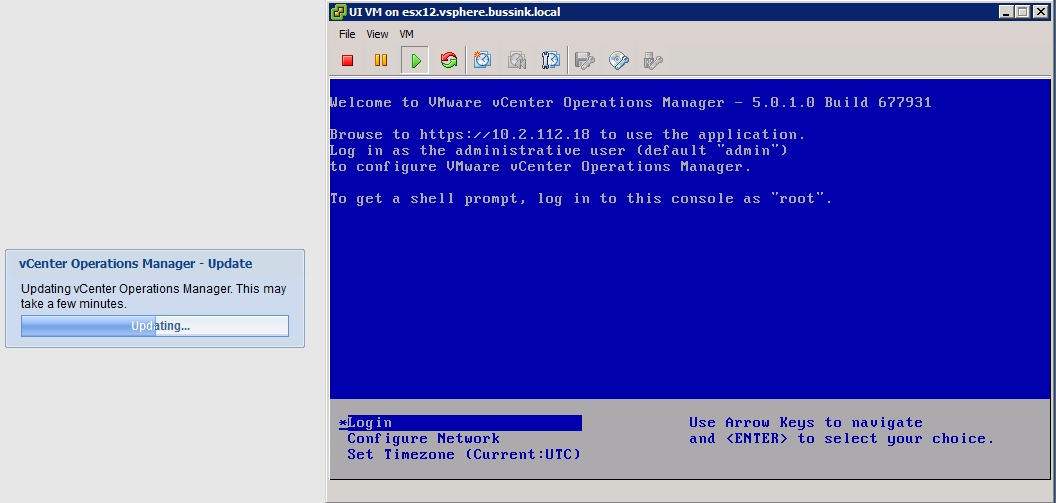
The upgrade process has started on my vCenter Operations Manager 5.0.1

Updating from 5.0.1 to 5.0.2

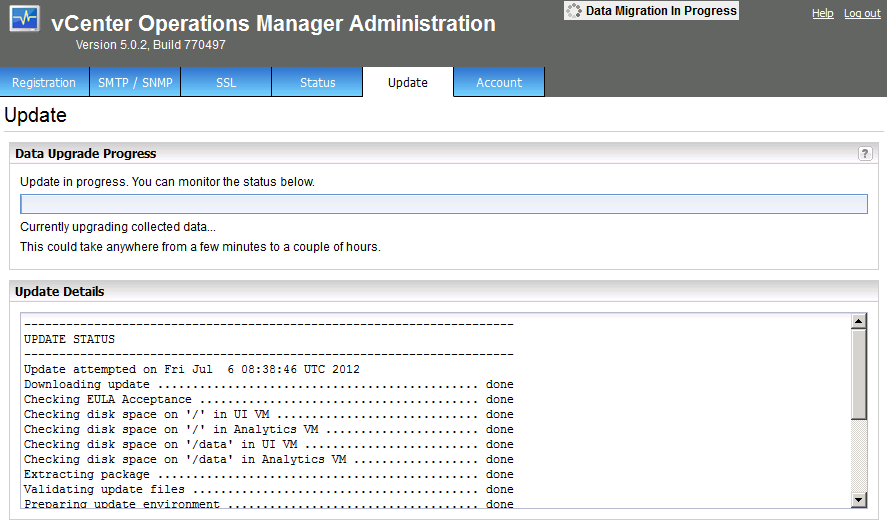
Once the upgrade process is done, it will log you out of the Administration portal and you will see a

Data Migration in Progress message

You can relog into the vCenter Operations Manager Administration web portal to follow more closely what it’s doing from the Update tab.

Updating checks and processes

The full update details will show something like this:

[box]

vCenter Operations Manager Administration
Version 5.0.2, Build 770497
Update
----------------------------------------------------------------------
UPDATE STATUS
----------------------------------------------------------------------
Update attempted on Fri Jul  6 08:38:46 UTC 2012
Downloading update .............................................. done
Checking EULA Acceptance ........................................ done
Checking disk space on '/' in UI VM ............................. done
Checking disk space on '/' in Analytics VM ...................... done
Checking disk space on '/data' in UI VM ......................... done
Checking disk space on '/data' in Analytics VM .................. done
Extracting package .............................................. done
Validating update files ......................................... done
Preparing update environment .................................... done
Stopping administration service ................................. done
Installing update ............................................... done
Starting administration service ................................. done
Stopping core services .......................................... done
Installing update ............................................... done
Upgrading CapacityIQ database ................................... done
Upgrading database .............................................. done
Deleting stale VM entities from database ........................ done
Starting core services .......................................... done
Update operation ................................................ done
Starting administration service ................................. done
Starting core services .......................................... done

[/box]

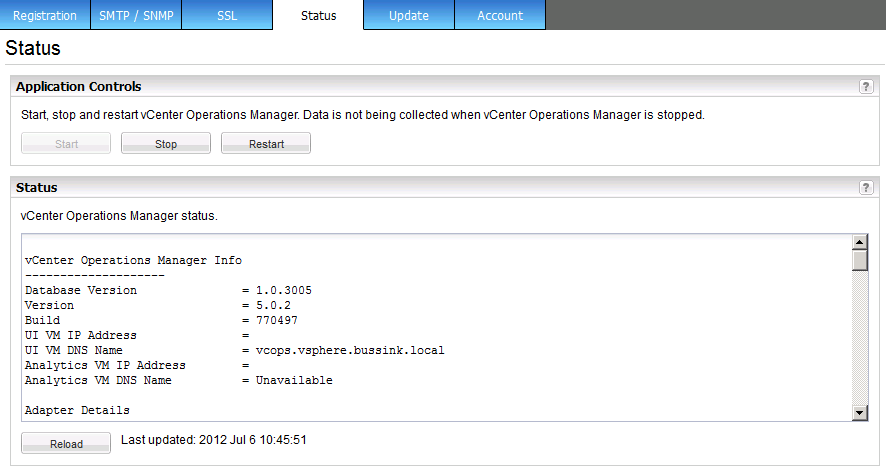
After which your vCenter Operations Manager will be running version 5.0.2

vCenter Operations Manager 5.0.2 Status Tab


Upgrading the Nexenta storage in the vLab

First, I’m sorry I have been so quiet on the web, bu I’ve just come back from 15 days of medical leave due to a Bursitus in my elbow, which made it extremely hard to write anything with a cast. But that did not stop me from swapping disks in Nexenta Storage server.

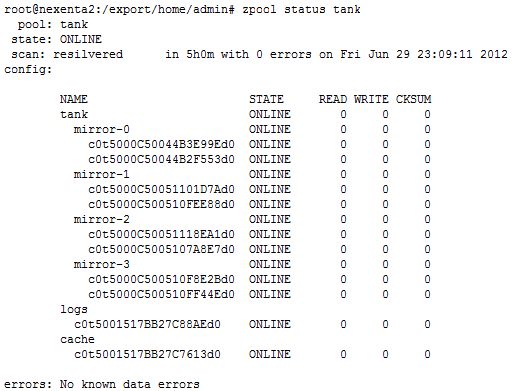
I’ve been running a ZFS Pool with 8x Hitachi Deskstar SATA 1TB HDS7210KLA330 for over 1200 days, and out of the 8 disk, not one has failed me. With 8x 1TB SATA Disk in mirror as seen in my previous Nexenta storage for the vLab article, I used to have 3.14TB Usable space. But I needed more, and I wanted to replace these 3 years old disk. I slowly swapped one disk per mirror at a time. Each disk resilver took just more than 8 hours.

I have now finished the complete replacement with 8x Seagate Barracuda ST3000DM001-9YN166 (3TB) disk. My current ZFS Pool is now as follows

zpool status after final resilver

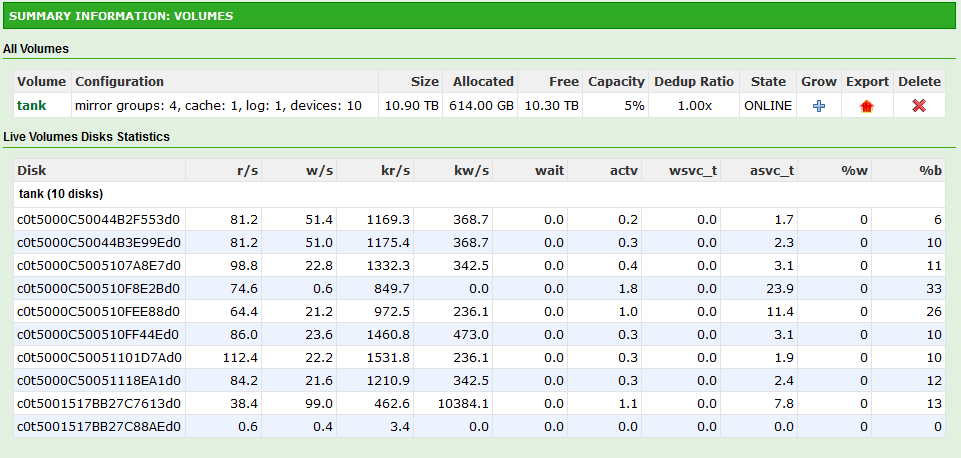
After the migration, the ZFS Pool is now of 10.9TB of Usable space.

Nexenta GUI tank Volume

This should give me quite a lot of space for new virtual machines. I will run some more performance test in a few days add them to this article.

Nexenta stats running sample VMware Data Recovery backup

Following my Nexenta storage for the vLab article. I was asked how my ARC and L2ARC where doing.

General ZFS ARC Information

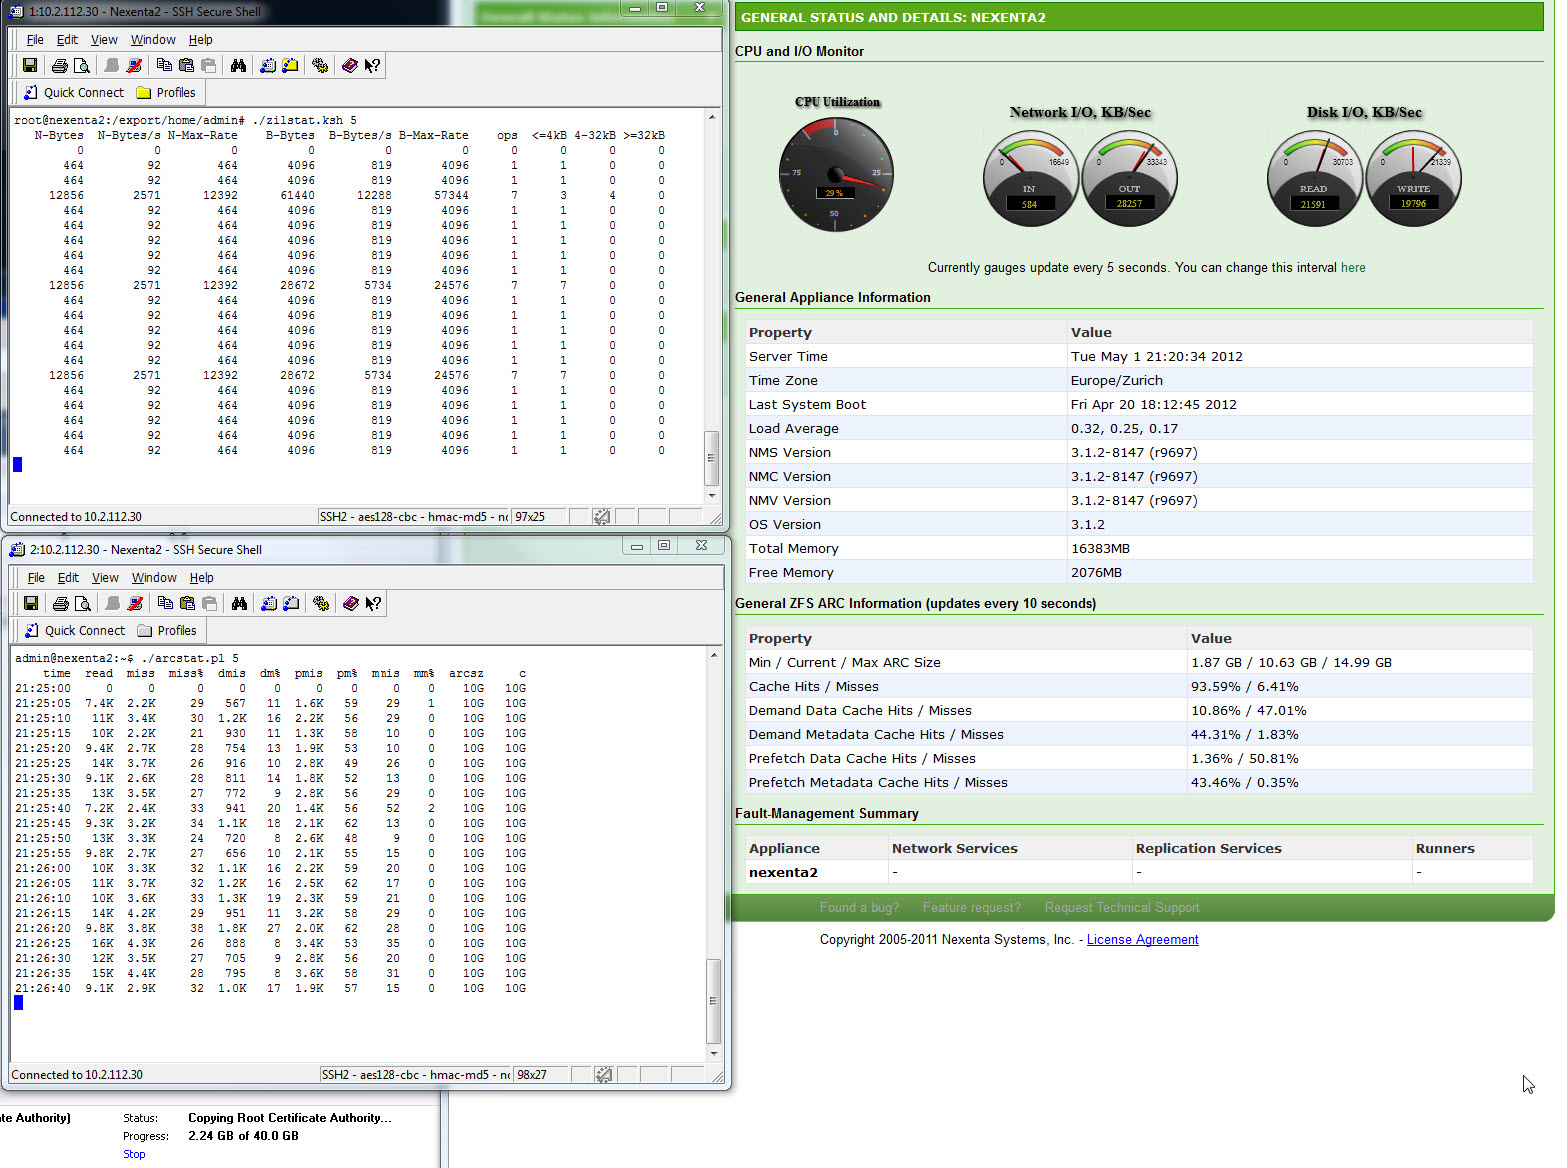
Here are two more screenshots that I just took on my infrastructure, while doing the initial backup of a 40GB virtual machine with VMware Data Recovery.

  • I had the Nexenta management interface on the General Stats
  • Running Richard Elling’s zilstat.ksh via SSH at the top left
  • Running the arcstat.pl by Mike Harsch via SSH at the left
  • And at the bottom left, you can glimpse the VMware Data Recovery job running on a 40GB VM (Initial run).

zilstats.ksh and arcstat.pl while running a VMware Data Recovery initial backup

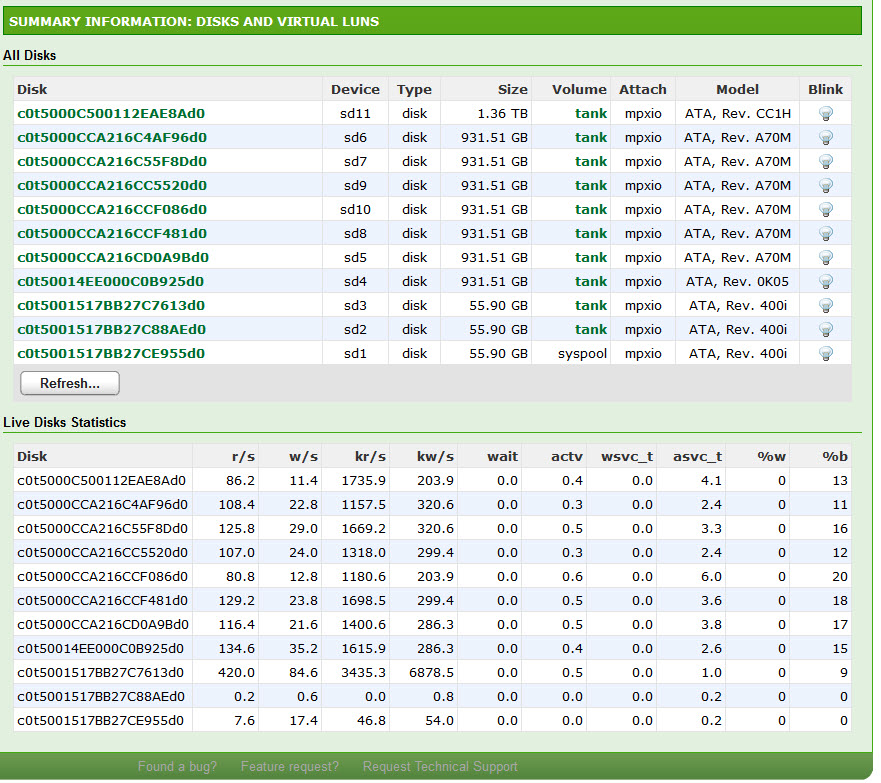
I also took the opportunity to screenshot the disk and Virtual LUN stats page on the Nexenta page.

Disks and Virtual LUNs

These stats above are far from the most impressive results I’ve had with my NexentaStor server.